
Introduction
Overview of OvoCheckout Mobile App - Complete Cross Platform Hybrid Payment Gateway | Android & iOS
OvoCheckout mobile app is the companion application for the OvoCheckout hybrid payment gateway platform. It is designed to help merchants and users manage payment activity on the go, offering a smooth mobile experience for accessing account information, tracking transactions, monitoring balances, and interacting with payment services directly from Android and iOS devices.
This documentation provides a clear overview of the entire system, summarizing the core processes for easy understanding. The platform includes an intuitive admin panel and landing page, designed for seamless use without any coding expertise. It also integrates multiple automated online payment gateways, simplifying global transactions effortlessly.
Thank you for choosing OvoCheckout. If you have any questions not covered in this documentation, please feel free to reach out to us via email. We're here to assist and will respond as promptly as possible.
Prerequisites
All the prerequisites before starting with the OvoCheckout mobile app.
Before configuring the OvoCheckout mobile app, make sure your web platform or backend API is already installed and working correctly. You will also need to set up the app in Firebase Console, enable the required services, and download the configuration files for your mobile build.
- Google Firebase: Firebase is a powerful backend platform provided by Google, essential for integrating features such as push notifications into OvoCheckout. To get started, you need to set up your project in the Firebase Console and configure it with your app. The setup involves creating a Firebase project, enabling necessary services, and downloading the configuration files to integrate with the app. For more info visit the Google Firebase Console . Google Firebase is a comprehensive backend-as-a-service (BaaS) platform. In this project, it processes mobile client user registration data, facilitates real-time mobile push notifications via Firebase Cloud Messaging (FCM), and handles social media authentication (Google Login). You must register your mobile package IDs here to acquire configuration settings files (google-services.json and GoogleService-Info.plist) that link your application to the Firebase project.
- Working API / Base URL: Make sure the OvoCheckout web platform API or mobile app base URL is accessible and correctly configured before running the application. The mobile app depends on this connection for authentication, account data, payments, and transaction history.
Flutter App Installation Requirements
Below are the requirements needed to set up and install a Flutter app.
The following installation requirements specify the essential setup for developing and running Flutter apps smoothly. Meeting these requirements helps ensure optimal performance and compatibility. Please confirm your environment meets these prerequisites before proceeding.
- Flutter SDK (latest stable version-> 3.44.2+)
- Dart SDK (bundled with Flutter SDK-> 3.11.5+)
- Android Studio (for Android development-> Latest)
- Xcode (for iOS development-> 26+)
- Android Studio | VS Code (Recommended IDEs)
- Java JDK 21 or later (for Android builds)
- Internet connection (for package and plugin downloads)
- Sufficient storage (at least 10GB free space)
- Minimum 8GB RAM (16GB recommended)
Installation
Application installation process
Setting up Flutter and Android Studio is straightforward and can be completed in a few simple steps. Our setup guide is designed to make the process seamless and efficient, ensuring a smooth start for your development environment.
Installation Steps:
- Download and Install Flutter: Visit the official Flutter installation page . Flutter is Google's open-source mobile UI software development kit (SDK) used to compile natively compiled applications for iOS and Android. This installation page provides the SDK files and setup instructions for configuring path variables in your local Windows, macOS, or Linux environment to run Flutter command-line utilities. for the latest version and platform-specific setup instructions. Follow the guidelines for your operating system (Windows, macOS, or Linux) to complete the installation.
- Set Up Android Studio: Android Studio is required for developing and running Flutter apps on Android. Visit the official Android Studio download page and install the latest version. Android Studio is the official Integrated Development Environment (IDE) for Android platform development, containing the Android SDK manager, virtual device emulator systems, and performance profiling tools. During setup, ensure that you install the latest Android SDK, Command-line Tools, and configure the system environment variables so that the Flutter command-line interface can compile and build your application package.
-
Verify Flutter Installation:
After installing both Flutter and Android Studio, open a terminal or
command prompt and run
flutter doctorto check if everything is set up correctly. This command will display any missing dependencies or configurations needed for development. - Connect a Device or Set Up an Emulator: Connect your Android device via USB or set up an Android emulator in Android Studio to test your app.
Folder Structure
Important details about the application folder structure
After installation, your project folder will contain essential directories and files necessary for the proper functioning of the Flutter application.
- assets
- fonts
-
images
- fonts
- lib
- core
- di_service
- helper
- route
- theme
-
utils
- di_service
- data
- controller
- model
- repo
- services
- controller
- App
- components
- screens
- components
- main.dart
- core
- pubspec.yaml
-
The
assetsfolder contains all essential assets such as images and fonts. This is the folder to use if you need to add or update any images or custom fonts. -
The
libfolder is the main directory for all Dart code in the application. It is typically organized into subfolders such ascorefor utility files and dependencies,datafor managing API calls and local data sources, andviewfor UI components and screens. -
The
main.dartfile is the entry point of the Flutter application where the app's root widget and initial setup are defined.
Change App Name
App name change overview
-
For Android:
- Open the Android project in Android Studio.
- Update the package name in
the `AndroidManifest.xml` file
located at
android/app/src/main/AndroidManifest.xml.

-
For iOS:
- Update the bundle
identifier in the `Info.plist` file located at
ios/Runner/Info.plist.

- Update the bundle
identifier in the `Info.plist` file located at
Change App Icon
App icon change overview
-
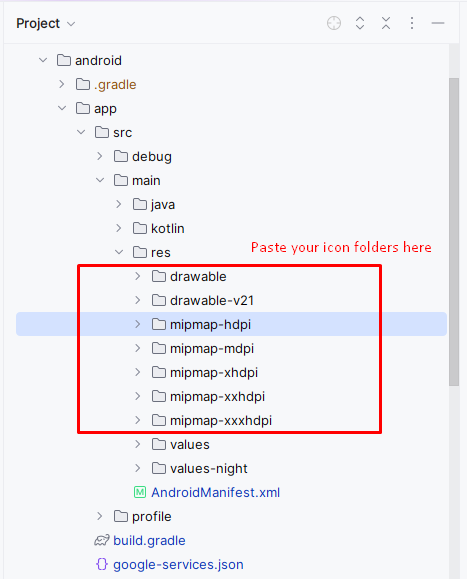
For Android:
- Prepare the icon images in various sizes (e.g., 48x48, 72x72, etc.).
- Navigate to the `res`
directory at
android/app/src/main/res/. - Replace the default icons
in the `mipmap-*` directories with your new app icon files
(e.g.,
mipmap-hdpi/ic_launcher.png). - Ensure that you follow the required naming conventions for different densities (e.g., `mipmap-mdpi`, `mipmap-hdpi`, `mipmap-xhdpi`, etc.).
- Update the icon in the
AndroidManifest.xmlfile if necessary.
-
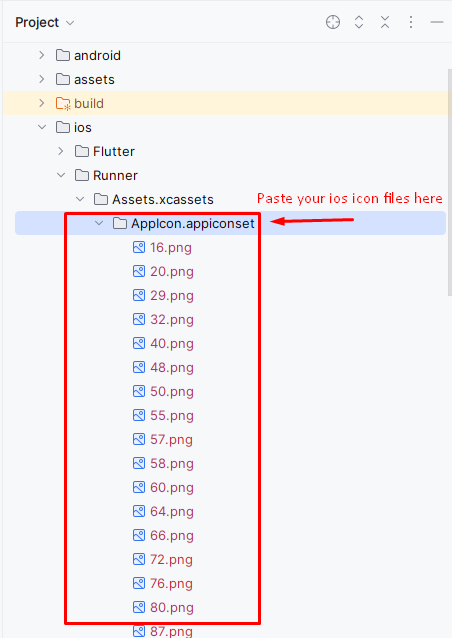
For iOS:
- Prepare the app icon images in multiple sizes (e.g., 60x60, 120x120, 180x180, etc.).
- Open the iOS project in Xcode.
- Navigate to the
Assets.xcassetsfolder in the project navigator. - Find the `AppIcon` set and drag your new icon images into the appropriate boxes for different sizes (e.g., 60pt, 120pt, etc.).
- Ensure that the icon set includes all required sizes for both iPhone and iPad.
Edit App Strings
Customize the display text across the app by modifying string values.
The app's strings are managed in the file located at:
lib/core/utils/my_strings.dart.
- Open
my_strings.dartin your preferred code editor. - Locate the string constants, which are typically organized for each screen or feature.
- Edit the text values as needed, and save the file to apply your changes throughout the app.
- Ensure you rebuild the app if required to see updates in the app UI.

Change Base URL
Overview of how to change the base URL for your app's API requests.
-
For Both Android and iOS:
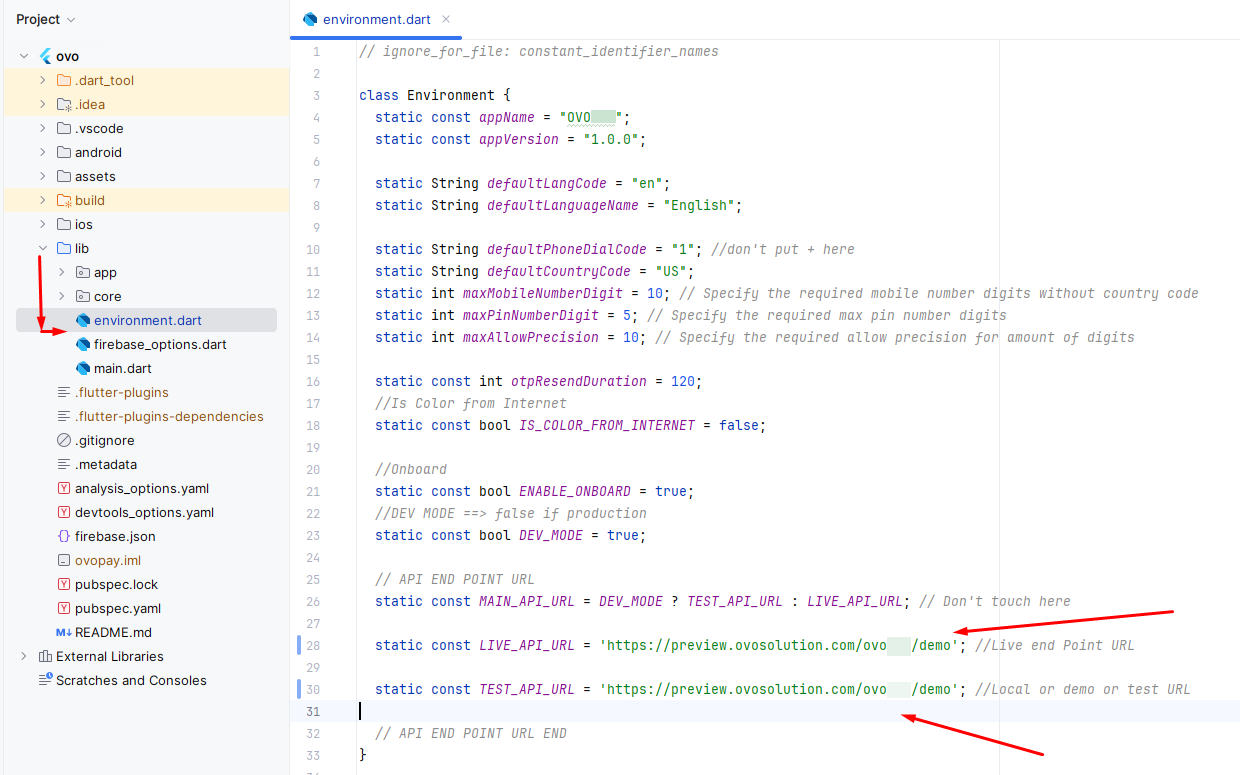
- Open the `lib` directory of your Flutter project.
- Locate the file that
manages your network configurations (e.g.,
lib\environment.dart). - In this file, define the
domain URL for your API requests (e.g.,
static const String LIVE_API_URL = 'https://yourapi.com';
static const String TEST_API_URL = 'https://yourapi.com';). - Ensure all network calls use this base URL for making API requests throughout the app.
Change App Color
Overview of how to change the app's primary and secondary color scheme.
-
For Both Android and iOS:
- Open the `lib` directory of your Flutter project.
- Navigate to your utils
folder (e.g.,
lib\core\utils\my_color.dart).

Change Package Name
Overview of how to change the package name for both Android and iOS in your Flutter app.
-
For Android:
- Open the Android project in Android Studio.
- Update the
applicationIdin theandroid/app/build.gradlefile: - Right click on project folder and click on Replace in Files
defaultConfig { applicationId "com.ovosolution.ovocheckout" }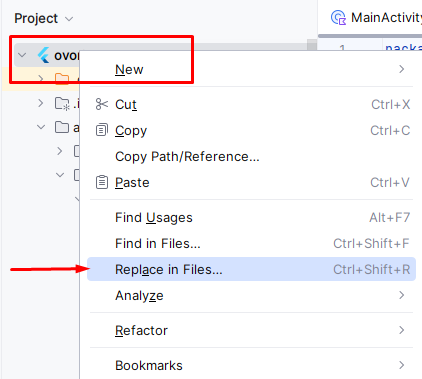
- Search com.ovosolution.ovocheckout in the first indicated box and your own package name in the second marked box. Then click Replace All button

Setting Environment Variables in Flutter
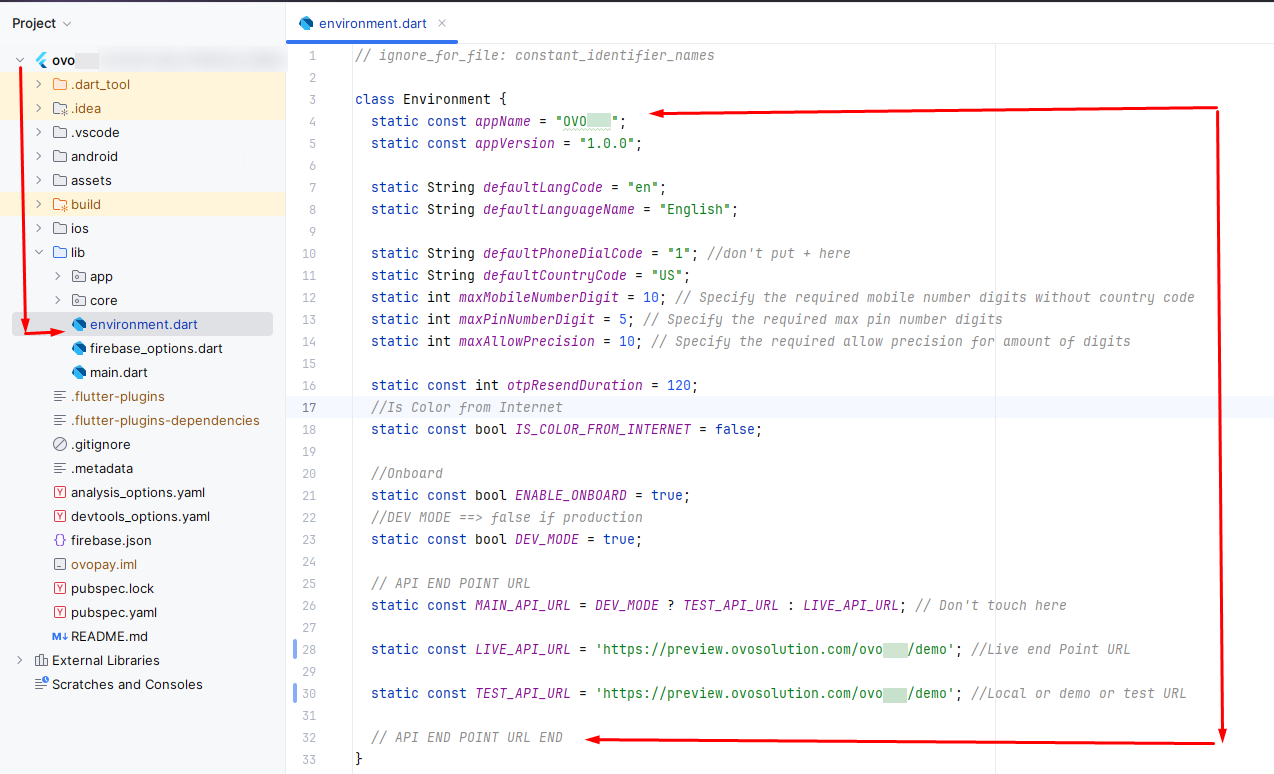
Learn how to configure environment variables in Flutter using the `environment.dart` file for different environments like development, staging, and production.
The app's environment configuration is stored in the file located at:
lib/environment.dart.
-
Open
environment.dartin your preferred code editor. - Locate the environment variables section where you define different variables for various environments.
- Set the values for each environment by modifying the respective key-value pairs in the file.
- Ensure you rebuild the app after making changes to the environment file to apply the new configuration.
How to Change App Logo in Flutter
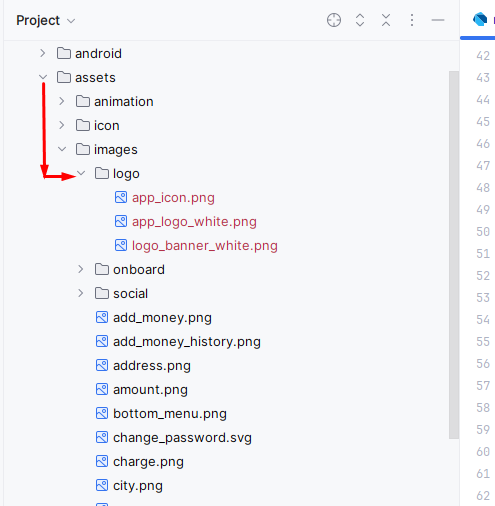
Learn how to change the logo of your Flutter app by updating the logo image in the assets directory.
-
Step 1: Add Your Logo to the Assets Directory
- Create a folder inside the `assets` directory, called `images/logo`.
- Place your logo image files inside the `assets/images/logo` folder. For example: - `assets/images/logo/logo.png` - You can also include other formats like `.jpg`, `.jpeg`, or `.svg` depending on your preference.
Update Firebase Settings for Flutter
Learn how to update Firebase settings for your Flutter app using the Firebase CLI tool and FlutterFire.
- Follow the official Firebase documentation to add Firebase to your Flutter app. This comprehensive setup guide details the installation of Firebase CLI tools, running FlutterFire CLI configuration commands, and integrating Firebase dependencies into your Dart code:
-
Step 1: Install Node.js and npm:
-
First, ensure you have Node.js and npm installed. Node.js is an
open-source JavaScript runtime environment, and npm is its
companion package manager. They are required to install the
Firebase CLI and FlutterFire command-line interfaces, compile
developer assets, and configure cloud dependencies for push
notifications. If not installed, follow these steps:
- Download Node.js & npm installer
-
After installation, verify if Node.js and npm are
installed by running:
node -vnpm -v
-
First, ensure you have Node.js and npm installed. Node.js is an
open-source JavaScript runtime environment, and npm is its
companion package manager. They are required to install the
Firebase CLI and FlutterFire command-line interfaces, compile
developer assets, and configure cloud dependencies for push
notifications. If not installed, follow these steps:
-
Step 2: Install Firebase CLI:
-
Install the Firebase CLI globally using npm:
npm install -g firebase-tools
-
After installation, verify if Firebase CLI is installed by
running:
firebase --version
-
Log in to Firebase using your Google account:
firebase login
-
Install the Firebase CLI globally using npm:
-
Step 3: Install FlutterFire CLI:
-
Install the `flutterfire_cli` tool globally using the following
command:
dart pub global activate flutterfire_cli
-
Ensure the `dart pub global` bin directory is in your PATH. You
can check if the tool is installed by running:
flutterfire --version
-
Install the `flutterfire_cli` tool globally using the following
command:
-
Step 4: Configure Firebase for Your Flutter Project:
-
Run the following command to configure Firebase in your Flutter
project:
flutterfire configure --project=your-firebase-project-id
- This command will automatically download the necessary configuration files (`google-services.json` for Android and `GoogleService-Info.plist` for iOS), modify the `pubspec.yaml` to include the required dependencies, and set up Firebase services.
-
Run the following command to configure Firebase in your Flutter
project:
Still facing issues to add Firebase? Watch our step-by-step video guide to get it resolved quickly!
Keystore Setup and Retrieving SHA-1/SHA-256 Keys
Learn how to generate a keystore and retrieve the SHA-1 and SHA-256 keys for your Flutter app.
Step 1: Generate Keystore
- Follow the official Flutter documentation to Build and release an Android app. This guide outlines how to generate a cryptographically secure release keystore, configure the Android Gradle compilation properties, obfuscate codebase files, and generate optimized production APK or Android App Bundle (AAB) packages for publishing to the Google Play Store:
- Or Open a terminal or command prompt and navigate to a folder where you want to save your keystore.
-
Run the following command to generate a keystore:
keytool -genkey -v -keystore your_keystore_name.jks -keyalg RSA -keysize 2048 -validity 10000
-
You will be prompted to enter the following details:
- Your name and organization details
- A password for the keystore
- A password for the key alias (can be the same as the keystore password)
- After successfully running the command, you will have a file named `your_keystore_name.jks`.
Step 2: Add Keystore to Your Flutter App
- Place the keystore file (`your_keystore_name.jks`) in the `android/app` directory of your Flutter project.
-
Edit the `android/app/build.gradle` file and add the keystore configuration
under the `android {}` block:
android {
    ...
    signingConfigs {
        release {
            keyAlias 'your_key_alias'
            keyPassword 'your_key_password'
            storeFile file('your_keystore_name.jks')
            storePassword 'your_keystore_password'
        }
    }
    buildTypes {
        release {
            signingConfig signingConfigs.release
            minifyEnabled false
            shrinkResources false
        }
    }
}
Step 3: Retrieve SHA-1 and SHA-256 Keys
- Open a terminal or command prompt.
-
Run the following command to get the SHA keys:
keytool -list -v -keystore your_keystore_name.jks
- Enter the keystore password when prompted.
-
The output will include the SHA-1 and SHA-256 keys under the certificate
details. For example:
Certificate fingerprints: SHA1: 12:34:56:78:90:AB:CD:EF:12:34:56:78:90:AB:CD:EF:12:34:56:78 SHA256: AB:CD:EF:12:34:56:78:90:AB:CD:EF:12:34:56:78:90:AB:CD:EF:12:34:56:78:90:AB:CD:EF
iOS Build Requirements & Signing
Everything you need to build, sign, and release the iOS app: code signing, certificates, and provisioning profiles.
Building the iOS app requires a Mac computer with Xcode installed and an active Apple Developer Program membership (US $99 / year, billed by Apple). Apple requires every iOS app to be code-signed before it can run on a physical device or be submitted to the App Store. These accounts and fees are provided by Apple and are not included with OvoCheckout.
1. Prerequisites
- A Mac running the latest macOS supported by your Flutter version.
- Xcode (latest stable) installed from the Mac App Store, plus the Command Line Tools.
- A paid Apple Developer account — enroll at developer.apple.com/programs.
- CocoaPods installed (
sudo gem install cocoapods) and the Flutter SDK configured for iOS.
2. Understanding Code Signing
iOS code signing links your app to your Apple Developer identity using two pieces issued by Apple:
- Signing Certificate — proves who published the app (an Apple Development certificate for testing and an Apple Distribution certificate for release).
- Provisioning Profile — ties together your App ID, your certificate, and (for development) the devices allowed to run the app. Use a Development profile for testing and an App Store profile for release.
-
Bundle Identifier (App ID) — a unique reverse-domain
ID such as
com.yourcompany.ovocheckout, registered in your Apple Developer account and set in Xcode. It must match the package / bundle id you configured for the app.
3. Automatic Signing (recommended for most users)
- Open the iOS project in Xcode: from the project root run
open ios/Runner.xcworkspace(open the.xcworkspace, not the.xcodeproj). - Select the Runner target, then open the Signing & Capabilities tab.
- Tick Automatically manage signing.
- Choose your Team from the dropdown (sign in with your Apple ID under Xcode > Settings > Accounts if the team is missing).
- Set the Bundle Identifier to your registered App ID. Xcode will then create the certificate and provisioning profile for you automatically.
4. Manual Signing (for teams / CI)
- In the Apple Developer portal, create an App ID matching your bundle identifier.
- Create a Distribution Certificate (Certificates > +), download it, and double-click to install it into your macOS Keychain.
- Register any test devices under Devices (development builds only).
- Create a Provisioning Profile (App Store for release, or Ad Hoc/Development for testing), download it, and double-click to install it.
- In Xcode, untick Automatically manage signing and select your imported profile and certificate for the Release configuration.
5. Build & Archive for Release
Build the release binary with Flutter, then upload it through Xcode:
- Open the generated archive, or in Xcode choose Product > Archive.
- In the Organizer window, click Distribute App and follow the prompts to upload to App Store Connect or export a signed
.ipa. - Create the app listing in App Store Connect and submit the build for review.
Common signing errors: "No profiles for 'com.yourcompany.ovocheckout' were found" means the App ID or provisioning profile is missing or does not match the bundle identifier — recreate the profile for the exact bundle id. "Signing certificate is not valid" usually means the certificate expired or is not installed in your Keychain.
For the full, always-current process, follow Flutter's official guide: docs.flutter.dev/deployment/ios.
App Store & Play Store Submission Policies for Payment Apps
A practical guide to publishing a payment / financial app on the Apple App Store and Google Play, including the rules that most often cause rejection.
Please read first. Apps that handle payments, money transfers, or cryptocurrency are reviewed more strictly than ordinary apps. The notes below are general guidance to help you prepare your submission — they are not legal advice, and store policies change regularly. You are responsible for holding any licences or registrations required in the countries where you publish, and for complying with the current version of each store's policies. Always confirm against the official pages linked in this section before you submit.
1. Before you submit — prepare these
Most payment-app rejections are caused by missing information rather than by the app itself. Have all of the following ready:
- A working demo account. Reviewers must be able to sign in and reach every screen without registering. Create a test user in your admin panel and give the email and password to the reviewer (App Store Connect > App Review Information, or Play Console > App access). If any screen is behind OTP / 2FA, either disable it for that account or supply the codes.
- Test payment credentials. Put your payment gateways in sandbox / test mode and provide test card numbers or test wallet details so the reviewer can complete a full payment without spending real money.
- A public privacy policy URL that actually describes what the app collects (name, email, transaction data, device token for push). Both stores require it for financial apps, and it must be reachable without logging in.
- Terms of service / refund policy URL. Payment apps are routinely asked for these.
- Support contact (email and/or URL) that receives mail.
- Proof of authorisation — if you present the app as a bank, remittance, exchange, or other regulated service, have your company registration and financial licence ready to upload. Both stores ask for this when the listing implies regulated activity.
- In-app account deletion. Both stores now require apps that let users create an account to also let them request deletion of that account and its data from inside the app (Play additionally asks for a web deletion link in the Console).
2. Apple App Store
The rules below come from the App Store Review Guidelines. The sections most relevant to a payment app are Payments (3.1), Privacy (5.1) and Legal (5.0).
| Topic | What Apple expects |
|---|---|
| In-App Purchase vs. your own gateway | Digital content or services that are consumed inside the app (premium features, subscriptions to app content, in-app credits) must be sold through In-App Purchase. Payments for physical goods and real-world services consumed outside the app — the normal case for a payment gateway, invoice, or merchant checkout app — must not use In-App Purchase and may use your own payment processing. Make it obvious in the app and in your review notes which of the two your app does. |
| Person-to-person / merchant transfers | Apps that send money between people or settle merchant balances are allowed outside In-App Purchase, but the flow of funds must be clearly explained to the user before they confirm, including any fee you charge. |
| Cryptocurrency | Apple applies extra conditions to crypto: wallet apps must be submitted by a developer enrolled in the Apple Developer Program as an organisation (not an individual); on-device mining is not allowed; and exchange functionality is generally accepted only from the exchange itself or an established, licensed institution, and only in the regions where it is licensed. If your build enables crypto payments, expect to provide documentation. |
| Regulated / financial services | Apps providing banking, lending, trading, or money-transmission services must be submitted by the licensed institution itself, or you must be able to show written authorisation from it. |
| App Privacy details | Complete the App Privacy questionnaire in App Store Connect accurately — declare the contact data, financial/transaction data, identifiers, and usage data the app collects. Mismatches between this form and the app's real behaviour are a common rejection reason. |
| Account creation & deletion | If users can register in the app, the app must also offer a way to delete the account. Sign in with Apple may be required if you offer other third-party logins (such as Google Sign-In) as the only alternative to email sign-up. |
| App completeness | No placeholder text, broken links, or "coming soon" screens. Every gateway you leave enabled must actually work in the build you submit — disable the ones you have not configured. |
| Export compliance (encryption) |
The app uses HTTPS, so you must answer the encryption
questions at upload. Standard HTTPS usually qualifies for the
exemption — see
Apple's export-compliance guide
before setting ITSAppUsesNonExemptEncryption.
|
Useful Apple links: Review Guidelines, App Review overview, App Review support.
3. Google Play
Google's rules live in the Developer Program Policy. For a payment app the important ones are Payments, Financial Services, Data safety, and Permissions.
| Topic | What Google expects |
|---|---|
| Payments policy | As on iOS, in-app digital goods must use Google Play Billing, while payments for physical goods and real-world services may use your own processor. See the Payments policy. |
| Financial Services policy | Apps offering financial products or services must complete the Financial features declaration in Play Console and, for regulated categories (lending, banking, money transmission, crypto exchanges and custodial wallets), upload licensing documentation and restrict distribution to the countries where you are licensed. See the Financial Services policy. |
| Data safety form | Every app must declare what it collects and shares in the Data safety section. Declare account data, financial/transaction data, and the Firebase messaging token, and state that data is encrypted in transit. |
| Account deletion | Provide in-app deletion plus a publicly reachable deletion request URL, and enter it in Play Console — see Account deletion requirements. |
| Permissions |
Only request permissions the app really uses. Sensitive
permissions such as SMS and Call Log require an approved
declaration and are usually rejected for payment apps that do
not need them — see the
Permissions policy.
Remove any permission you are not using from
AndroidManifest.xml before building.
|
| Target API level |
New apps and updates must target a recent Android API level.
Check the current requirement at
Target API level requirements
and set targetSdkVersion accordingly in
android/app/build.gradle.
|
| Metadata & store listing | Do not imply that your app is a bank or is endorsed by one, do not use another brand's logo, and make sure screenshots match the actual app. See the Store listing and promotion policy. |
| Developer account | Financial apps normally require a verified organisation account with verified identity and D-U-N-S details. Register at Play Console. |
4. Pre-submission checklist
- App name, icon, package/bundle id and base URL all changed to your own branding (see the APP SETUP sections above).
- Base URL points to your live HTTPS domain — not the demo server.
- Every enabled payment gateway is configured and completes a real test transaction.
- Demo account and sandbox payment details entered in the store's review-notes field.
- Privacy policy, terms, and support links open correctly from inside the app and from the store listing.
- Account deletion available in the app (and a deletion URL for Play).
- Data safety form (Play) and App Privacy details (Apple) filled in truthfully.
- Unused permissions removed from
AndroidManifest.xmlandInfo.plist. - Correct age rating / content rating questionnaire completed.
- Release build signed with your own keystore (Android) and distribution profile (iOS).
If you are rejected: both stores tell you which policy section failed. Reply in the review thread with a short, factual explanation, a screen recording of the flow the reviewer could not reach, and any licence documents they asked for. Most payment-app rejections are resolved by supplying a working demo account or the missing declaration rather than by changing code.
Updates & Versioning
How to version your app, how to release an update to the stores, and how to take a new OvoCheckout release into an app you have already customised.
1. Where the version number lives
The app version is defined in pubspec.yaml at the root of the
Flutter project:
name: ovo_checkout
description: "Next-Generation Multi-Purpose Payment Gateway "
publish_to: "none"
version: 1.0.0+1
The value has two parts separated by a +:
-
1.0.0— the version name. This is what users see on the store listing. Flutter passes it to Android asversionNameand to iOS asCFBundleShortVersionString. -
+1— the build number. Users never see it. Flutter passes it to Android asversionCodeand to iOS asCFBundleVersion. Both stores use it to tell one upload apart from another.
You do not edit the Android or iOS files to change the version. They
already read the values from pubspec.yaml —
android/app/build.gradle.kts contains:
versionCode = flutter.versionCode
versionName = flutter.versionName
and ios/Runner/Info.plist uses
$(FLUTTER_BUILD_NAME) and
$(FLUTTER_BUILD_NUMBER).
There is a second place to update.
lib/environment.dart holds a separate
appVersion string that the app displays in its own
interface:
static const appVersion = "1.0.0";
This one is not read from pubspec.yaml, so
it will not change on its own. Whenever you bump the version in
pubspec.yaml, update this string to match. Forgetting
it is the single most common versioning mistake — the app keeps
reporting an old version even though the store shows the new one.
2. Choosing the next version number
A simple, widely used convention (semantic versioning) works well here.
Given a version MAJOR.MINOR.PATCH:
| Change you made | Bump | Example |
|---|---|---|
| Bug fixes, copy changes, small styling tweaks | Patch | 1.0.0+1 → 1.0.1+2 |
| New screens or features, backwards compatible | Minor | 1.0.1+2 → 1.1.0+3 |
| Redesign, or changes requiring a matching backend upgrade | Major | 1.1.0+3 → 2.0.0+4 |
| Re-uploading after a store rejection, no version-name change | Build number only | 1.0.0+1 → 1.0.0+2 |
The build number must always increase. Google Play
and App Store Connect both reject an upload whose build number is
equal to or lower than one you have already uploaded — even if that
earlier build was rejected, or you deleted it. Increment the number
after the + on every single upload, and never
reuse one.
3. Releasing an update — step by step
-
1. Bump both version fields. Edit
version:inpubspec.yamlandappVersioninlib/environment.dart. -
2. Confirm the app points at your live server. In
lib/environment.dart,DEV_MODEmust befalseandLIVE_API_URLmust be your own domain — not the demo URL that ships with the package. -
3. Rebuild cleanly.
flutter clean flutter pub get flutter build appbundle --release # Android flutter build ipa --release # iOS (on macOS) - 4. Test the release build on a real device before uploading. A debug build can behave differently from a release build, particularly around push notifications and social sign-in.
- 5. Upload to a test track first. Use Google Play's Internal testing track and Apple's TestFlight. Both let you install the exact binary you are about to publish.
- 6. Write release notes describing what changed. Keep a running changelog as you work — it makes this step trivial and gives store reviewers useful context.
- 7. Roll out gradually. Google Play supports staged rollout (start at 10–20%); Apple supports phased release. If something is wrong you can halt it before it reaches everyone.
4. Keeping the app and the backend in step
The app is a client for your OvoCheckout Laravel installation — it talks to
the server set in Environment.MAIN_API_URL. When a release
contains changes on both sides:
- Update the web/Laravel side first, then publish the app. The server stays compatible with older app versions for longer than an old server stays compatible with a new app.
- Remember that store reviews take time. Users may run the previous app version for days or weeks after you publish — some never update at all. Avoid removing or renaming API responses the older app still depends on; add new fields rather than changing existing ones.
-
Test against your own server, not the demo. Point
LIVE_API_URLat your upgraded installation and walk through login, deposit and withdrawal before you upload.
The endpoints the app uses, and the response format it expects, are documented in the API Integration section of the main documentation. The Troubleshooting API Responses section above covers what to check when the app and server disagree.
5. Taking a new OvoCheckout release into a customised app
When we publish a new version of OvoCheckout, you will have already customised your copy. Rather than starting over, keep track of which files are yours and carry them across.
Before you customise anything, put the untouched project under version control:
cd Files/Flutter
git init
git add .
git commit -m "OvoCheckout v1.0.0 - original files"
Then make your changes as normal commits. When a new release arrives, you
can copy the new files over the top and git diff will show
you exactly where your customisations and the new code overlap.
These are the files you are most likely to have changed, and that must be carried over or re-applied after any update:
| File / folder | What it holds |
|---|---|
lib/environment.dart |
App name, version string, API URL, default language and country. |
lib/firebase_options.dart |
Your Firebase configuration, generated by flutterfire configure. |
android/app/google-services.jsonios/Runner/GoogleService-Info.plist |
Your Firebase platform config files. |
android/app/build.gradle.kts |
Your applicationId and signing configuration. |
Your keystore .jks and key.properties |
Android upload signing. Keep these outside the project and backed up. |
assets/ |
Your logo, icons and onboarding images. |
| App name and string files | The display name and any wording you changed — see the Change App Name and Edit App Strings sections. |
After merging a new release, run flutter clean and
flutter pub get, then rebuild and test before you upload
anything.
6. Keeping dependencies and SDK levels current
Even if you change nothing in the app, the platforms move underneath it. Check the following a few times a year:
-
Flutter and Dart. The project requires the Dart SDK
range declared in
pubspec.yaml(sdk: ">=3.10.0 <4.0.0"). Runflutter upgradeto move to a newer stable Flutter. -
Packages.
flutter pub outdatedlists what has moved on;flutter pub upgradeapplies updates allowed by the existing constraints. Useflutter pub upgrade --major-versionsonly when you are ready to read changelogs and retest — major package upgrades can introduce breaking changes. -
Android target SDK. Google Play requires new uploads
to target a recent Android API level, and the required level rises
every year. This project is currently on
compileSdk = 36/targetSdk = 36inandroid/app/build.gradle.kts. Check the current requirement at Google Play target API level requirements. - iOS and Xcode. Apple periodically requires apps to be built with a newer Xcode / iOS SDK. See Apple's App Review support page for current requirements.
After any dependency or SDK change, do a full
flutter clean && flutter pub get and rebuild both
platforms — issues from these upgrades usually surface at build time
rather than at runtime.
7. Things that cannot be undone once you are live
Do not change the package name / bundle ID after
publishing. The Android
applicationId (com.ovosolution.ovocheckout
by default) and the iOS bundle identifier permanently identify your
app on the stores. Changing either creates a brand-new listing:
your existing users keep the old app, do not receive the update,
and your reviews and install count do not carry over. Decide on the
final identifier before your first upload — see the
Package Name section.
Do not lose your Android upload keystore. Every
update must be signed with the same key as the original upload. If
you lose the .jks file or its passwords you can no
longer update your own app, and recovery depends entirely on
whether you enrolled in Play App Signing. Back up the keystore and
key.properties somewhere safe and separate from the
project folder — see the
Keystore & SHA Key section.
The same applies to your Firebase project: keep the credentials in
lib/firebase_options.dart, google-services.json
and GoogleService-Info.plist backed up, and note that
changing the package name also invalidates the SHA fingerprints registered
in Firebase, which will break Google sign-in until you add the new ones.
Third-Party Services & Costs
External accounts, tools, and fees required to build and publish the mobile app.
Important: OvoCheckout does not include any third-party accounts, API keys, developer memberships, or paid subscriptions. Every service listed below belongs to an independent external company. You must create your own account with each service you choose to use, and you are solely responsible for reviewing and accepting that provider's current pricing, terms, and regional availability. All setup, membership, subscription, per-transaction, and usage-based fees are charged directly by the third-party provider — not by OvoCheckout or its author.
| Service | Used for | Required? | Typical costs (charged by the provider) |
|---|---|---|---|
| Apple Developer Program developer.apple.com/programs |
Signing, testing on real devices, and publishing the iOS app. | Only if you release on iOS. | Annual membership fee charged by Apple (US $99 / year at the time of writing). A Mac with Xcode is also required. |
| Google Play Console play.google.com/console |
Publishing and updating the Android app. | Only if you release on Google Play. | One-time registration fee charged by Google (US $25 at the time of writing). |
| Firebase (Google) firebase.google.com |
Push notifications (Cloud Messaging) and Google/Apple social sign-in. | Only if you use push notifications or social login. | Cloud Messaging and Authentication are free on the Spark plan for typical usage; very high volumes may need the pay-as-you-go Blaze plan. See Firebase pricing. |
| Payment gateways (NOWPayments for crypto; PayPal, Stripe and others for fiat) |
Processing the payments shown in the app. Configured on the server, not in the app. | Only for the payment types you accept. | Free account creation; per-transaction and/or percentage fees set individually by each gateway, plus any network or withdrawal fees. |
| Flutter SDK & Android Studio / Xcode | Building the app from source. | Required to build. | Free to download. Xcode requires macOS. |
| Your OvoCheckout server | The backend the app connects to (web hosting, domain, SSL). | Required. | Charged by your hosting provider and domain registrar. |
Prices shown here are indicative only and can change at any time. Always confirm the latest fees on each provider's official website before you commit. You only need the services you actually intend to use — for example, you can ship an Android-only build without an Apple Developer membership, or run the app without Firebase if you disable push notifications and social login.
Troubleshooting API Responses
How the OvoCheckout API replies, what every error code means, and how to handle each one in the Flutter app.
1. The response envelope
Every endpoint returns the same JSON shape, produced by the
apiResponse() helper in
core/app/Http/Helpers/helpers.php:
{
    "remark": "login_success",
    "status": "success",
    "message": ["Login successful"],
    "data": { "access_token": "...", "user": { } }
}-
remark- a stable, machine-readable key. Branch your app logic on this, never on the human-readable text. -
status- the string"success"or"error". Note this is a string, not a boolean. -
message- a flat array of strings, not a keyed object and not a single string. Join the entries or show the first one. -
data- present only when there is a payload. Treat it as optional and always null-check it.
2. The one thing that catches every new integrator
Most errors come back with HTTP 200.
apiResponse() defaults to status code 200, and the
controllers deliberately use that default for business errors.
So a failed login, a validation failure and a rejected withdrawal
all arrive as HTTP 200 with
"status": "error" in the body. An app that decides
success by checking statusCode == 200 will silently
treat every one of those failures as a success.
Check status first, then switch on remark, and
use the HTTP code only for transport-level problems:
final http.Response res = await http.post(uri, headers: headers, body: body);

// 1. Transport / server level first - the body may not even be JSON.
if (res.statusCode >= 500) {
  throw ApiException('Server error (${res.statusCode}). Please try again later.');
}

late final Map<String, dynamic> json;
try {
  json = jsonDecode(res.body) as Map<String, dynamic>;
} on FormatException {
  // An HTML error page instead of JSON - almost always a server misconfiguration.
  throw ApiException('Unexpected response from server.');
}

// 2. Then the application level - this is what actually decides success.
final String remark  = json['remark'] as String? ?? '';
final bool   isError = json['status'] != 'success';
final String text    = (json['message'] as List?)?.join('\n') ?? 'Something went wrong.';

if (isError) {
  switch (remark) {
    case 'unauthorized':        return _forceLogout();       // token expired
    case 'unverified':          return _goToVerification();  // email / SMS / 2FA
    case 'profile_incomplete':  return _goToProfileSetup();
    case 'kyc_verification':    return _goToKycForm();
    case 'validation_error':    return _showFieldErrors(text);
    default:                    return _showError(text);
  }
}
3. Errors that DO carry an HTTP status code
These come from the global handler in
core/app/Http/Exception/ExceptionHandler.php, so they can
reach any endpoint.
| HTTP | Remark | What it means in the app |
|---|---|---|
| 401 | unauthorized |
The Sanctum bearer token is missing, malformed, or was revoked (for example the user logged out elsewhere, or you deleted the account). Clear the stored token and send the user back to the login screen. Do not retry. |
| 403 | restricted |
The action is not permitted for this account. Show the message; retrying will not help. |
| 404 | not_found |
The route or record does not exist. In practice this usually means a typo in your endpoint path or a stale ID - check your base URL first. |
4. Common remarks returned with HTTP 200
| Remark | Cause | How the app should respond |
|---|---|---|
validation_error |
One or more fields failed validation. Every failure is a separate entry in message. |
Show them against the form. This is the most frequent error by a wide margin. |
invalid_credential |
Wrong email/username or password at login. | Show the message on the login form; do not clear what the user typed. |
login_error |
The account exists but is banned or otherwise blocked from signing in. | Show the message and point the user at support. |
user_not_found |
No account matches the supplied email during password reset. | Show a neutral message - avoid confirming whether an address is registered. |
registration_disabled |
The admin has turned off new registrations. | Hide or disable the sign-up screen. |
invalid_code / code_not_match / wrong_code |
The emailed or texted verification code is wrong or has expired. | Let the user retype it and offer "resend code". |
already_verified |
That verification step is already done. | Skip straight to the next step instead of showing an error. |
try_after |
A code was requested again too soon. | Disable the resend button and show the countdown from message. |
token_not_exists |
The device token you tried to remove was not registered. | Harmless - ignore it silently. |
exception |
An unhandled server-side error. message carries the exception text. |
Show a generic failure message. Ask the site owner to check core/storage/logs/laravel.log. |
5. When a valid token still gets refused
Three middlewares sit in front of the money-moving endpoints, so a
perfectly good token can still be turned away. These are
not bugs - each one is telling you to send the user
somewhere first. All three return HTTP 200 with
"status": "error".
| Remark | Raised by | Where to send the user |
|---|---|---|
profile_incomplete |
registration.complete |
The profile completion screen - post to api/user-data-submit. |
unverified |
check.status |
The verification screen. The response's data.user object tells you which step is outstanding: ev email, sv mobile, tv two-factor, status account enabled. |
kyc_verification |
kyc |
The KYC form - fetch it from api/kyc-form. Applies to withdrawals, invoices, wallets and payment history. |
6. Network-level problems
-
The body is HTML, not JSON. Your
jsonDecodethrows aFormatException. This is a server-side failure (usually a missingcore/vendorfolder, a permissions problem, or a PHP fatal error) surfacing as an error page. Always wrap decoding in a try/catch, as shown above. - Timeouts. Set an explicit timeout on every request (10-30 seconds is reasonable). Crypto payment creation calls out to NOWPayments and can legitimately be slow, so give those endpoints the longer end of that range.
-
Retries. Only retry idempotent
GETrequests, and back off exponentially. Never blindly retrypayment-initiateor a withdrawal request - you risk creating a duplicate transaction. - SSL errors on Android. Almost always a server with an incomplete certificate chain. Fix the chain on the server; never ship an app that disables certificate validation.
-
Everything fails at once after a rebuild. Check
LIVE_API_URL/TEST_API_URLinlib/environment.dartand theDEV_MODEflag - a trailing slash or a stale host is the usual culprit.
Integrating a website or server rather than the mobile app? The
merchant-facing REST API, its client-id /
client-secret headers, IP whitelisting and IPN
webhooks are documented in the
API Integration section
of the main documentation.
Support
How to get assistance
Thank you for purchasing our product! For any support or assistance, feel free to reach out to us via the provided email address. Our dedicated support team is available 24/7, ready to help with any questions, technical issues, or inquiries you may have. We are committed to providing prompt and reliable assistance to ensure a seamless experience with our product. Your satisfaction is our priority, and we are here to support you every step of the way.
Social Authentication Setup
Learn how to configure and integrate social authentication providers like Google.
Google Authentication