
Introduction
Overview of OvoCheckout - Hybrid Cross Platform Payment Gateway | Android & iOS | Web & Admin Panel
OvoCheckout is a powerful and flexible online payment gateway solution designed to help businesses securely accept and manage digital payments from customers worldwide. Built for performance, reliability, and scalability, OvoCheckout provides a complete payment processing system that can be fully deployed and managed by the business owner. Whether you are operating an eCommerce store, subscription service, marketplace, or custom web application, OvoCheckout enables seamless transaction handling with full control over configuration, fees, and payment workflows. For hybrid payments, including both fiat and cryptocurrency, the maximum expected processing time is approximately 5–15 minutes, depending on the payment method, network congestion, and confirmation requirements.
The system includes a comprehensive admin panel that allows administrators to manage payment gateways, currencies, transaction records, user accounts, settlements, and system settings from a centralized dashboard. With real-time transaction monitoring and detailed reporting features, OvoCheckout helps businesses maintain transparency and accuracy in financial operations. Merchants can create payment requests, generate invoices, track payment statuses, and monitor revenue growth through an intuitive and easy-to-navigate interface designed for both technical and non-technical users. For faster payment confirmation, businesses can prioritize certain gateways or crypto networks where supported.
Security is a core foundation of OvoCheckout. The platform implements advanced encryption protocols, secure API communication, two-factor authentication (2FA), and fraud prevention mechanisms to ensure that every transaction is processed safely. Supporting multiple payment methods such as credit/debit cards, bank transfers, digital wallets, and cryptocurrencies, OvoCheckout offers flexibility while maintaining high security standards. With complete ownership of the system and full customization capability, businesses can tailor the platform according to their operational needs and branding requirements, while also monitoring maximum transaction durations and confirmations to provide reliable customer experiences.
This documentation provides a clear overview of the entire system, summarizing the core processes for easy understanding. The platform includes an intuitive admin panel and landing page, designed for seamless use without any coding expertise. It also integrates multiple automated online payment gateways, simplifying global transactions effortlessly.
Prerequisites
Before installing and using OvoCheckout, please ensure that you meet all necessary technical and payment integration requirements. You must have a working hosting environment with PHP-supported server configuration, a database system (such as MySQL), and access to your server control panel (cPanel, VPS, or dedicated server). Basic knowledge of web application deployment and server management is recommended to properly configure the system. Additionally, you should have valid SSL (HTTPS) enabled on your domain to ensure secure payment processing and encrypted data transmission.
If you plan to accept cryptocurrency payments, you must obtain valid API credentials from NOWPayments. OvoCheckout requires the official NOWPayments API Key in order to process, verify, and monitor crypto transactions in real time. Without proper API credentials from NOWPayments, the crypto payment module will not function. Make sure your NOWPayments account is fully verified and activated before connecting it to OvoCheckout to avoid transaction failures or verification issues.
For fiat (traditional) payments, you must collect and configure the API credentials for each individual payment gateway you intend to use within OvoCheckout. This includes gateways such as card processors, bank transfer providers, or digital wallet services that are supported by the system. Each gateway requires its own API keys, merchant IDs, secret keys, or webhook configuration details provided directly by the respective payment provider. OvoCheckout does not supply these credentials — they must be obtained directly from the official payment gateway accounts registered in your business name. Proper configuration of these credentials is essential to ensure successful transaction processing and payment verification.
- NOWPayments API (Crypto Payments): To enable cryptocurrency payments in OvoCheckout, you must have valid API credentials from NOWPayments. NOWPayments is a leading external, third-party cryptocurrency payment gateway service that allows merchants to accept over 300+ digital currencies with auto-conversion and instant settlement. You need to sign up for a merchant account on their official website to obtain your live API key, generate an IPN secret key, and configure webhooks. These keys are required to secure communication and verify transactions between OvoCheckout and the blockchain network. For more details, register an account and read their guides, visit the NOWPayments Official Platform .
- Fiat Payment Gateway Credentials: For traditional payment methods such as credit/debit cards, bank transfers, and digital wallets, each payment gateway must be registered separately and configured with valid credentials including API keys, merchant IDs, and secret keys. These credentials must be obtained directly from the payment providers and properly set up in OvoCheckout for successful transaction processing.
- Server Requirements: Ensure your hosting environment meets the technical requirements for OvoCheckout, including PHP 8.x support, MySQL database, and HTTPS-enabled domain. Proper server configuration ensures smooth operation of all payment features and secure data transmission.
- SSL Certificate: A valid SSL certificate is mandatory to secure all payment transactions and protect sensitive customer data. All payments processed without HTTPS may be blocked or marked insecure by browsers and payment gateways.
- Email Notifications: To fully utilize transaction alerts and notifications, a valid SMTP email configuration is required. This ensures that payment confirmations, receipts, and error alerts are reliably delivered to both merchants and customers.
- Time Zone & Currency Settings: Correct configuration of your business’s local time zone and default currency is essential for accurate transaction records, settlements, and reporting within the OvoCheckout admin panel.
Server Requirements
All server requirements are stated bellow
The following server requirements outline the essential specifications for setting up and running the system efficiently. Meeting these requirements will ensure smooth operation, enhance performance, and support seamless functionality across all features. Please verify your server configuration aligns with these standards prior to installation.
- PHP Version 8.3 or 8.3+
- MySQL Version 8.0+ or MariaDB version 10.6+
- BCMath PHP Extension
- Ctype PHP Extension
- cURL PHP Extension
- DOM PHP Extension
- Fileinfo PHP Extension
- GD PHP Extension
- JSON PHP Extension
- Mbstring PHP Extension
- OpenSSL PHP Extension
- PCRE PHP Extension
- PDO PHP Extension
- pdo_mysql PHP Extension
- Tokenizer PHP Extension
- XML PHP Extension
- Filter PHP Extension
- Hash PHP Extension
- Session PHP Extension
- Zip PHP Extension
- allow_url_fopen()
- file_get_contents()
Installation
Application installation process
Installation is straight forward and can be completed in a few simple steps. Our setup process is designed to be seamless and efficient, ensuring a smooth start
Installation Steps:
-
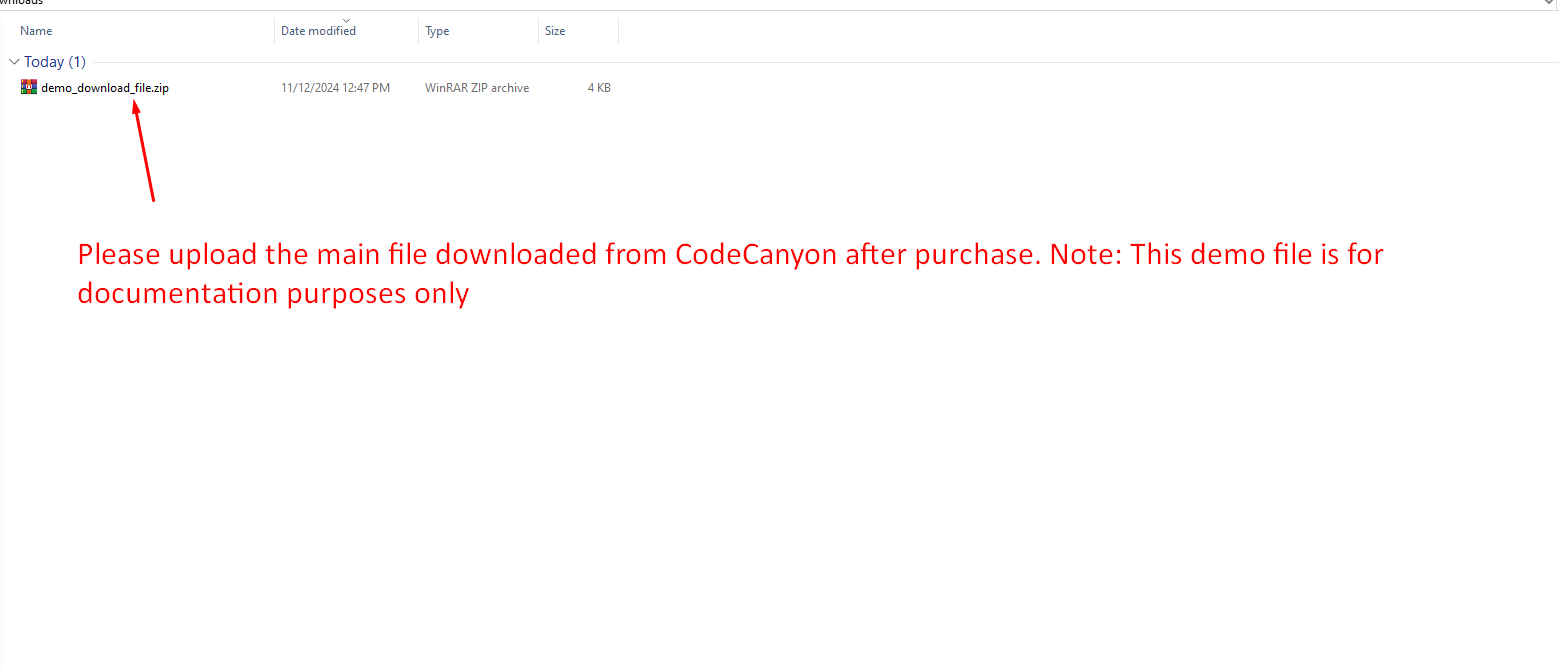
Upload the downloaded files directly to your server after purchase to
begin setup.
-
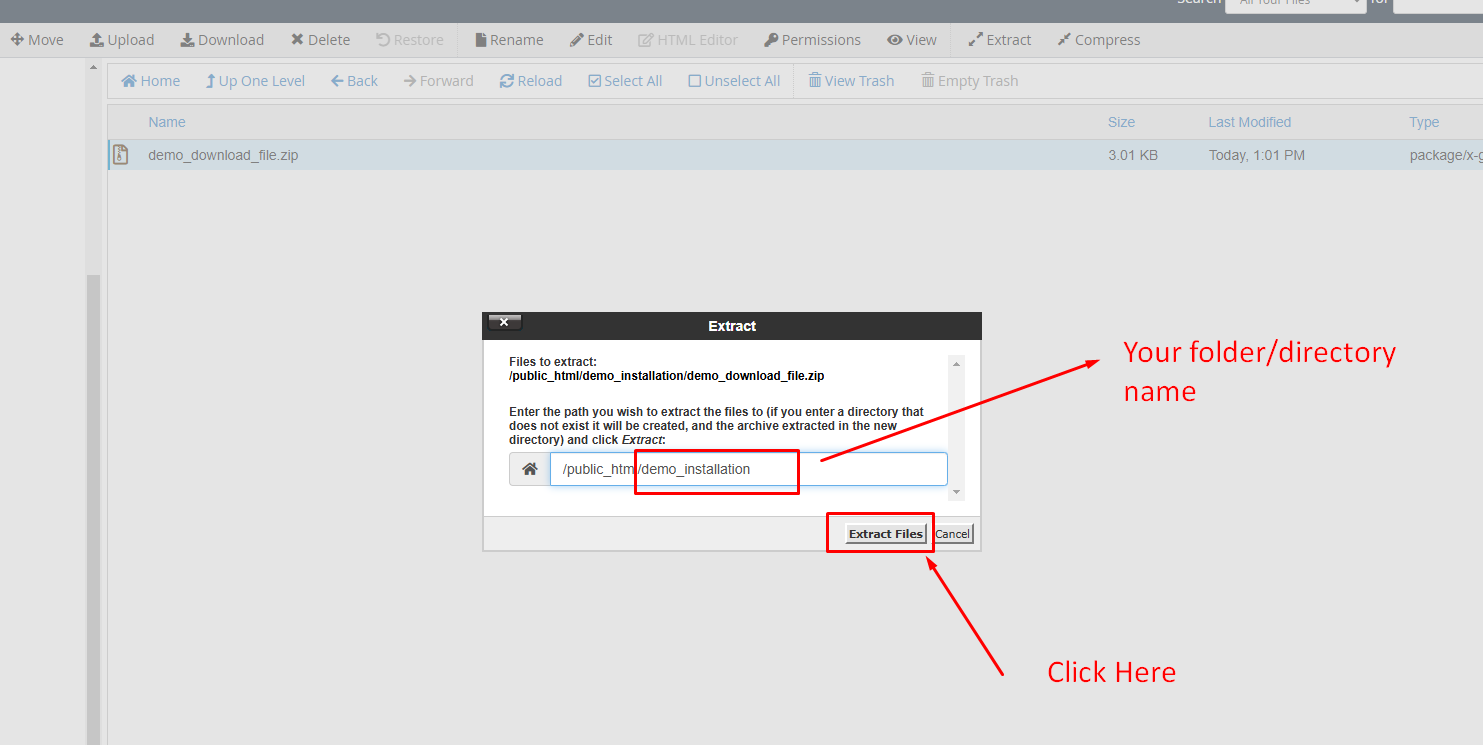
Extract the downloaded file and move all contents from the
Filesfolder to your desired installation directory. Ensure that bothindex.phpand.htaccessare included.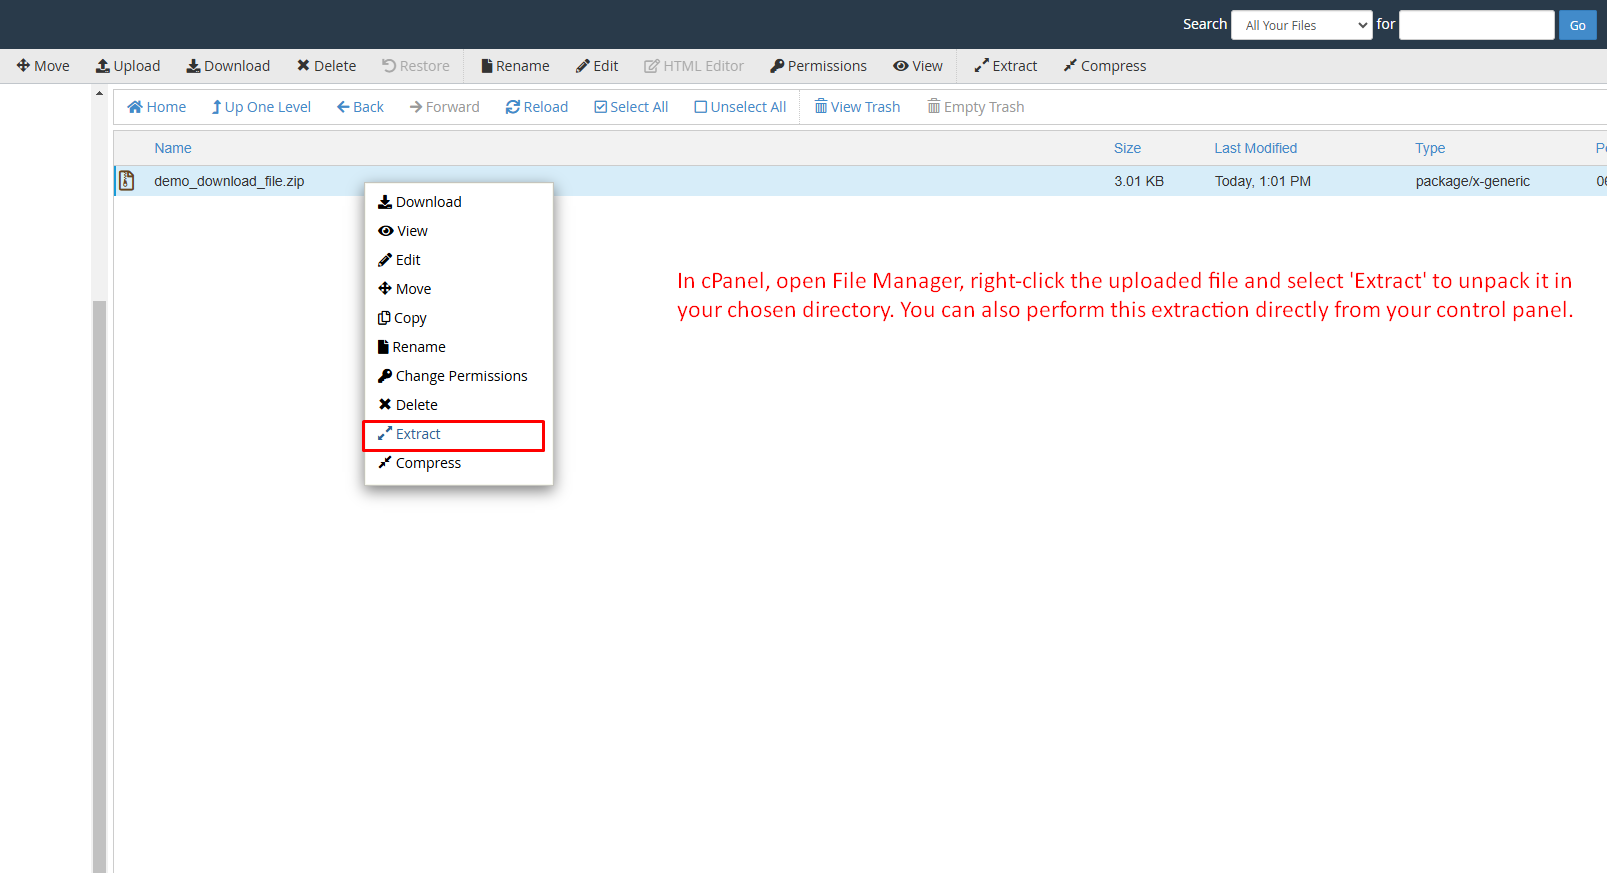
-
Install the PHP dependencies. Open a terminal inside the
corefolder and runcomposer install. This generates thecore/vendordirectory, which is required for the application to run and is intentionally not shipped in the package.cd core && composer install --no-dev --optimize-autoloaderOn shared hosting without terminal access, run
composer installlocally and upload the generatedcore/vendorfolder, or ask your host to run Composer for you. Requires PHP 8.2+ and Composer 2. -
Quickly set up your database using the
Database Wizard/Managerin your control panel.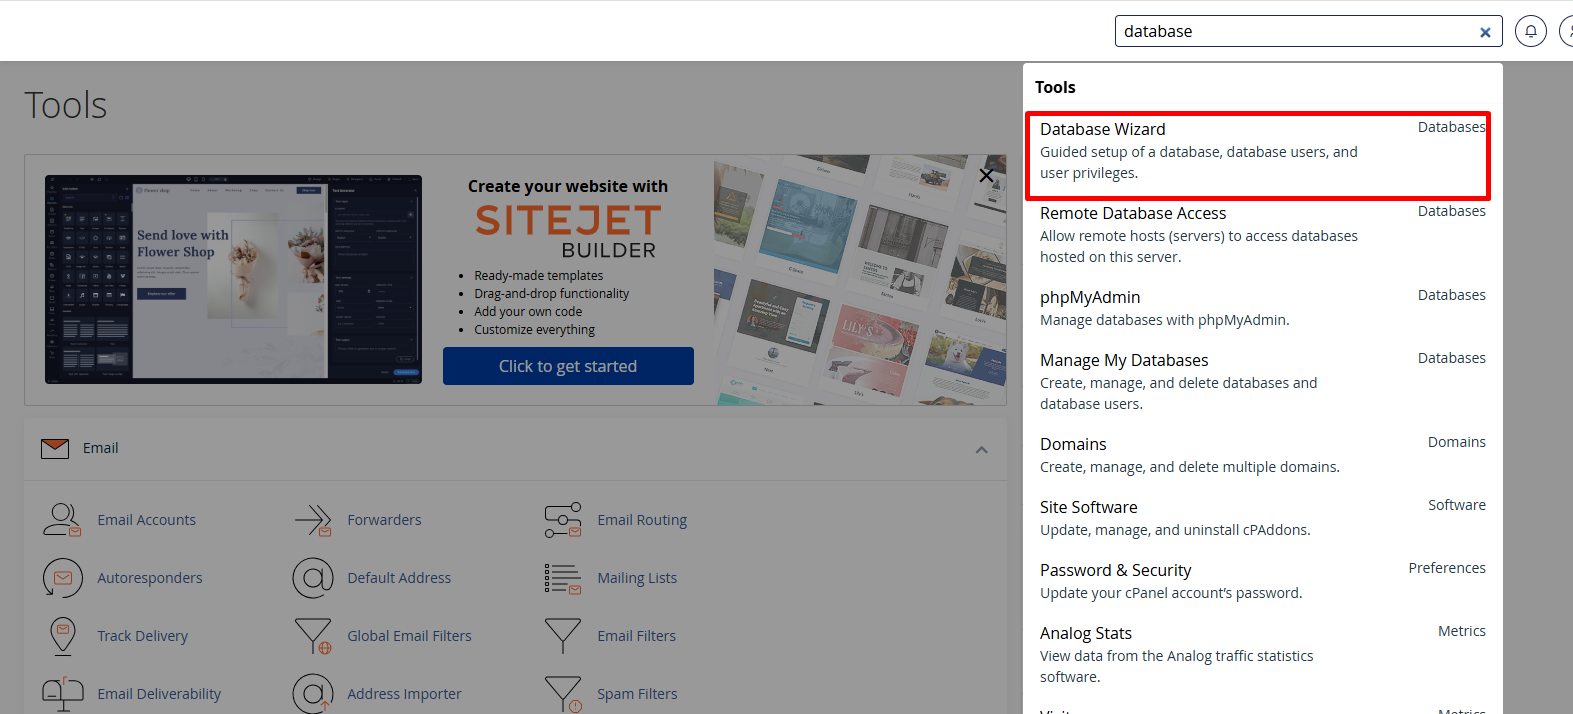
-
After creating the database, access
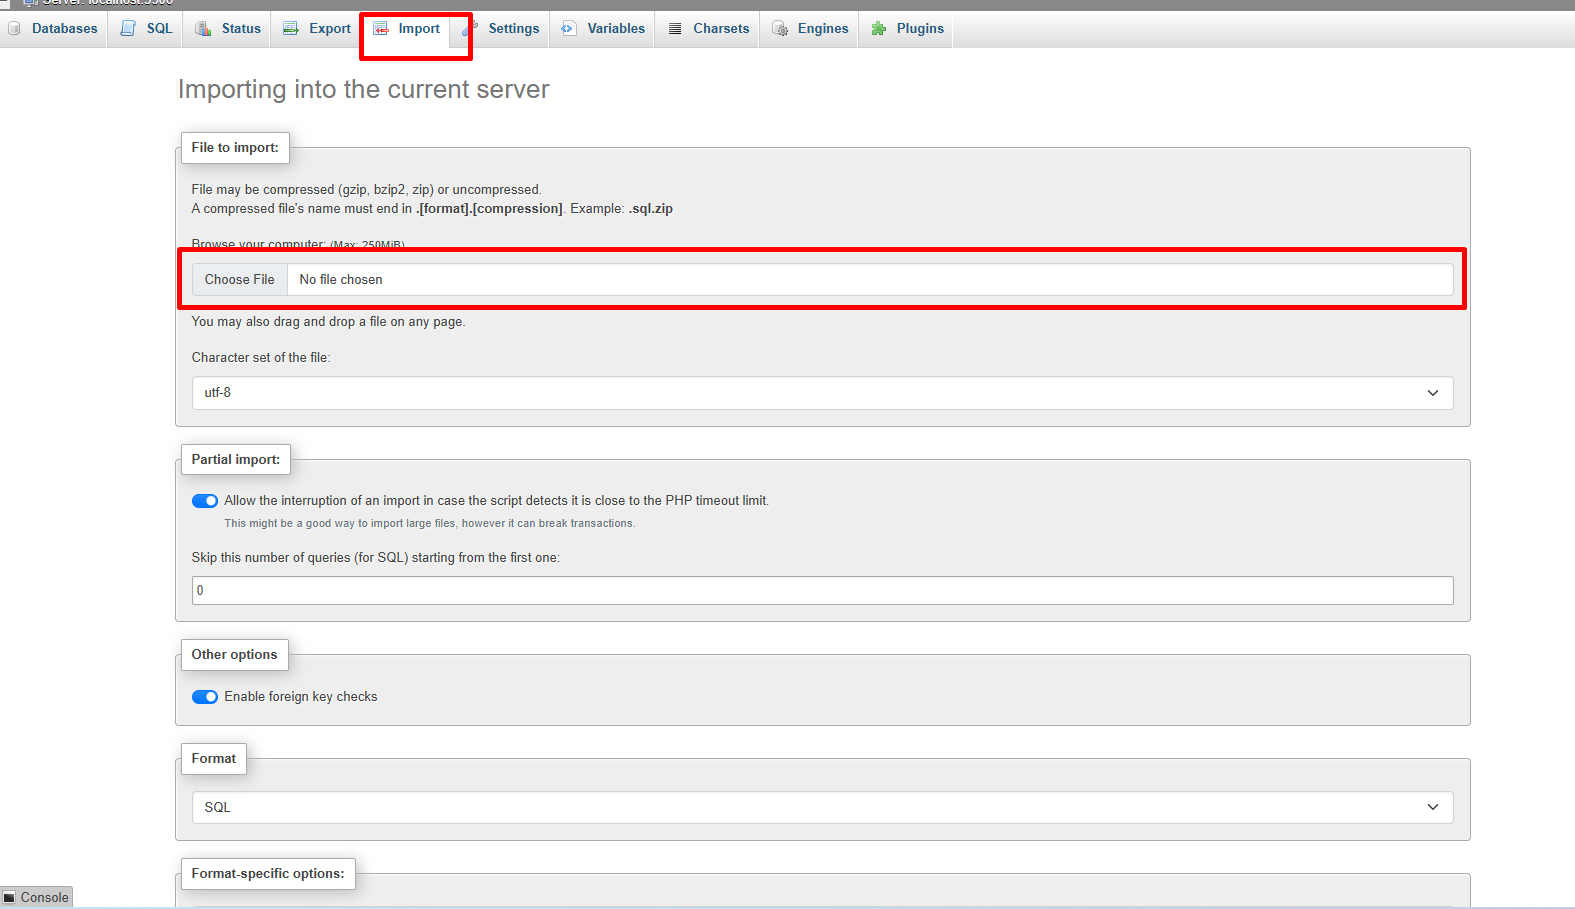
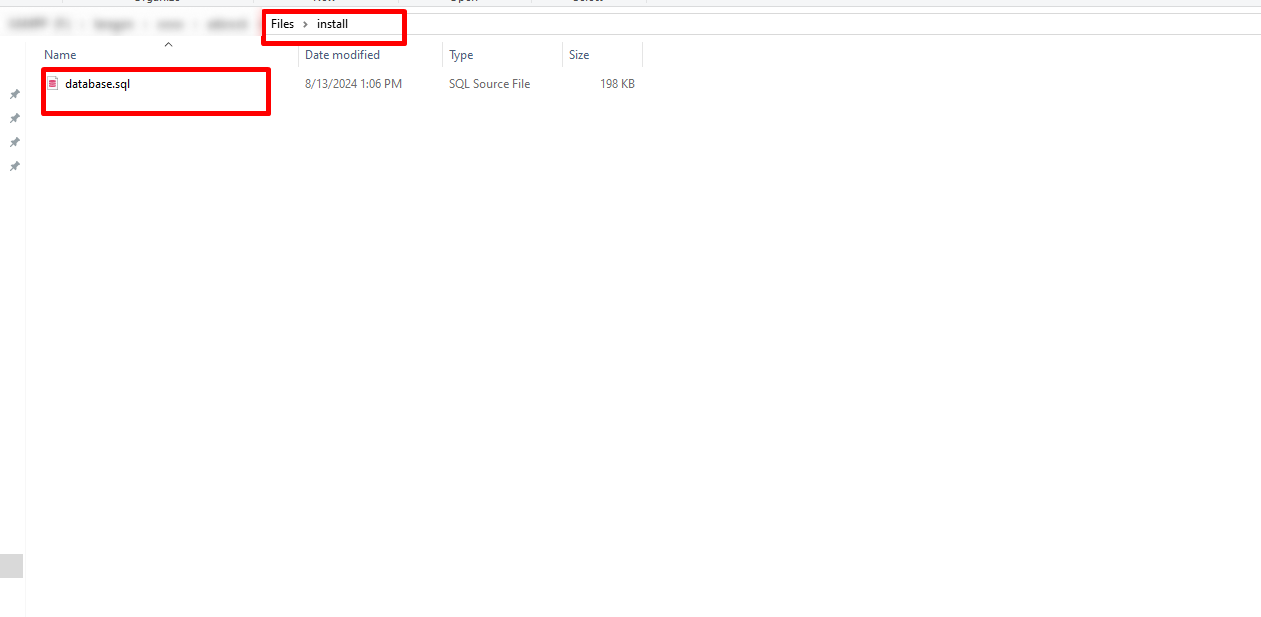
phpMyAdminon your server, select the newly created database, and import the project database from theFiles/Installationfolder.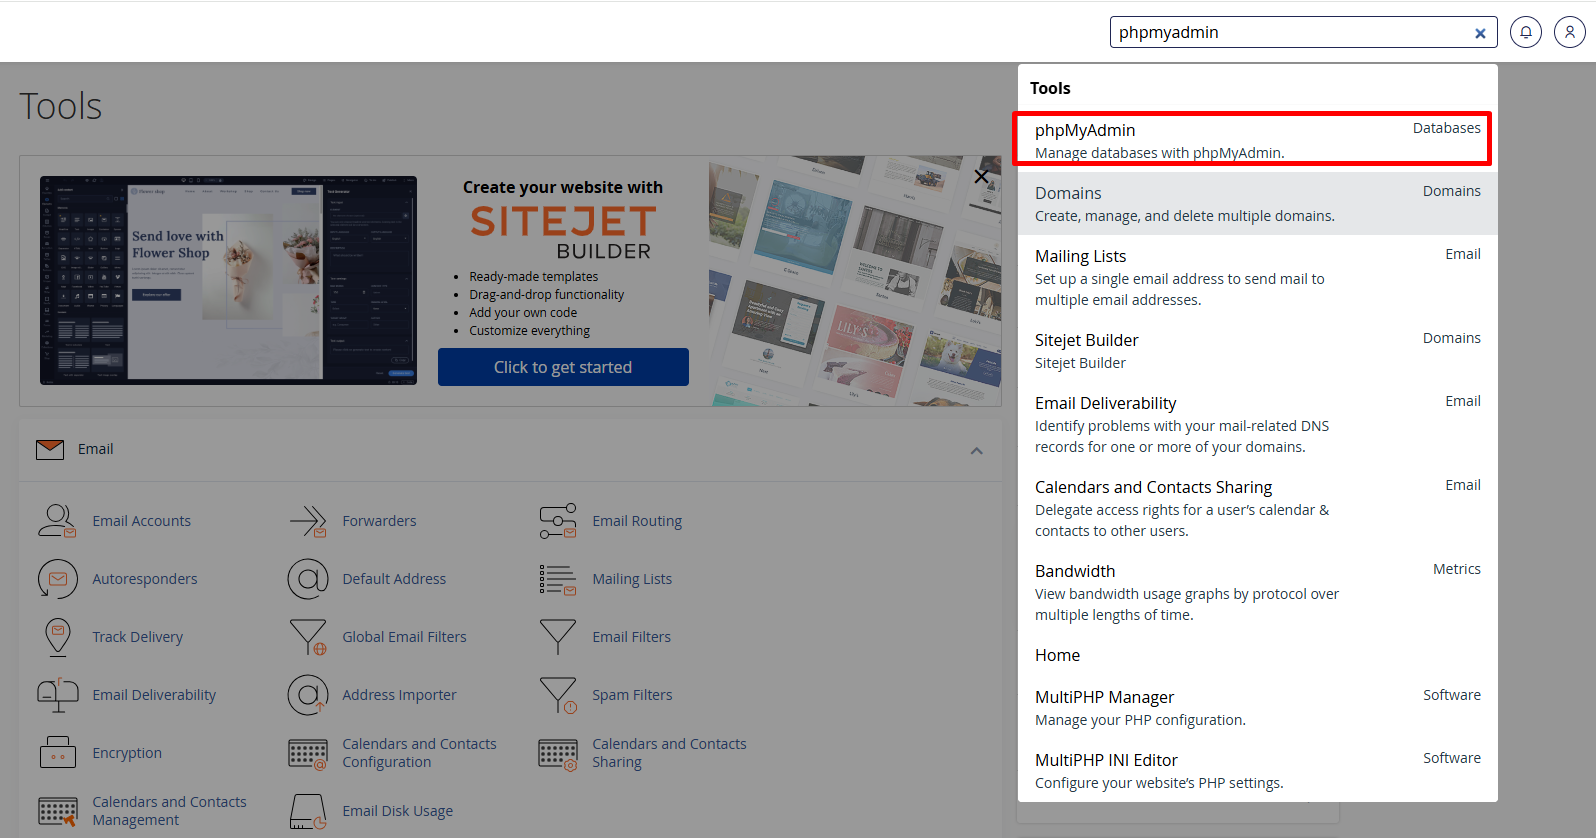
-
After importing the database, update the
database credentialsin thecore/.envfile (DB_HOST,DB_DATABASE,DB_USERNAMEandDB_PASSWORD) and adjust any other necessaryenvironment variables. KeepAPP_DEBUG=falseon a live site.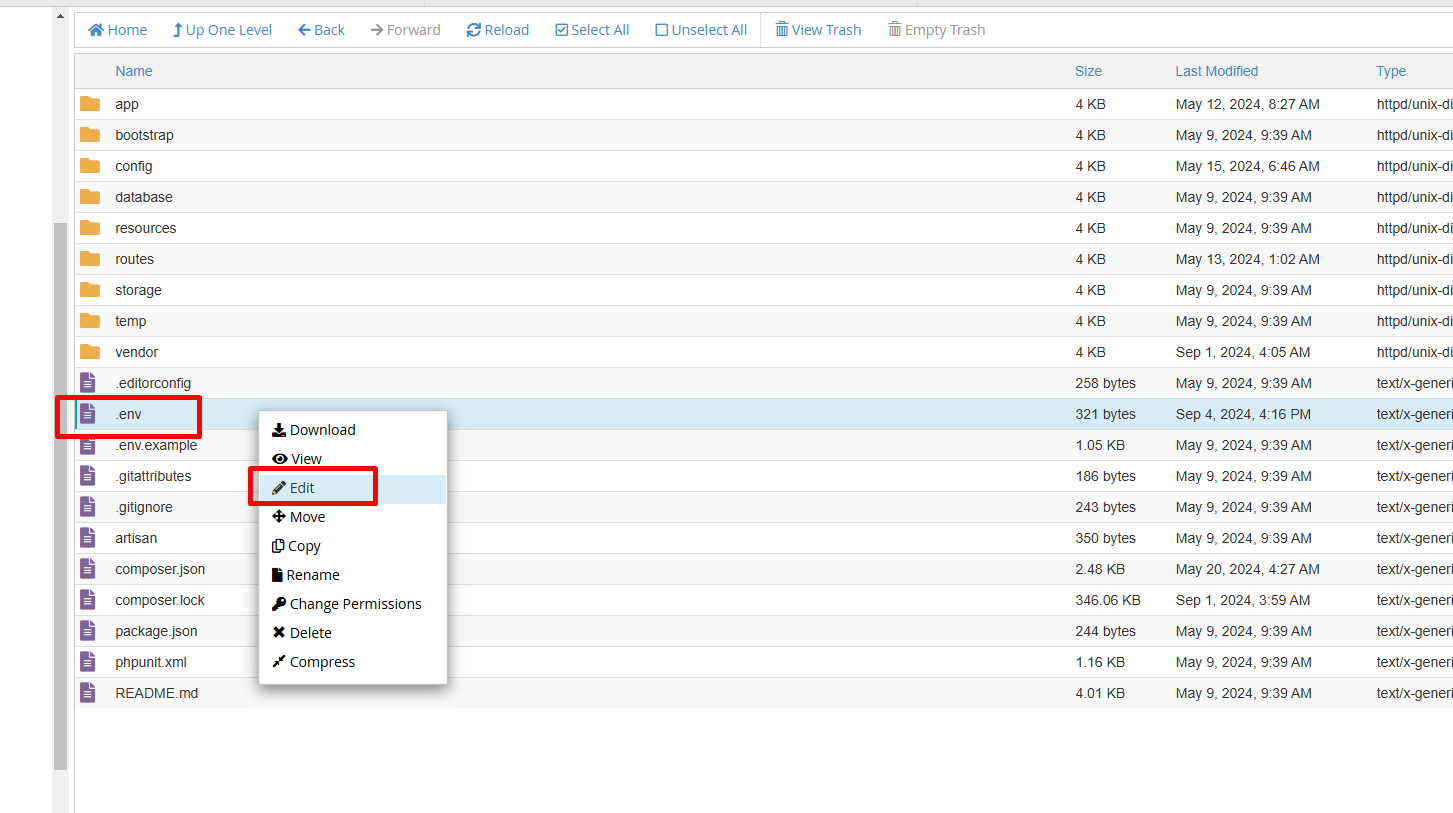
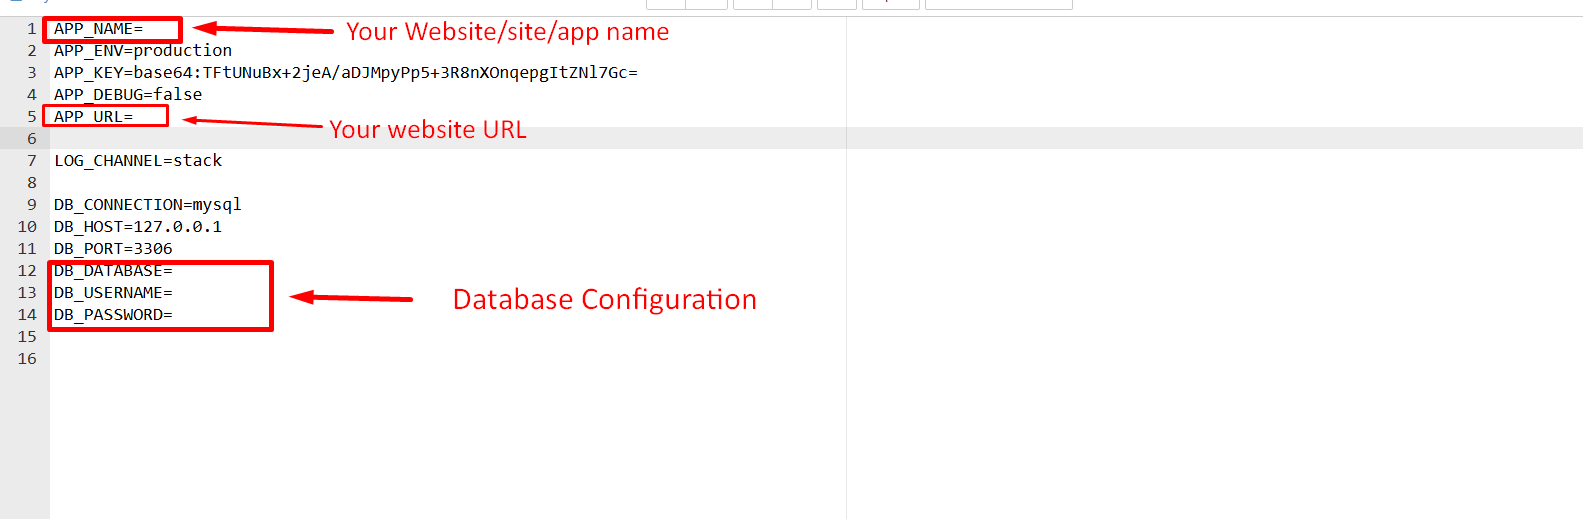
-
Installation is almost complete. Your site is now ready to browse.
Simply visit
https://your-site-url/adminand log in with the credentials below- username:admin
- password:admin
-
After logging in, please change the password for security. Also, remember to remove the
installationfolder once the project is successfully installed. -
If you're still unable to install the system, please contact us. We offer free installation on cPanel-based hosting.
Folder Structure
Important details about the application folder structure
After installation, your main folder will contain essential directories and files necessary for the proper functioning and MVC architecture of the OvoCheckout application.
- assets
- css - Frontend stylesheets
- js - Frontend JavaScript files
- images - Site logo and template graphics
- templates - Theme-specific template assets
- core
- app
- Http
- Controllers - Handles HTTP request business logic (Admin, API, Payment)
- Middleware - Route authentication and security filters
- Models - Eloquent database models
- Traits - Reusable operation traits (Invoice, User, Wallet operations)
- Notify - Dispatches Email, SMS, and Push notifications
- Lib - Custom helper libraries and manager classes
- Http
- config - Framework and custom environment configuration files
- routes - Grouped application routing definitions
- resources
- views - Blade templates for multi-template support
- storage - Application logs, caching, sessions, and uploads
- app
- install
- .htaccess
- index.php
-
assets/: In the
assetsfolder, you'll find all the client-facing assets such as stylesheets (CSS), scripts (JS), fonts, and templates. Any design or styling customizations should be written directly in the related files inside this folder. -
core/: The
corefolder contains the core Laravel files. It follows the standard MVC architecture pattern for clean organization:- -
core/app/holds controllers, middleware, traits, and notification classes. - -
core/app/Http/Controllers/contains the logic for processing customer payments, admin configurations, and external API requests. - -
core/app/Traits/houses reusable logic traits shared across controllers to manage invoices, deposits, and wallets. - -
core/config/holds settings for services, databases, and general variables. - -
core/routes/specifies web, API, administrator, and payment webhook routes. - -
core/resources/views/contains HTML blade files that structure your frontend pages. - -
core/storage/contains log files, cache data, and generated session details (must be writable).
- -
- install/: Initial installation resources containing the MySQL database structure backups and configurations.
- .htaccess: Apache redirection rules ensuring all requests are directed to `index.php` for Laravel routing.
- index.php: The entry point of the application, connecting the web server requests to Laravel's bootstrap logic inside `core/`.
-
Third-party libraries (source form): Every bundled
JavaScript and CSS library ships as its full, readable, original
source — there are no
.min.jsor.min.cssfiles anywhere in this package. Each library sits at its normal path and is the file the application actually loads, so what you read is exactly what runs. For exampleassets/global/js/bootstrap.bundle.jsis Bootstrap's official unminified distribution, andassets/global/js/jquery-3.7.1.jsis the official uncompressed jQuery build. You can open, read, debug and step through any of them directly in your browser's developer tools.assets/admin/js/fontawesome-iconpicker.jsis the plugin author's original source files (src/js/jquery.ui.pos.jsandsrc/js/iconpicker.js), with the default icon list extended to include the Line Awesome set alongside Font Awesome 5. The package also contains nonode_modulesorvendorfolder: PHP dependencies are installed withcomposer install(see the Installation section), and no npm/build step is required — the front-end assets above are loaded directly by the browser. -
Firebase SDK: the Firebase JavaScript SDK v7.23.0 is
not bundled into the package at all — it is loaded straight from
Google's official CDN
(
https://www.gstatic.com/firebasejs/7.23.0/), referenced incore/resources/views/partials/push_script.blade.phpandassets/global/js/firebase/firebase-messaging-sw.js. Firebase Cloud Messaging is a network service, so the SDK is fetched over the internet in the same way the notifications themselves are delivered. Everything insideassets/global/js/firebase/is OvoCheckout's own plain, readable JavaScript — the service worker and yourconfigs.jscredentials file. Seeassets/global/js/firebase/README.txtfor setup notes.
Third-Party Services & Costs
External accounts and services that OvoCheckout can connect to, and the costs you should expect from each provider.
Important: OvoCheckout does not include any third-party accounts, API keys, or paid subscriptions. The integrations listed below are optional and are provided by independent external companies. You must create your own account with each provider you choose to use, and you are solely responsible for reviewing and accepting their current pricing, terms, and availability. Any setup, subscription, per-transaction, or usage-based fees are charged directly by the third-party provider — not by OvoCheckout or its author.
The following external services can be integrated with OvoCheckout. Each is independent, and the crypto/fiat gateways are only needed if you intend to accept those specific payment types.
| Service | Used for | Required? | Typical costs (charged by the provider) |
|---|---|---|---|
| NOWPayments nowpayments.io |
Cryptocurrency payment processing (300+ coins), auto-conversion and settlement. | Only if you accept crypto payments. | Free account creation; a per-transaction processing fee (a small percentage of each payment) plus any network/withdrawal fees. See the provider's current pricing page. |
| Fiat payment gateways (PayPal, Stripe, and other supported providers) |
Accepting card, bank transfer, and wallet payments in traditional currencies. | Only if you accept fiat payments. | Free account creation; per-transaction and/or percentage fees set individually by each gateway. Some may charge monthly or currency-conversion fees. |
| Firebase (Google) firebase.google.com |
Mobile & web push notifications (Cloud Messaging) and Google/Apple social sign-in. | Only if you use push notifications or social login. | Cloud Messaging and Authentication are free on the Spark plan for typical usage. Very high volumes may require the pay-as-you-go Blaze plan. See Firebase pricing. |
| SMTP email provider (your host, Gmail, SendGrid, Mailgun, etc.) |
Delivering transactional emails: receipts, confirmations, alerts. | Recommended for email notifications. | Many hosts include SMTP free. Dedicated providers offer free tiers with paid plans above a monthly send limit. |
| SMS gateway (Twilio, Nexmo/Vonage, or others) |
Optional SMS notifications and OTP delivery. | Optional. | Pay-per-message pricing set by the SMS provider; rates vary by destination country. |
| Google reCAPTCHA / Analytics / Tawk.to | Optional extensions: bot protection, traffic analytics, live chat. | Optional. | Generally free for standard usage under each provider's terms. |
| Apple Developer Program developer.apple.com/programs |
Signing and publishing the iOS mobile app. | Only if you publish the iOS app. | Annual membership fee charged by Apple (US $99 / year at the time of writing). A Mac with Xcode is also required to build. |
| Google Play Console play.google.com/console |
Publishing and updating the Android mobile app. | Only if you publish the Android app. | One-time registration fee charged by Google (US $25 at the time of writing). |
| Web hosting, domain & SSL certificate | Running the OvoCheckout platform itself. | Required. | Charged by your hosting provider and domain registrar. An SSL certificate is mandatory; many hosts include a free one. |
Pricing shown here is indicative only and can change at any time. Always confirm the latest fees directly on each provider's official website before going live. OvoCheckout can operate with only the services you actually need — you are never required to sign up for a service you do not intend to use.
Publishing the mobile app is also subject to Apple's and Google's own review policies for payment applications. See App Store & Play Store Submission Policies in the mobile app documentation.
Admin Dashboard
Overview of the admin dashboard
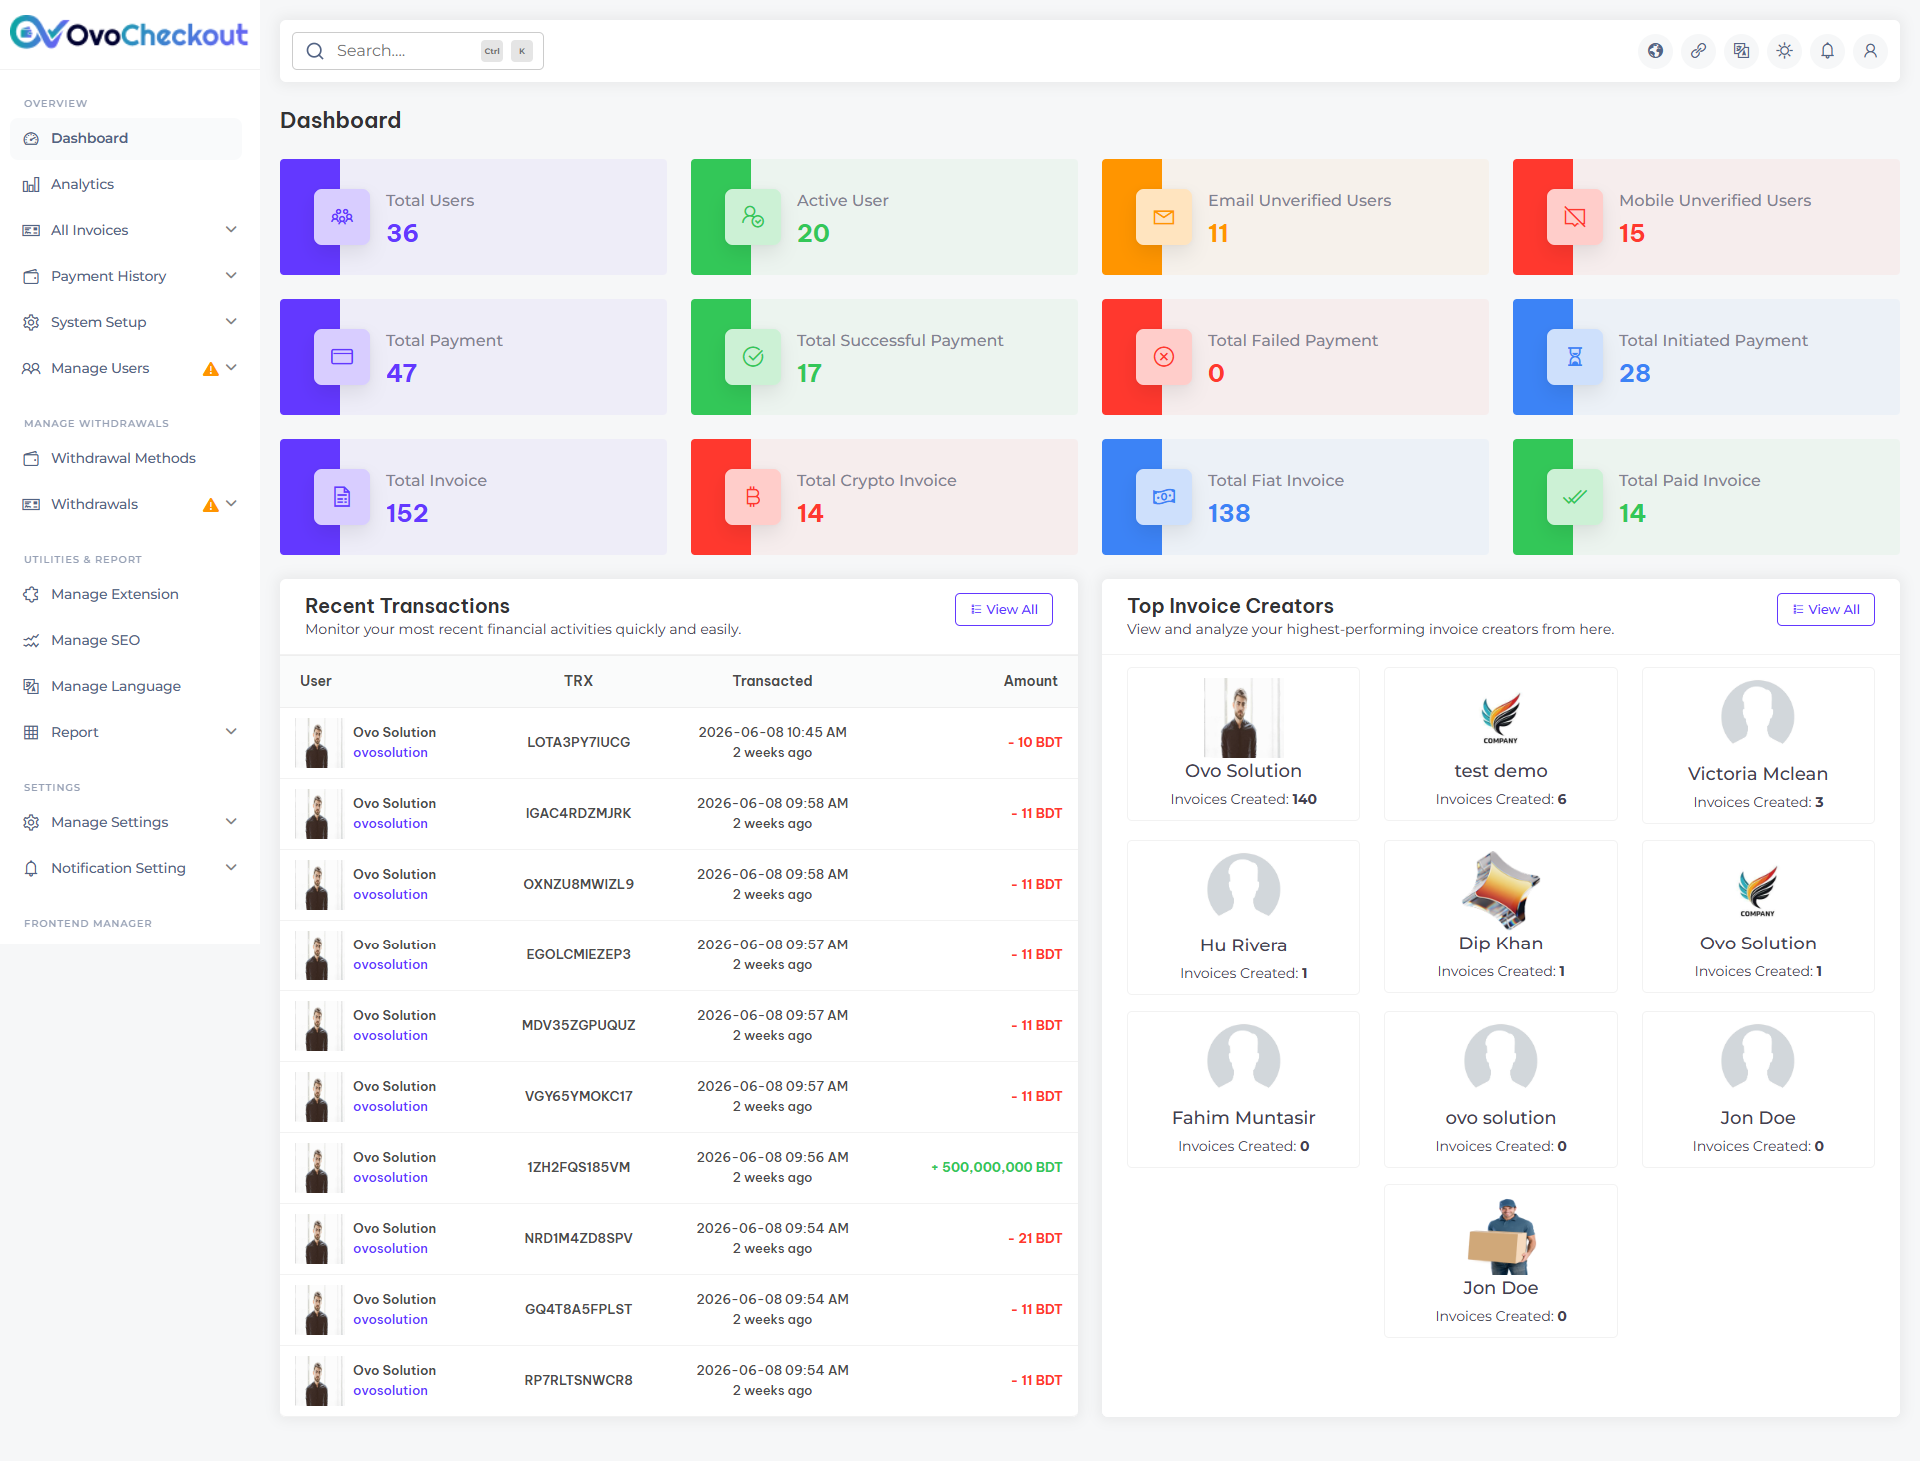
The items include the latest secure admin panel with a unique admin dashboard. By logging into your dashboard, you can easily view and manage all key information related to your website. From this dashboard, you'll get a comprehensive overview of your system, including user statistics, total payment, withdrawals, and more. Additionally, you can track and compare system transactions with graphical data for better insights.
Fiat Currency
Overview of the platform fiat currency settings
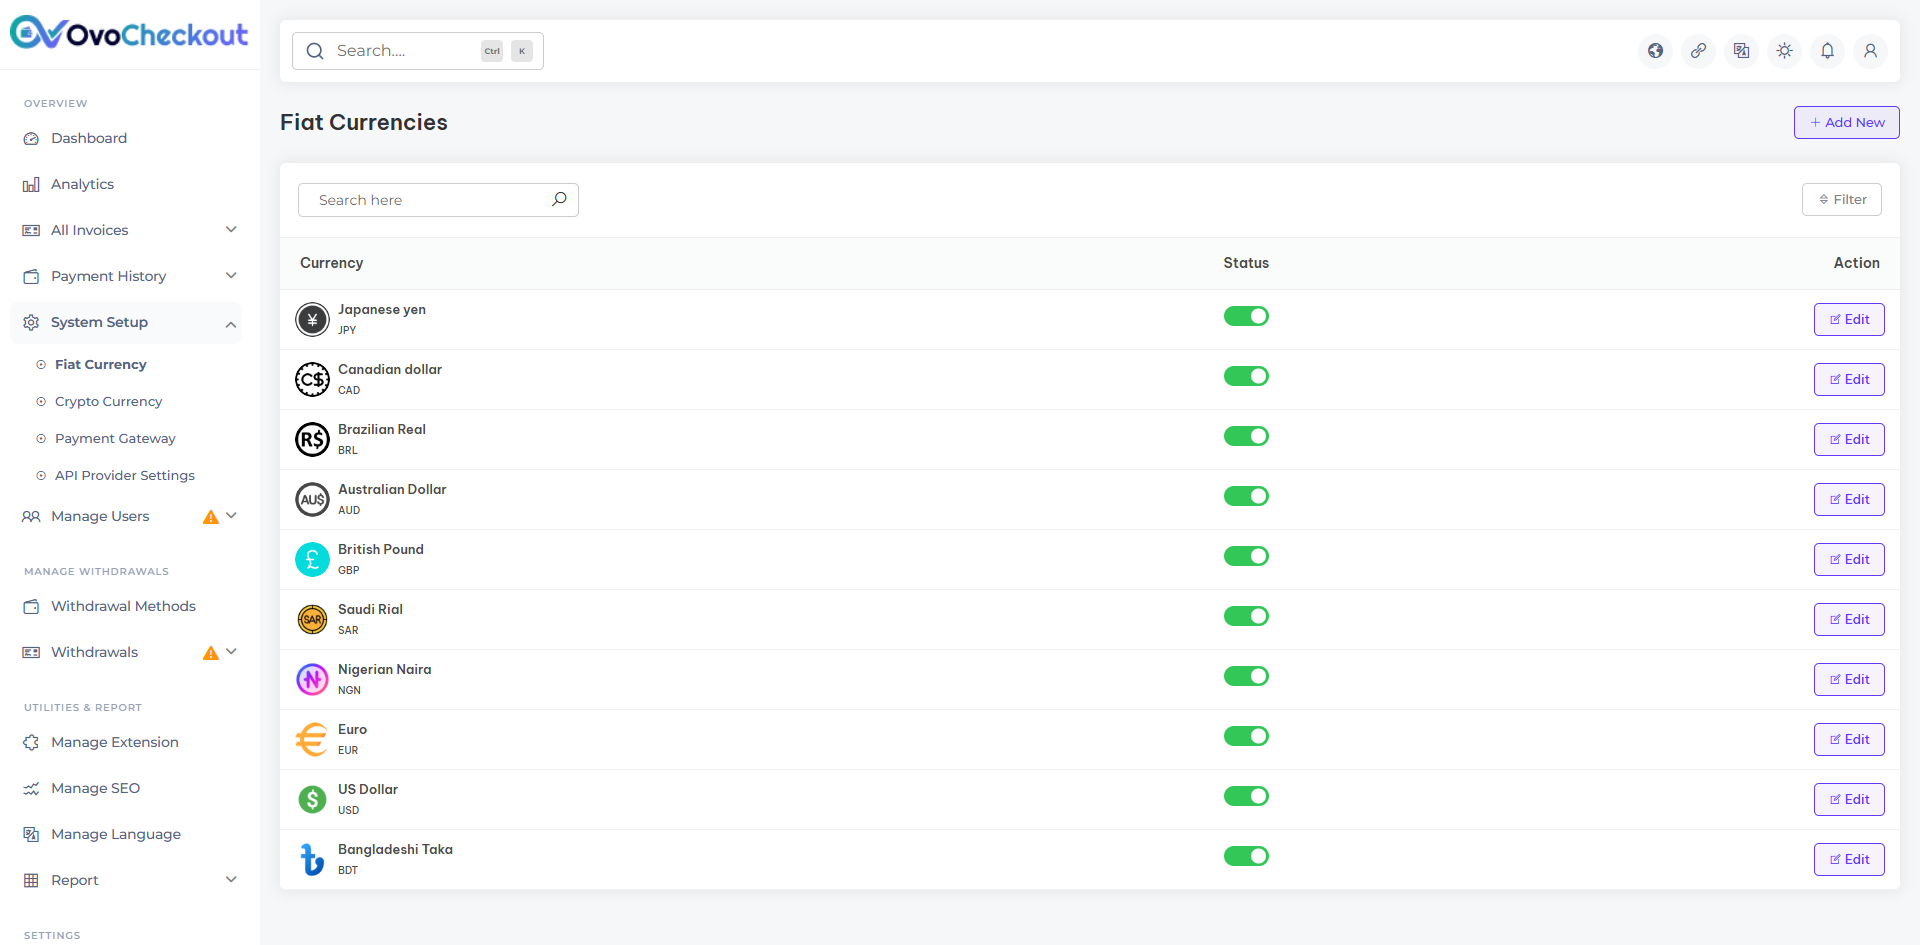
In the fiat currency section, you can manage and configure all aspects related to the fiat currency used on your platform. This includes setting the default currency, defining currency symbols, configuring display formats, and managing exchange rates to ensure accurate and consistent financial transactions across your system.
Crypto Currency
Overview of the crypto currency settings
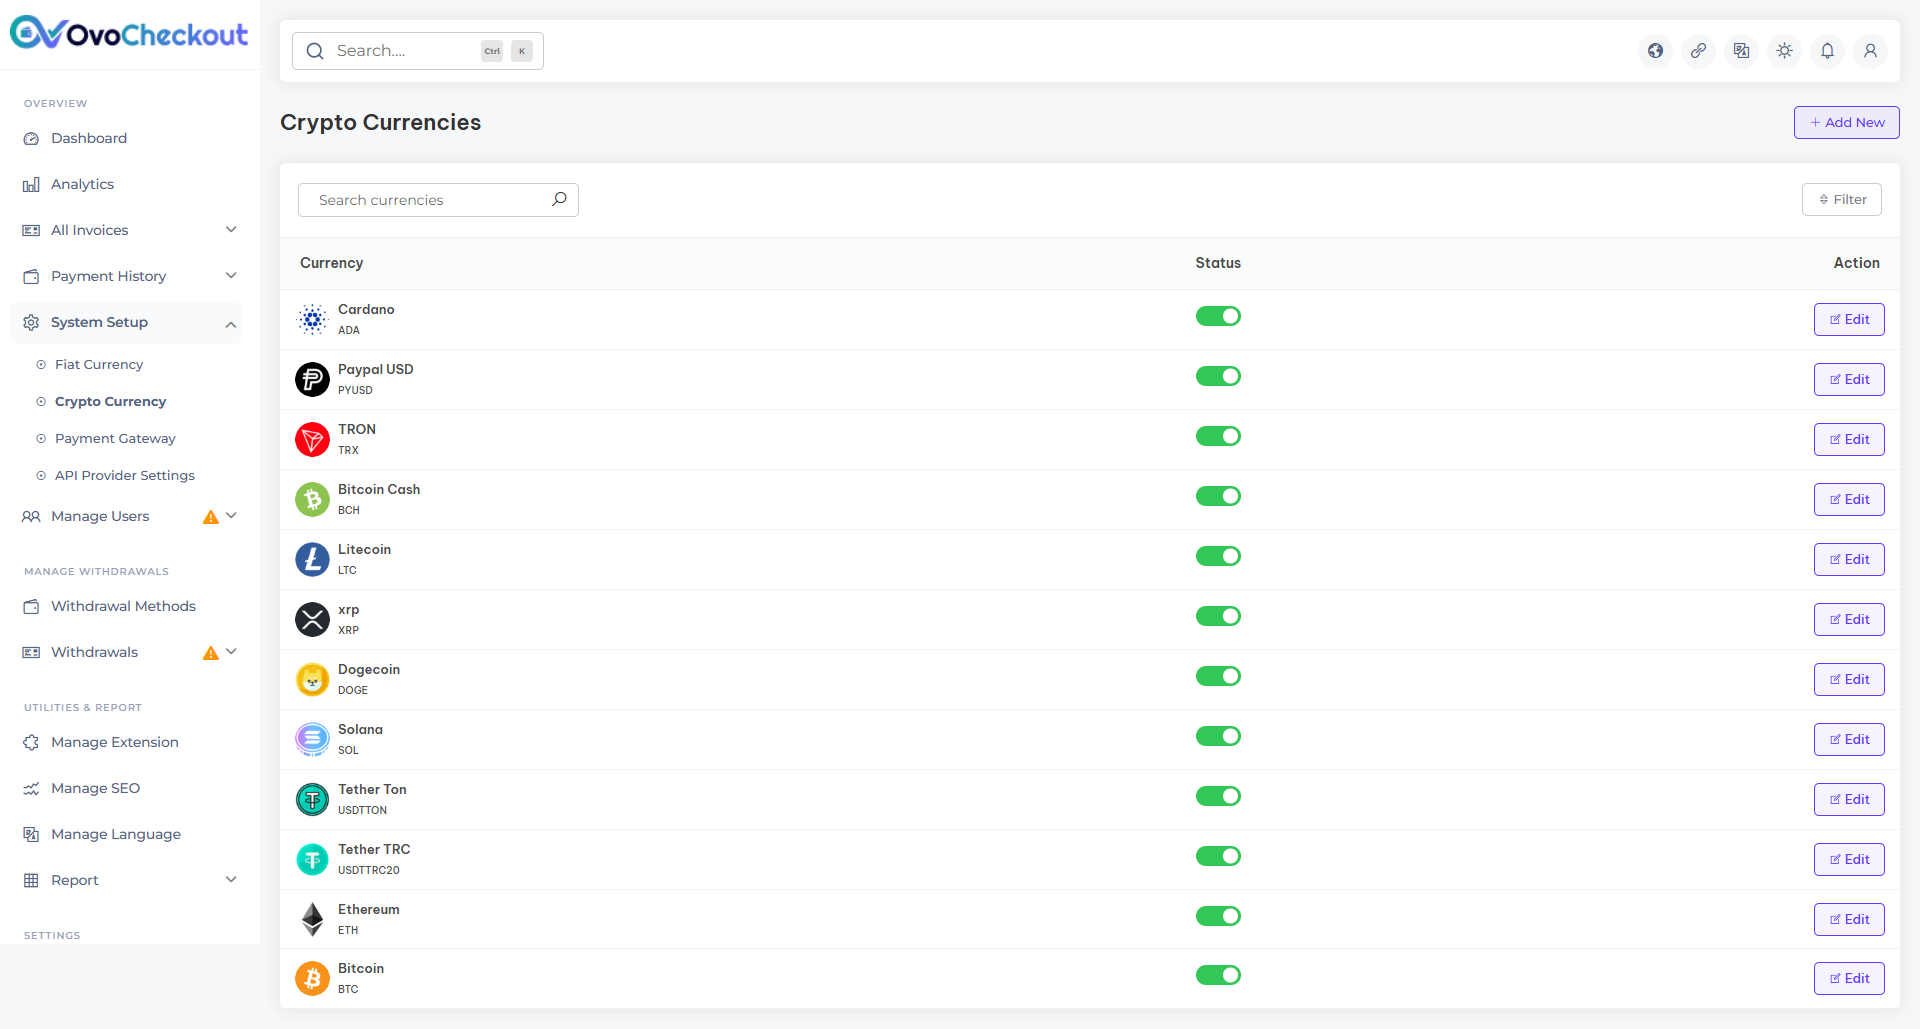
In the Crypto Currency section, admins can manage and configure all aspects related to the crypto currencies used on your platform. This includes setting up supported cryptocurrencies, defining their symbols, configuring display formats, and managing exchange rates to ensure accurate and consistent transactions across your system. tracking and management of user subscriptions over time.
User
Overview of the platform Users
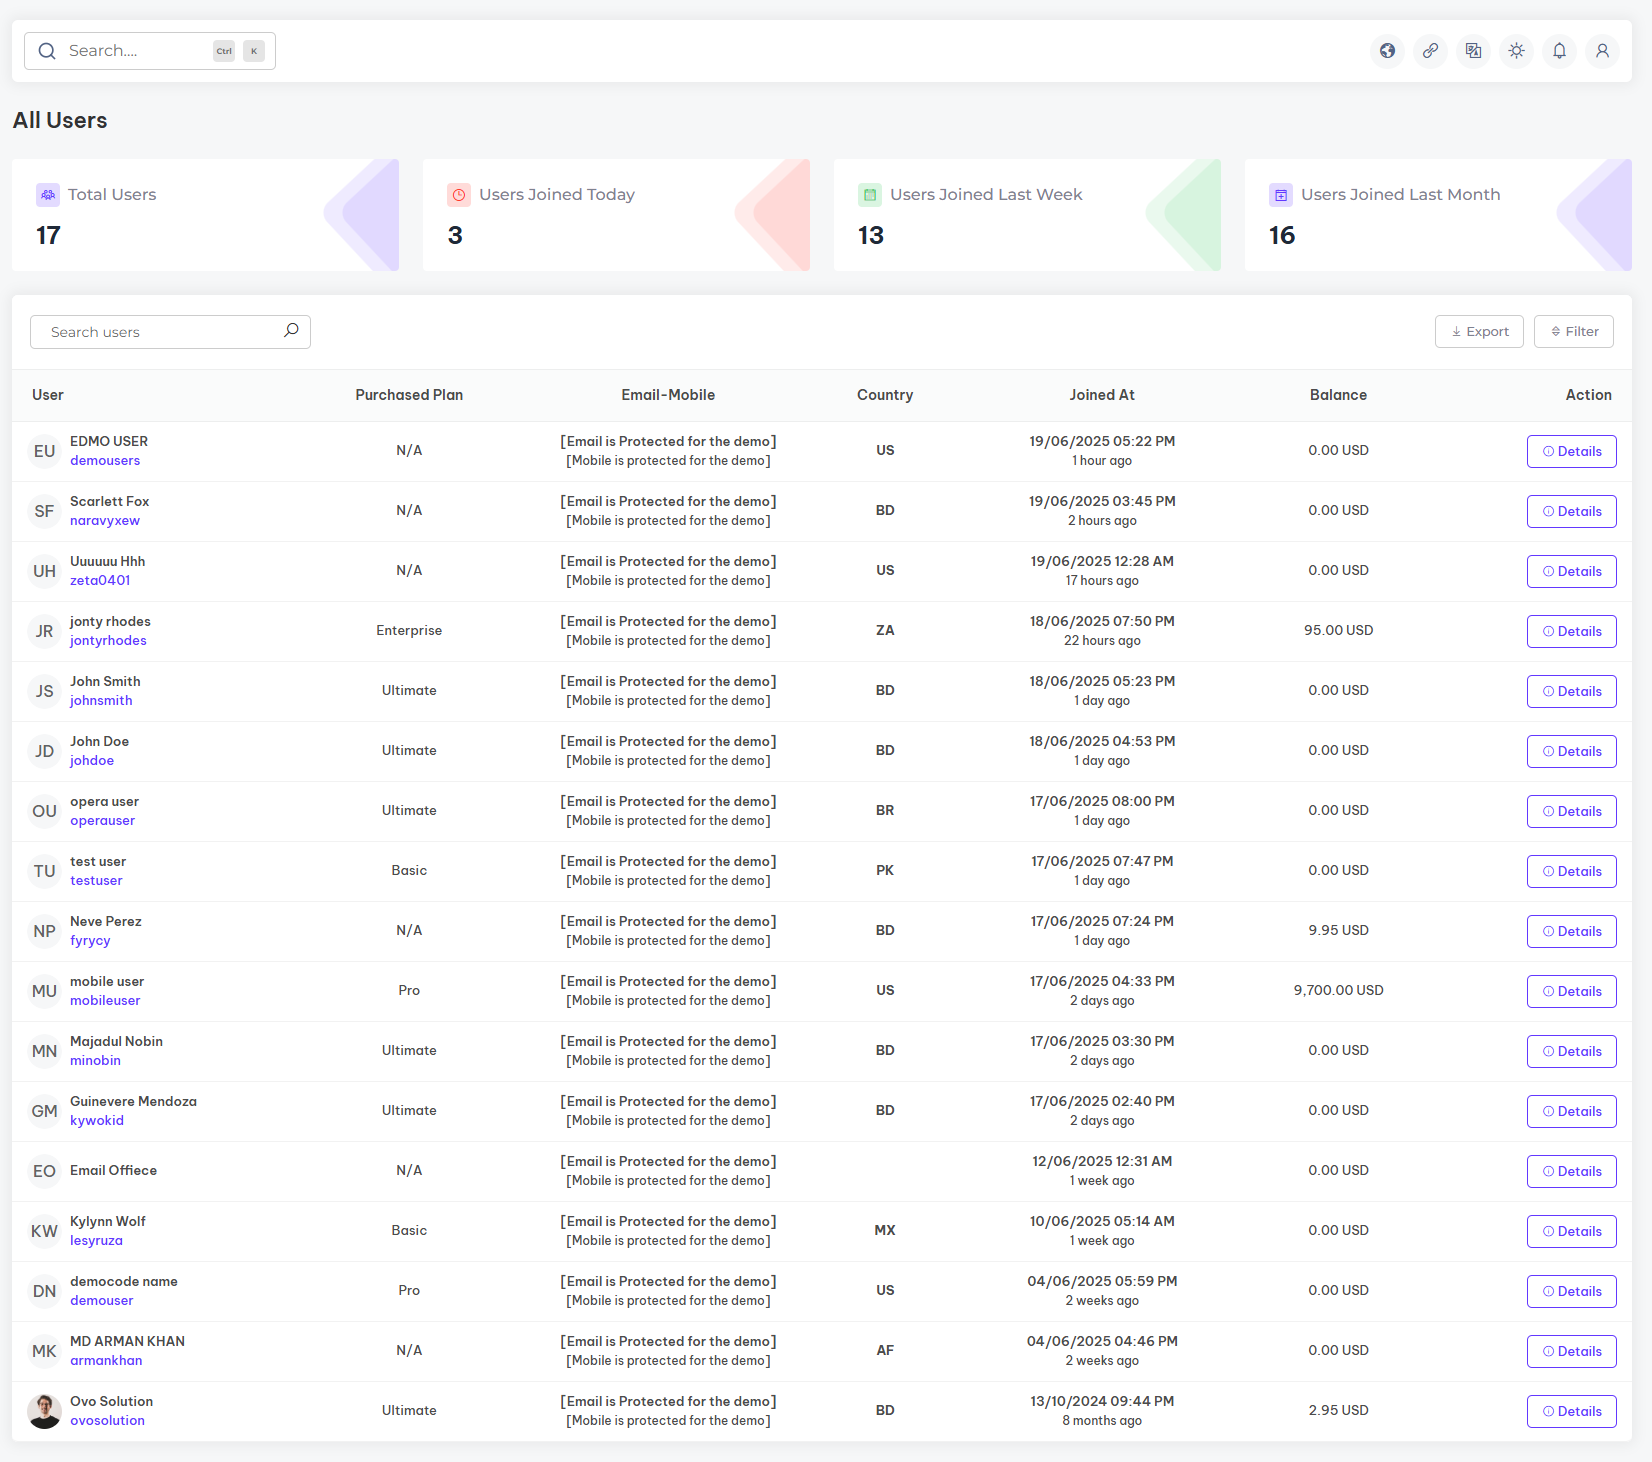
In the manage users section, you can oversee all registered users on the platform. This includes viewing users profiles, tracking users subscription, managing status, and handling any necessary updates to ensure a smooth and reliable experience for all users.
Manage Payments
Overview of the platform Payments
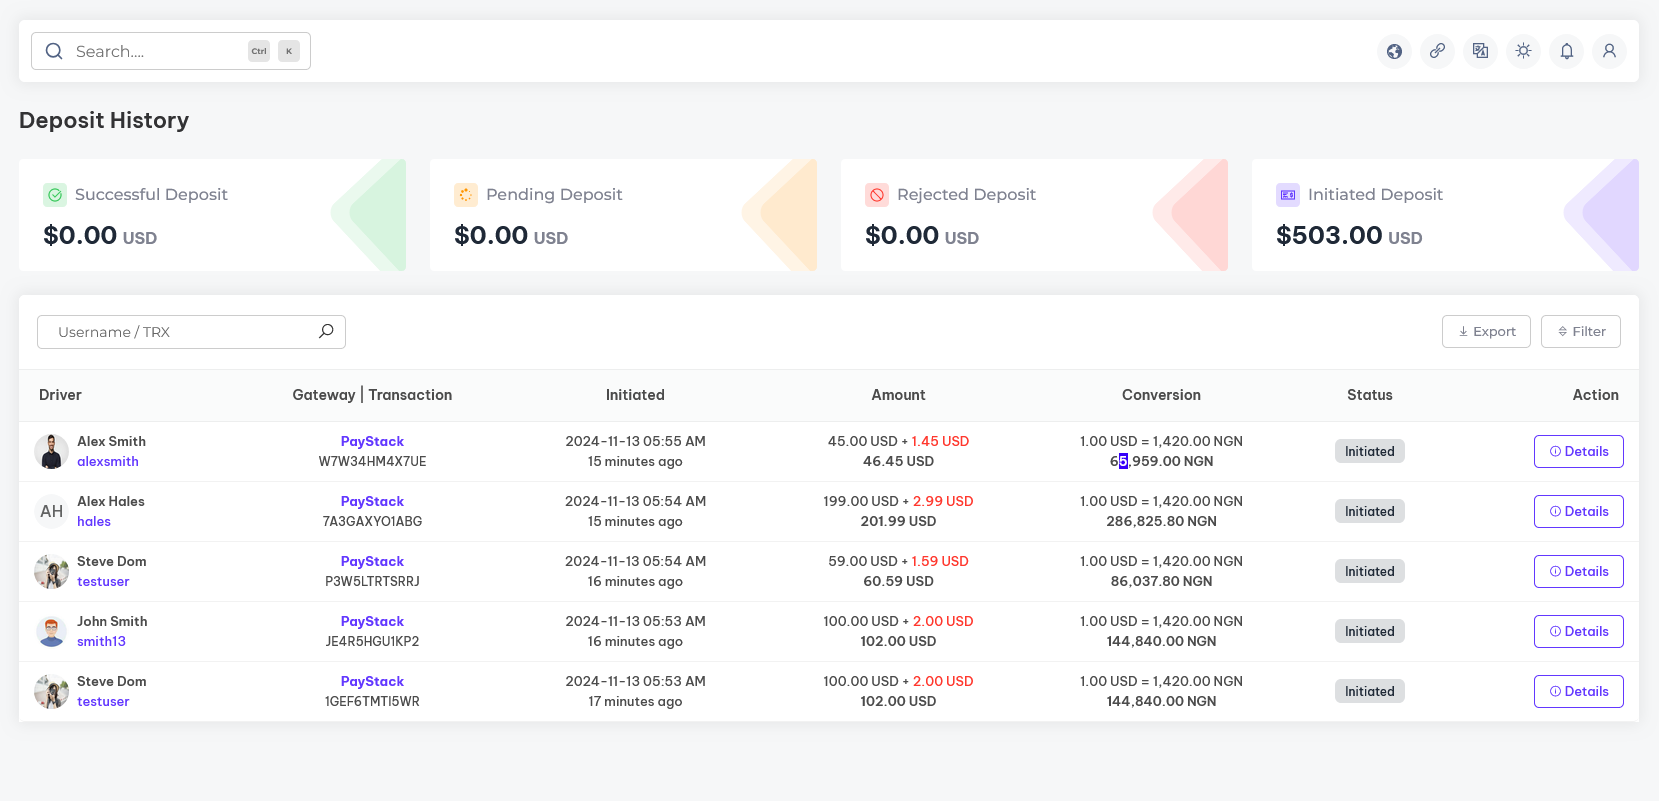
In the Manage payments section, you can manage and track all payment transactions made by drivers. This includes reviewing payment details, confirming payments, and ensuring accurate records to maintain financial transparency and support drivers effectively.
Manage Withdrawals
Overview of the platform Withdrawals
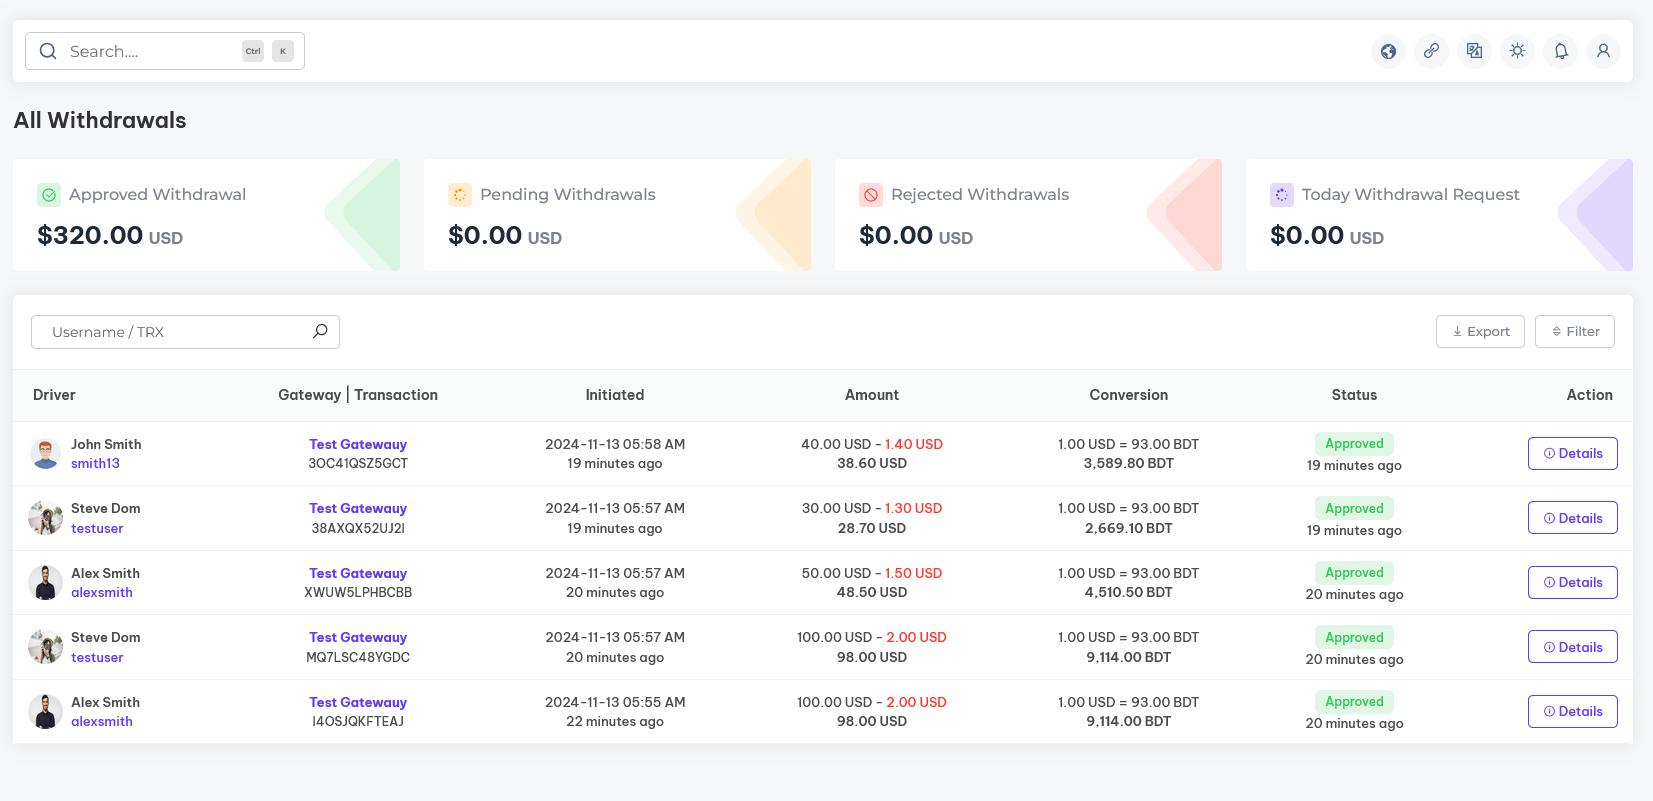
In the manage withdrawals section, you can oversee and process withdrawal requests from users. This includes reviewing withdrawal details, approving transactions, and maintaining accurate records to ensure timely and transparent payouts.
Payment Gateway
Overview of the platform-integrated payment gateway
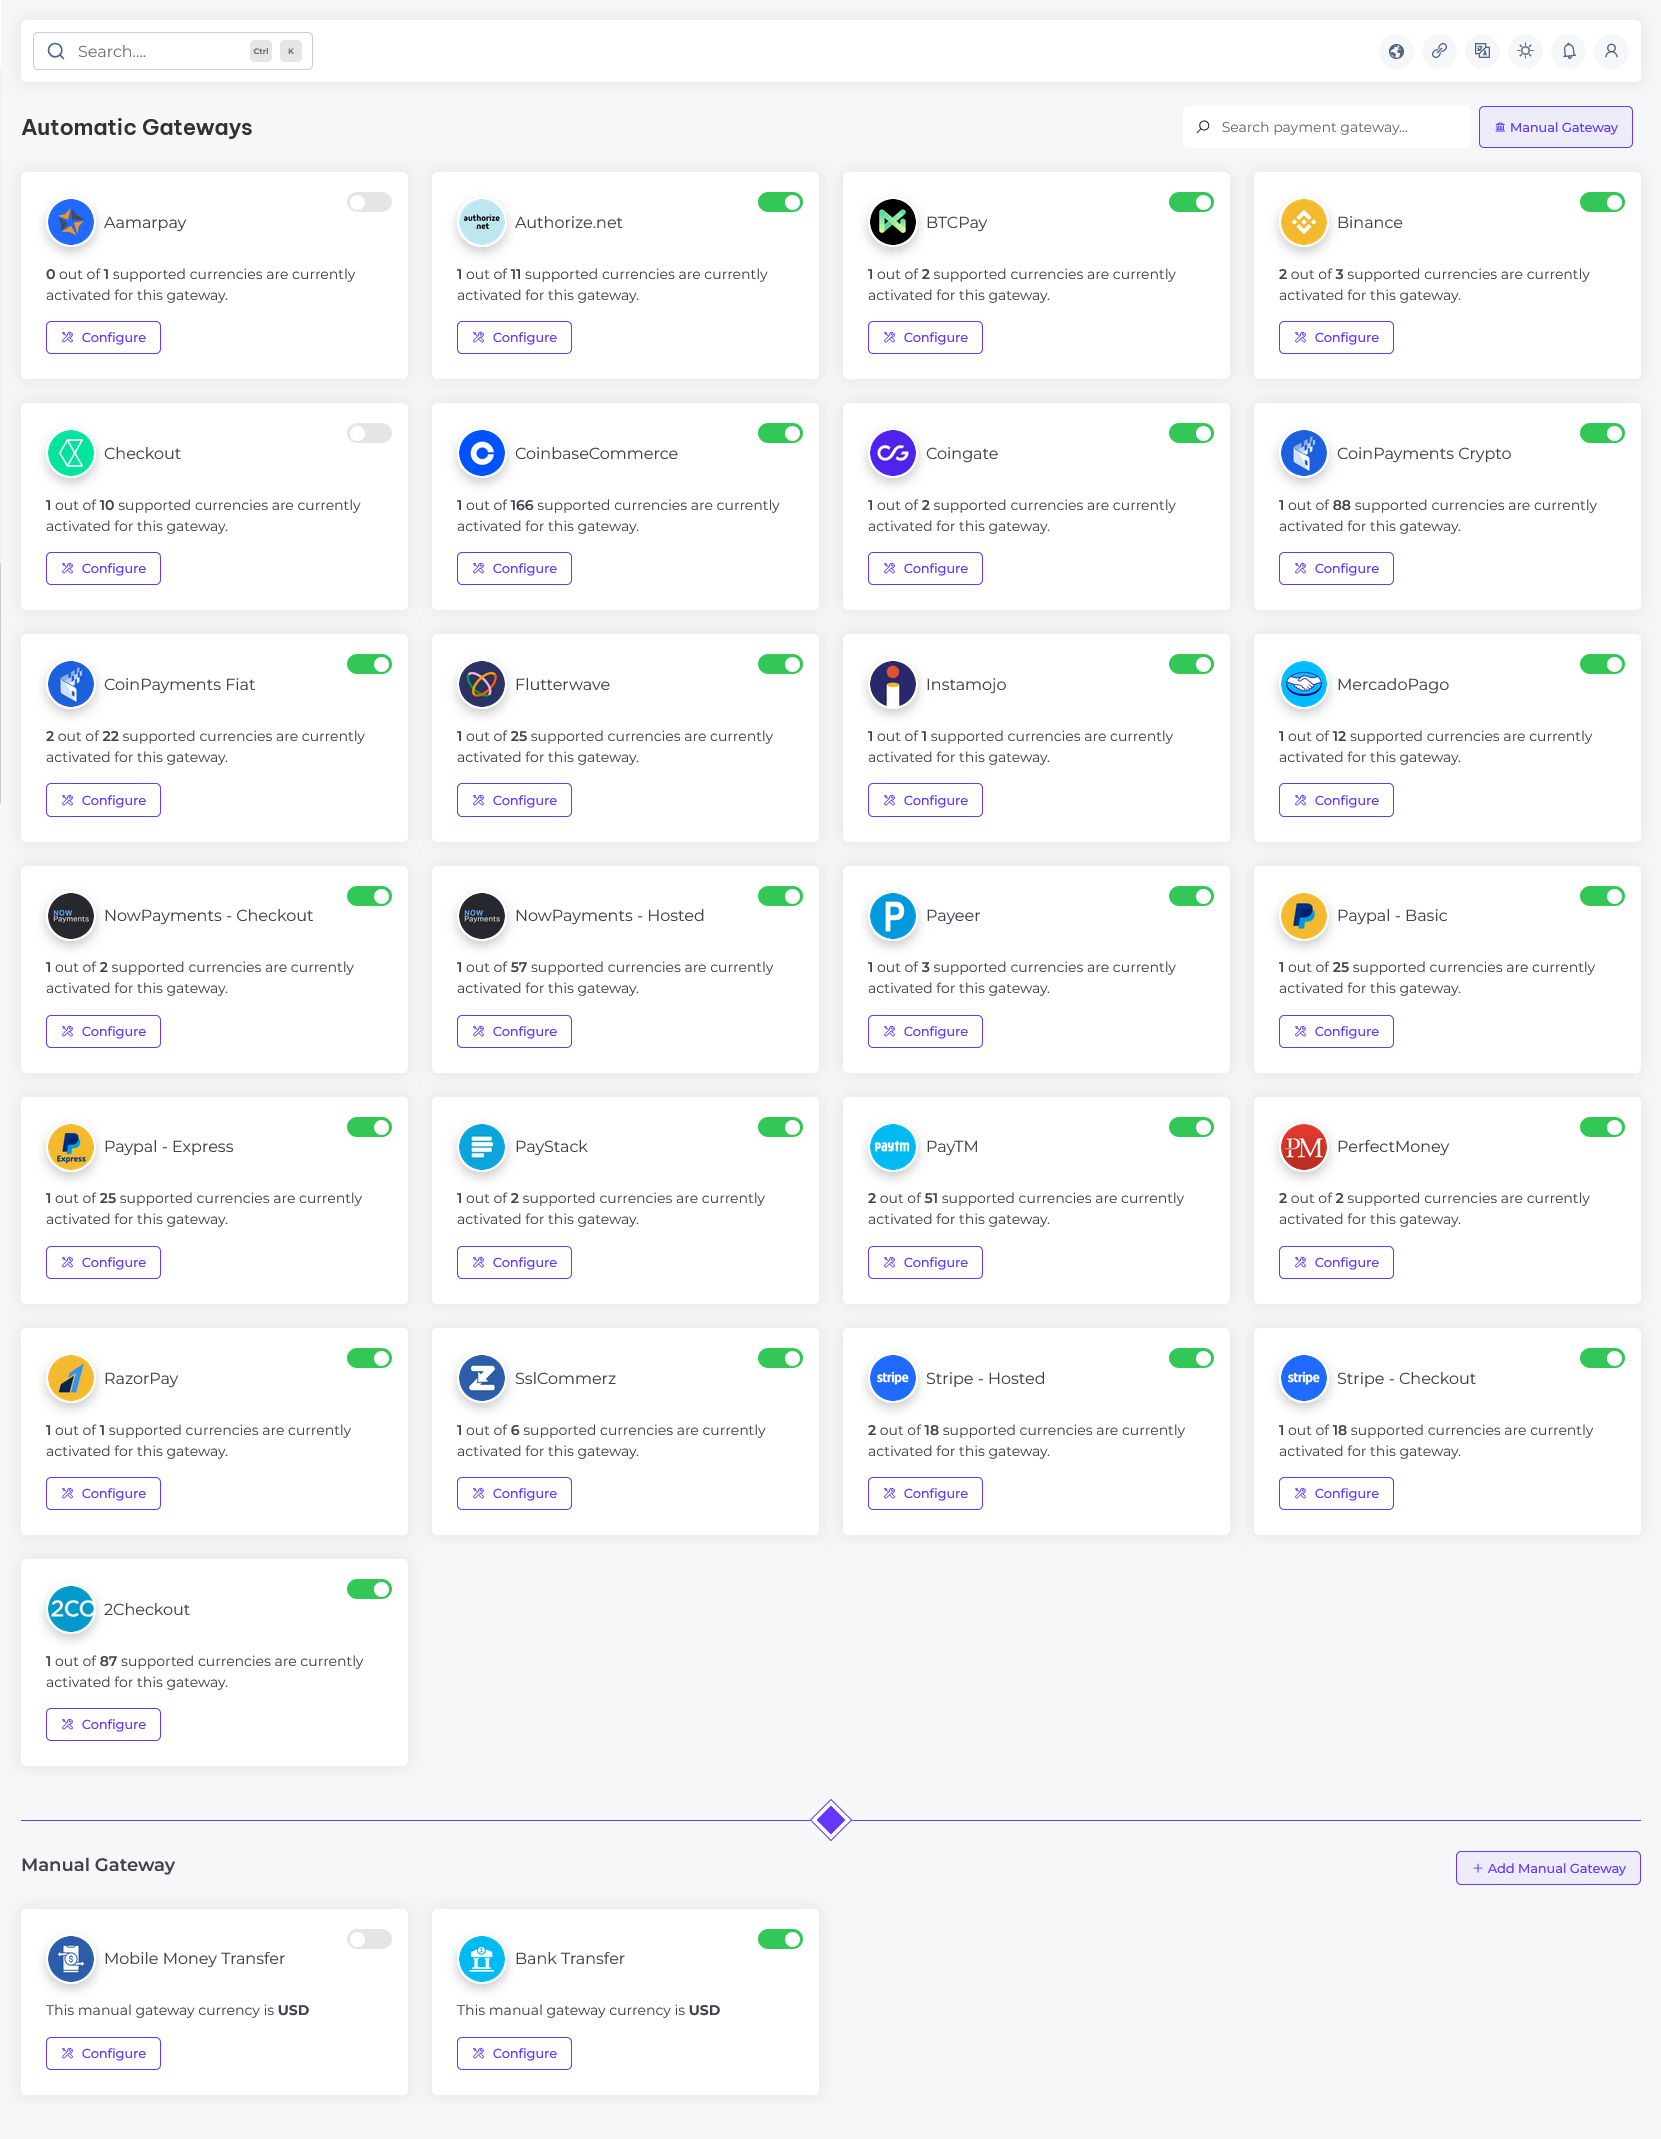
In the payment gateway section, you can configure and manage both automatic and manual payment gateways. This includes setting up preferred payment methods, ensuring secure transactions, and offering flexibility in payment options for a seamless user experience
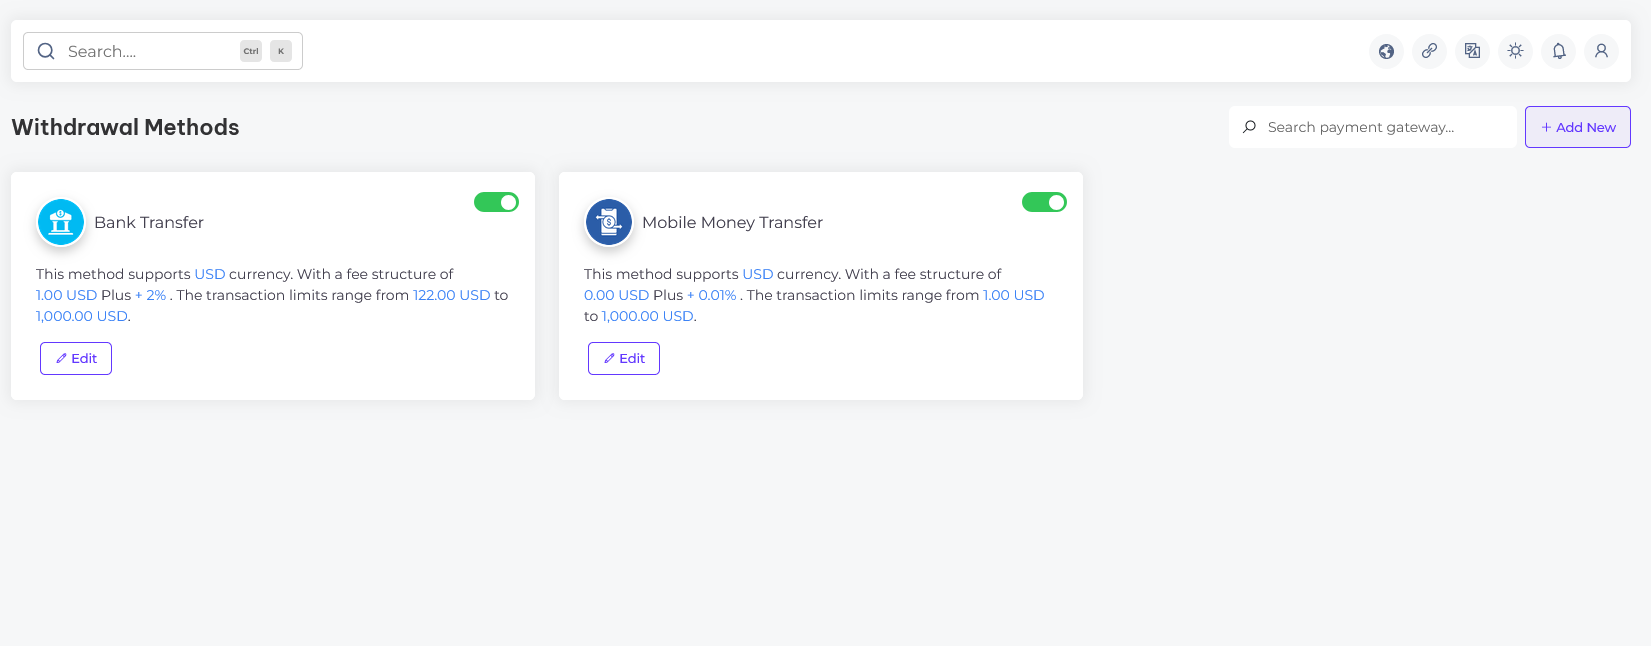
Withdrawal Methods
Withdrawal methods overview
In the withdrawal methods section, you can set up and manage available options for users to withdraw funds. This includes configuring various withdrawal methods, defining limits, and ensuring secure processing to provide a smooth and reliable withdrawal experience
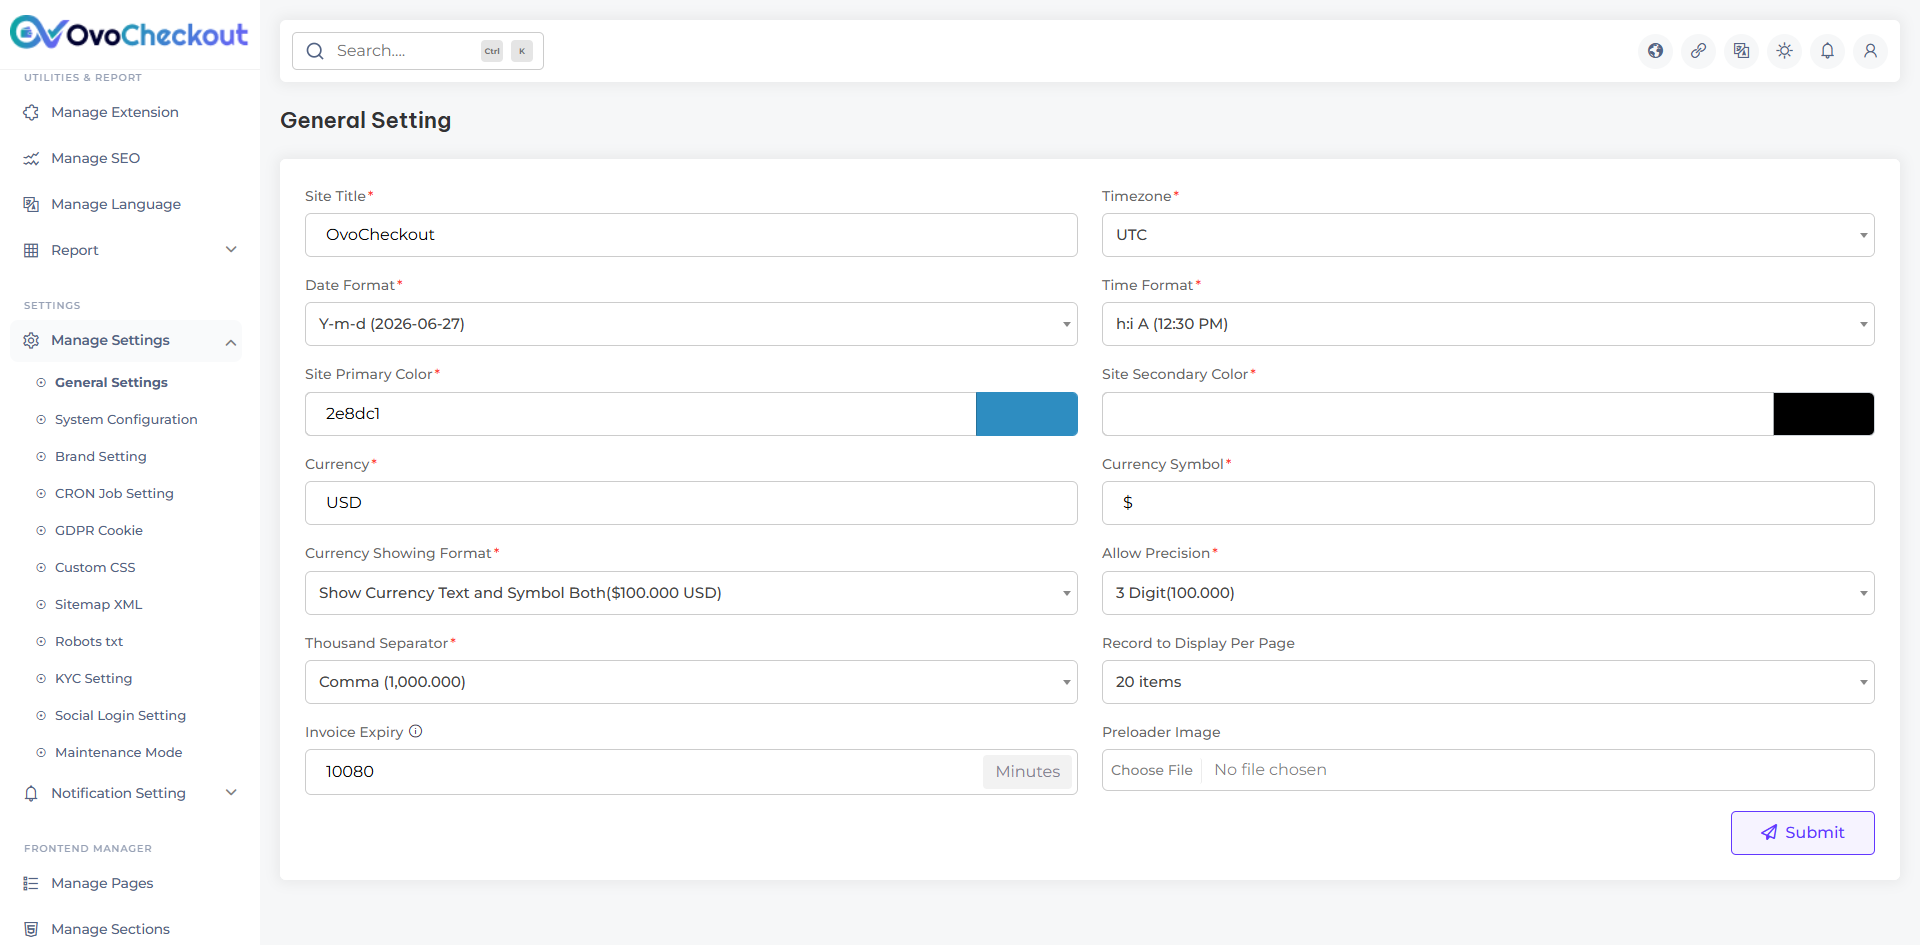
General Setting
General settings overview
In the general settings section, you can configure the foundational details of your website. This includes setting the site title, timezone, date and time format, site primary and secondary colors, currency, currency symbol, display format, precision settings, thousand separator, records displayed per page, and other essential elements that define your site’s identity.
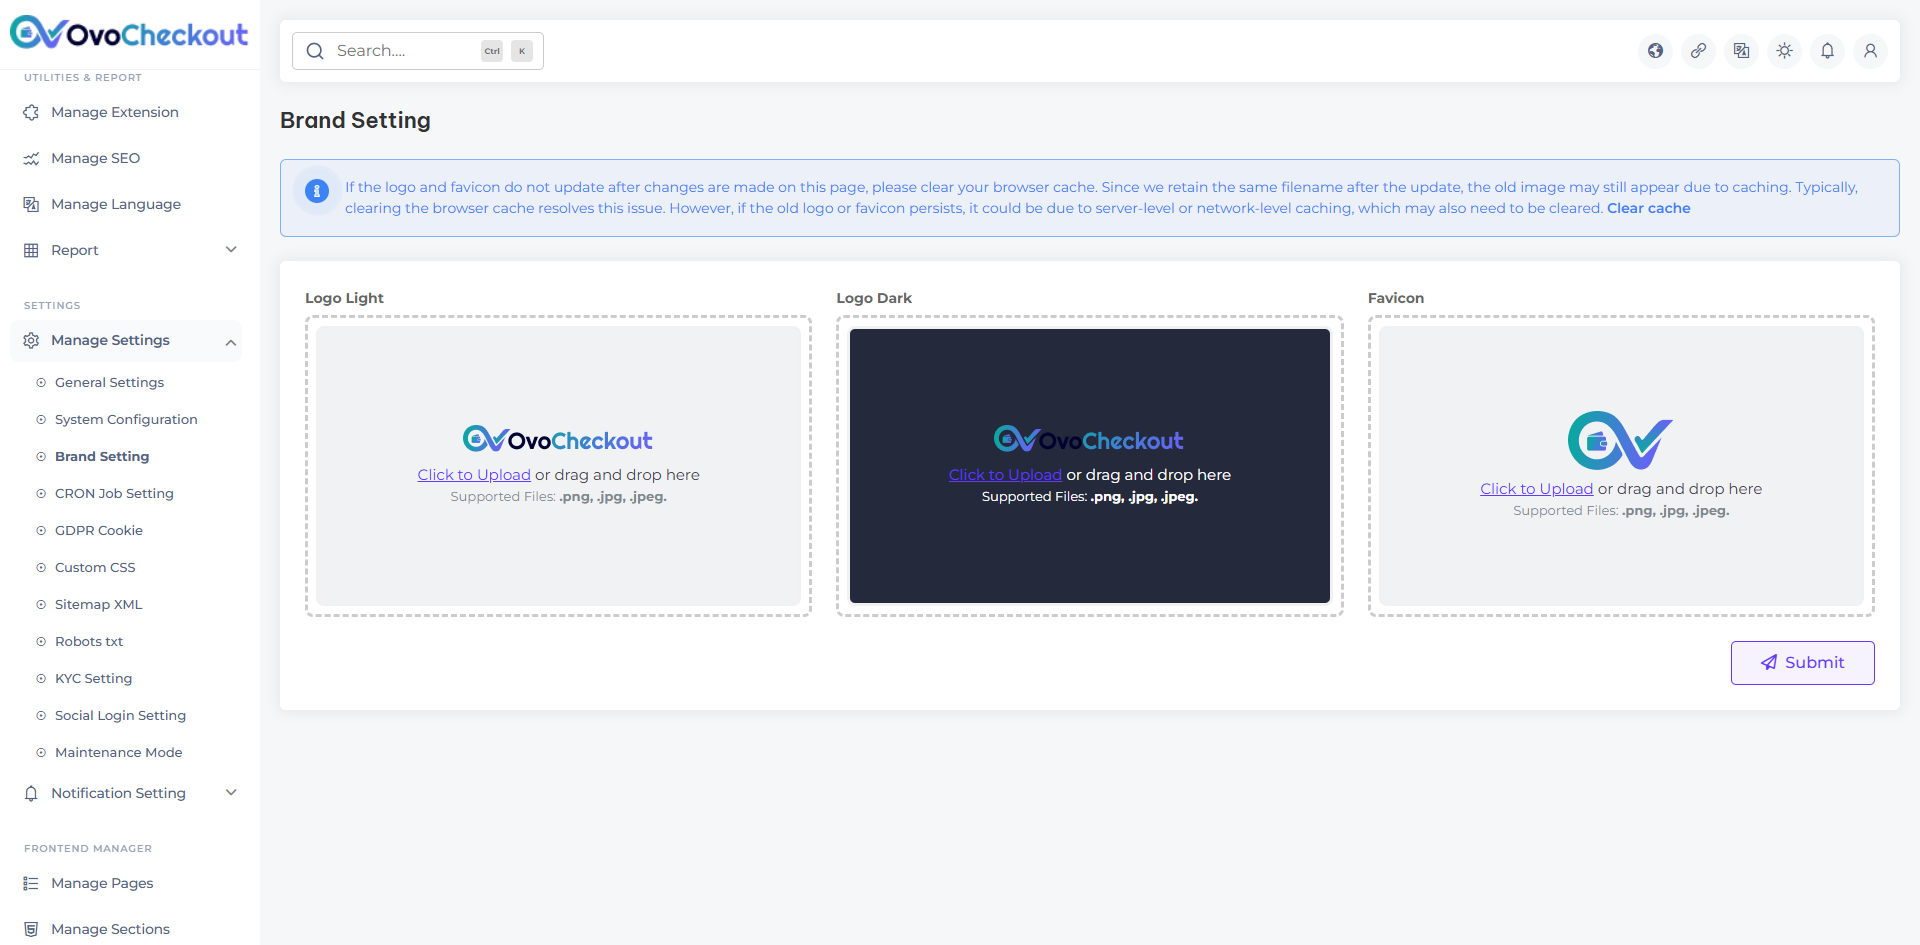
Brand Setting
Brand settings overview
In the brand settings section, you can establish the core branding elements of your website. This includes uploading your logo in both dark and light variations, setting a site favicon, and configuring other essential elements that define your site’s unique identity.
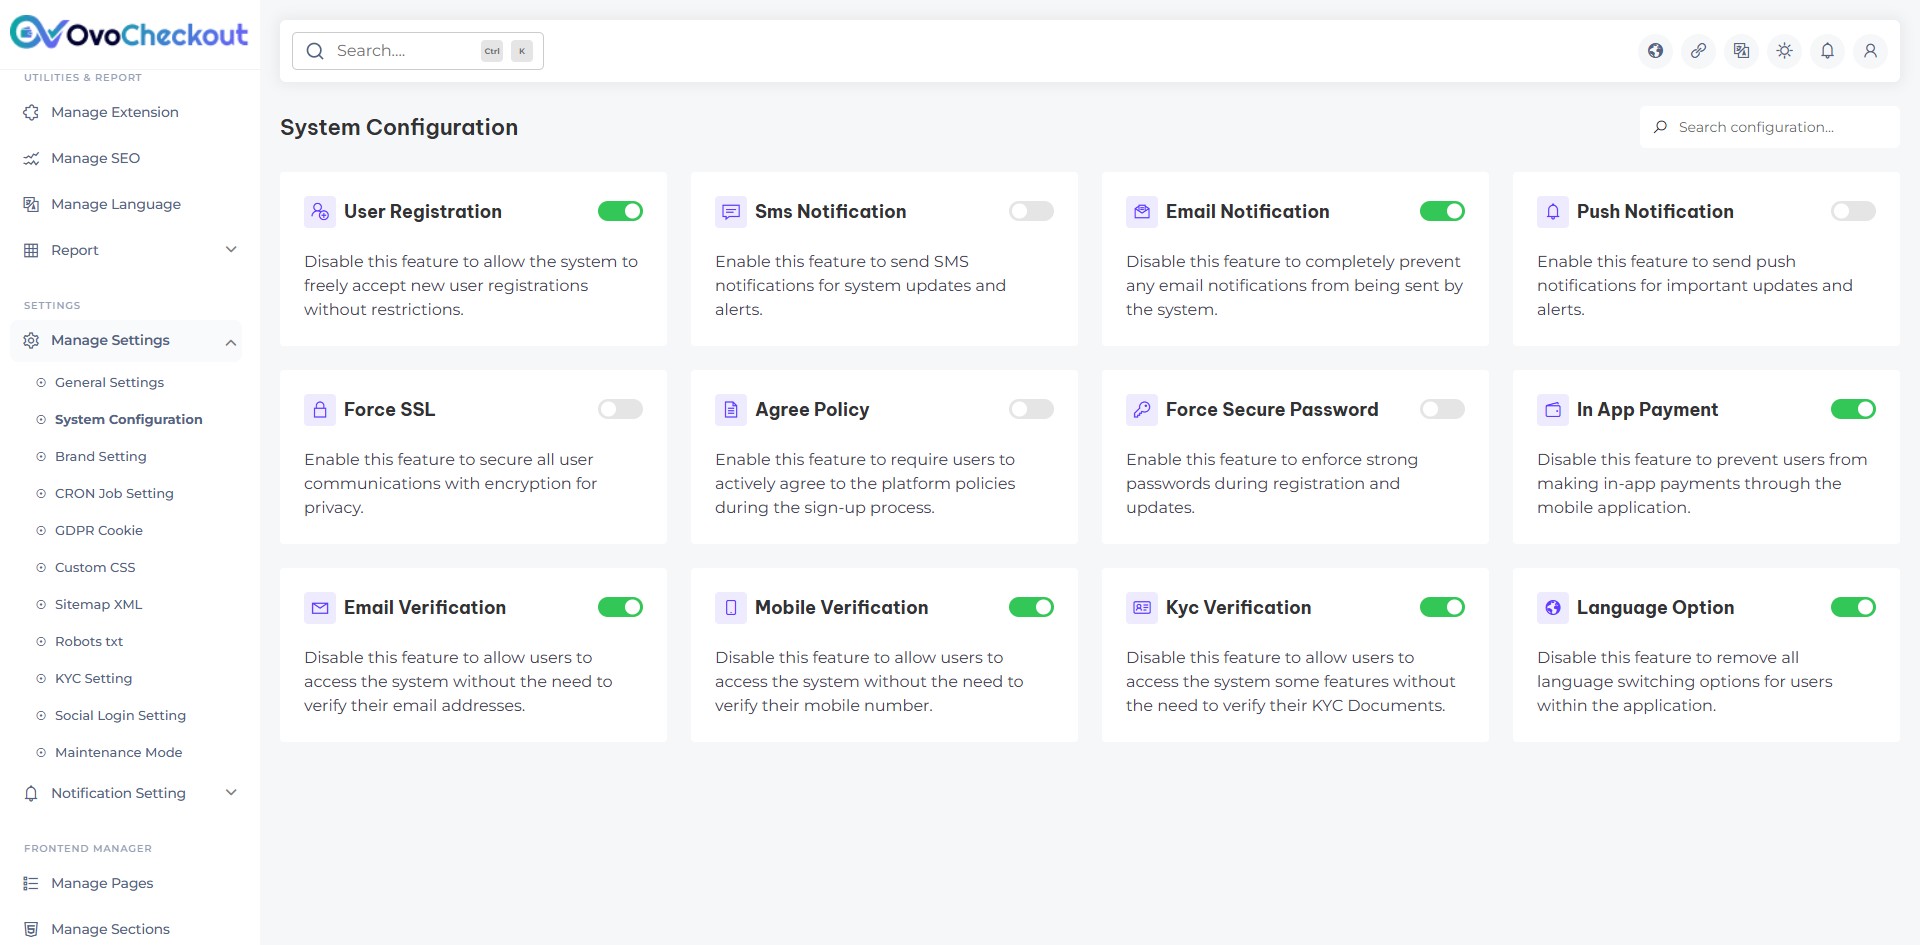
System Configuration
System configuration overview
In the system configuration section, you can manage critical settings that control your website’s functionality and performance. This includes configuring server preferences, email settings, sms settings, and other essential parameters to ensure smooth and efficient system operations.
Notification Setting
Notification setting overview
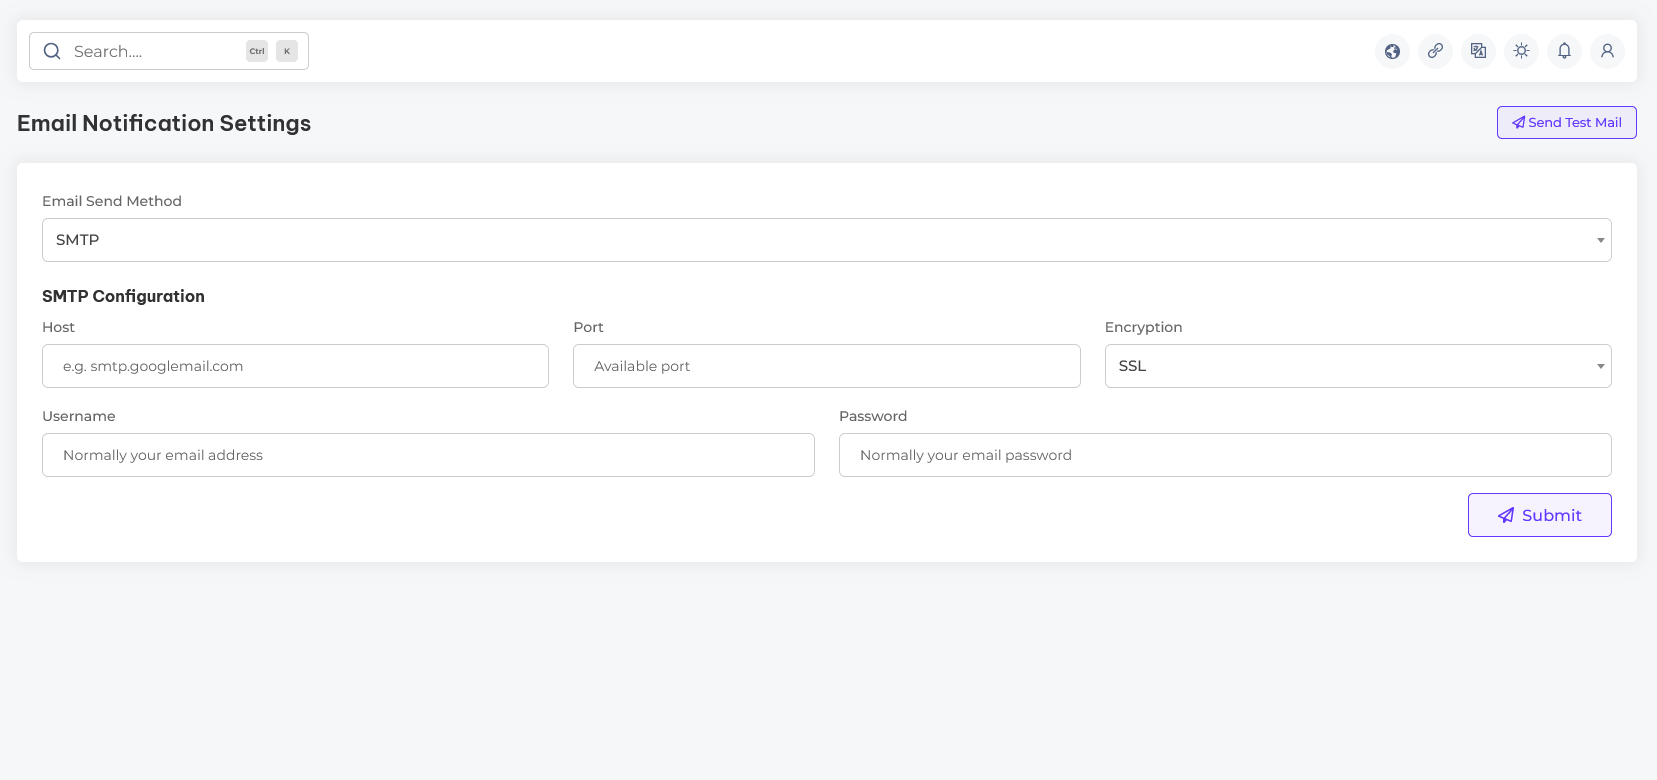
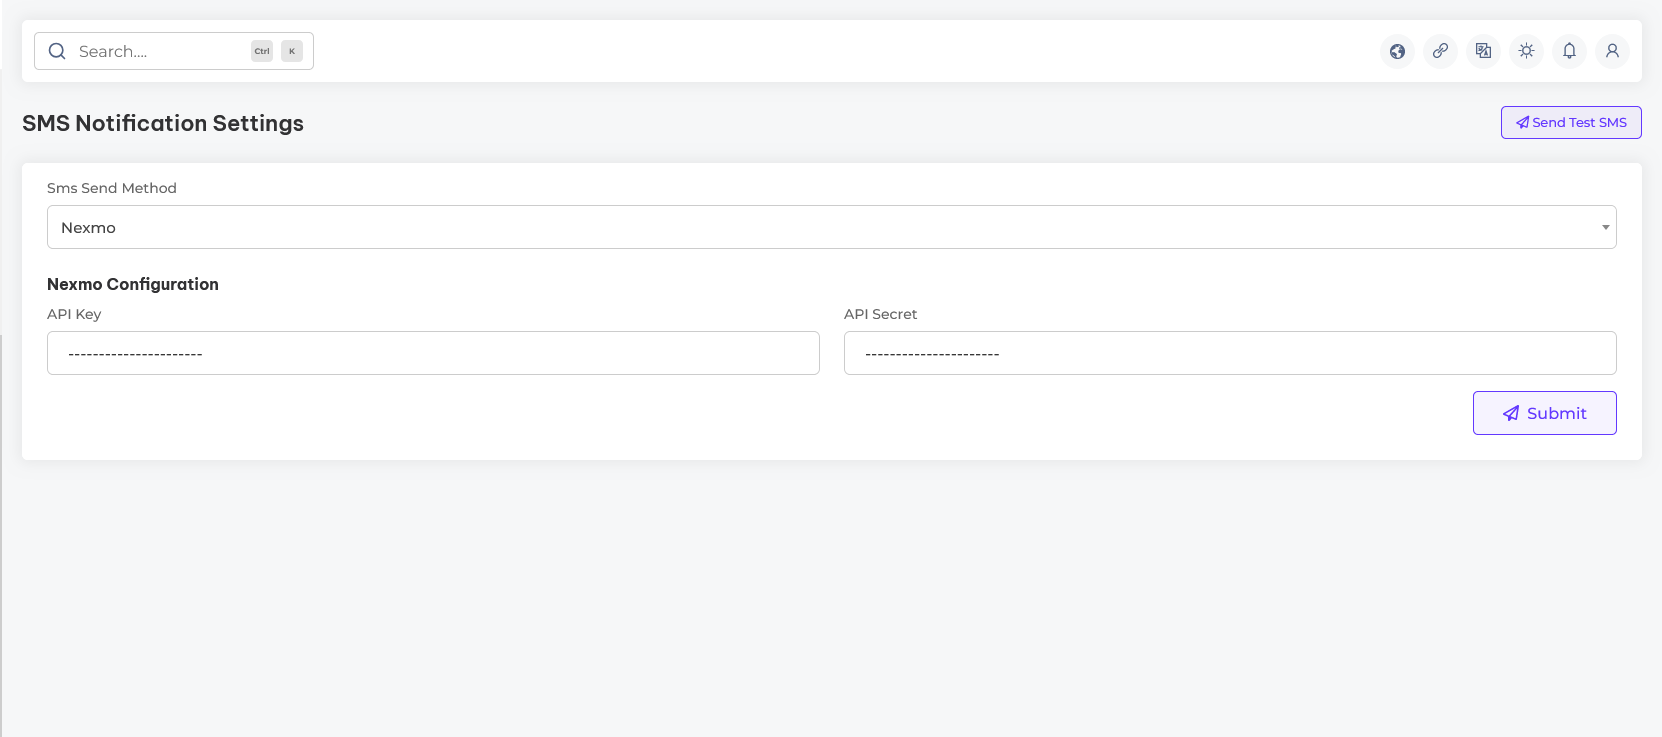
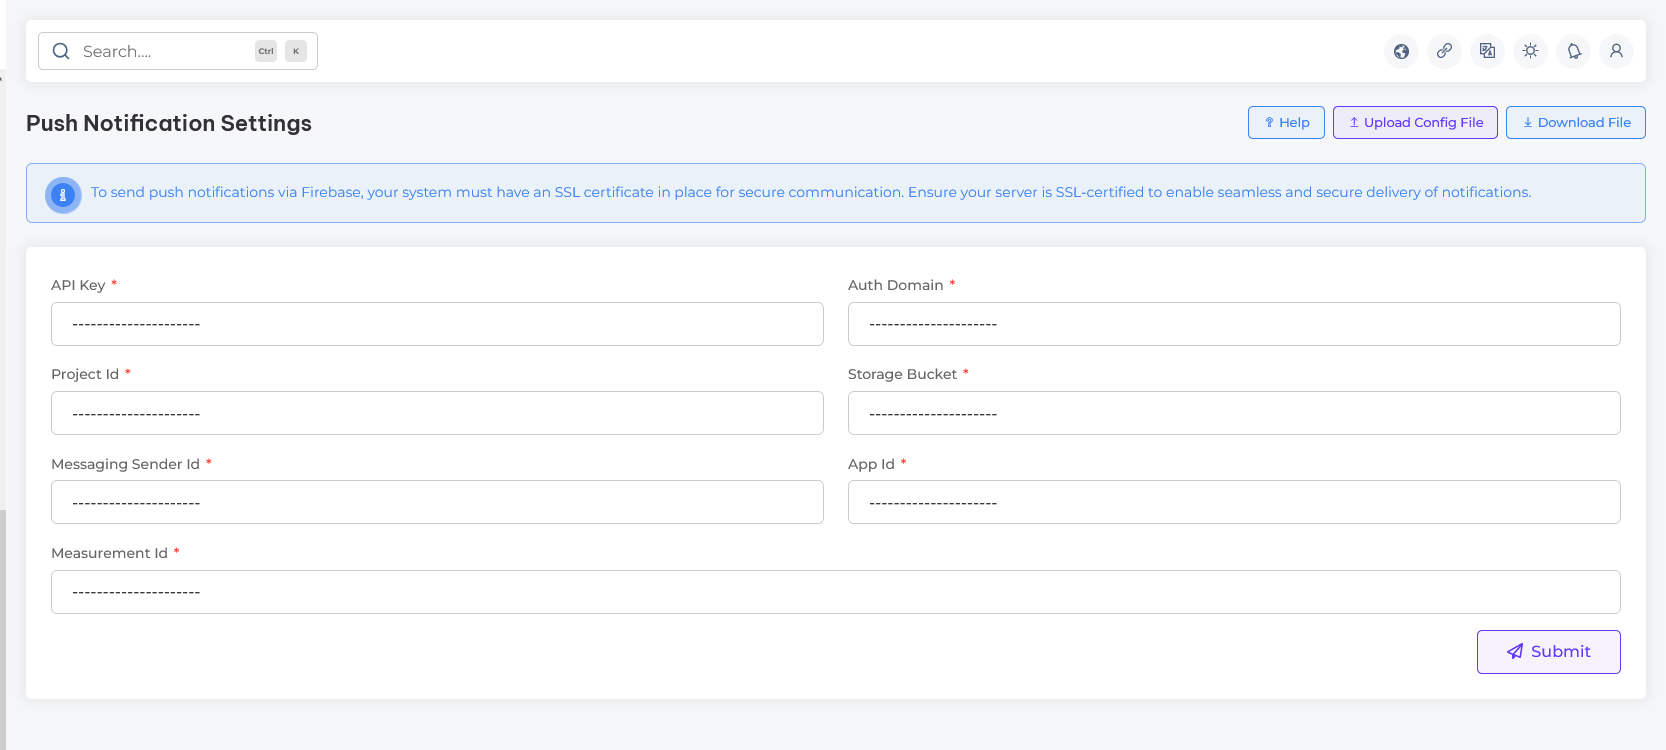
In the notification settings section, you can manage all communication channels for your system, including email notifications, SMS alerts, and push notifications. This setup allows you to keep users informed and engaged effectively across all platforms.
Cron Job Setup
Set up cron jobs to automate background tasks and ensure your platform functions smoothly.
Cron jobs are essential for processing queued tasks, scheduled commands, automated notifications, subscription updates, and more. Setting them up ensures that background operations continue to run without manual intervention.
Follow the steps:
- Access Your Hosting Control Panel: Log in to your hosting control panel (e.g., cPanel, Plesk, or VPS terminal access).
- Open the Cron Jobs Section: Find and click on the Cron Jobs option under Advanced or Tools section.
-
Create a New Cron Job: Choose a time interval
(recommended: every 1 minute) and go to the your admin dashboard and
copy following command.

- Save and Activate: Click the Save or Add New Cron Job button. Your scheduled tasks are now automated.
- Test It: Navigate to the Cron Job Settings section from your admin dashboard to monitor and verify if the cron jobs are running correctly by reviewing the execution logs.
Need help configuring cron jobs? Watch our quick tutorial to walk you through the process step by step.
Extensions
Overview of the platform integrated extensions
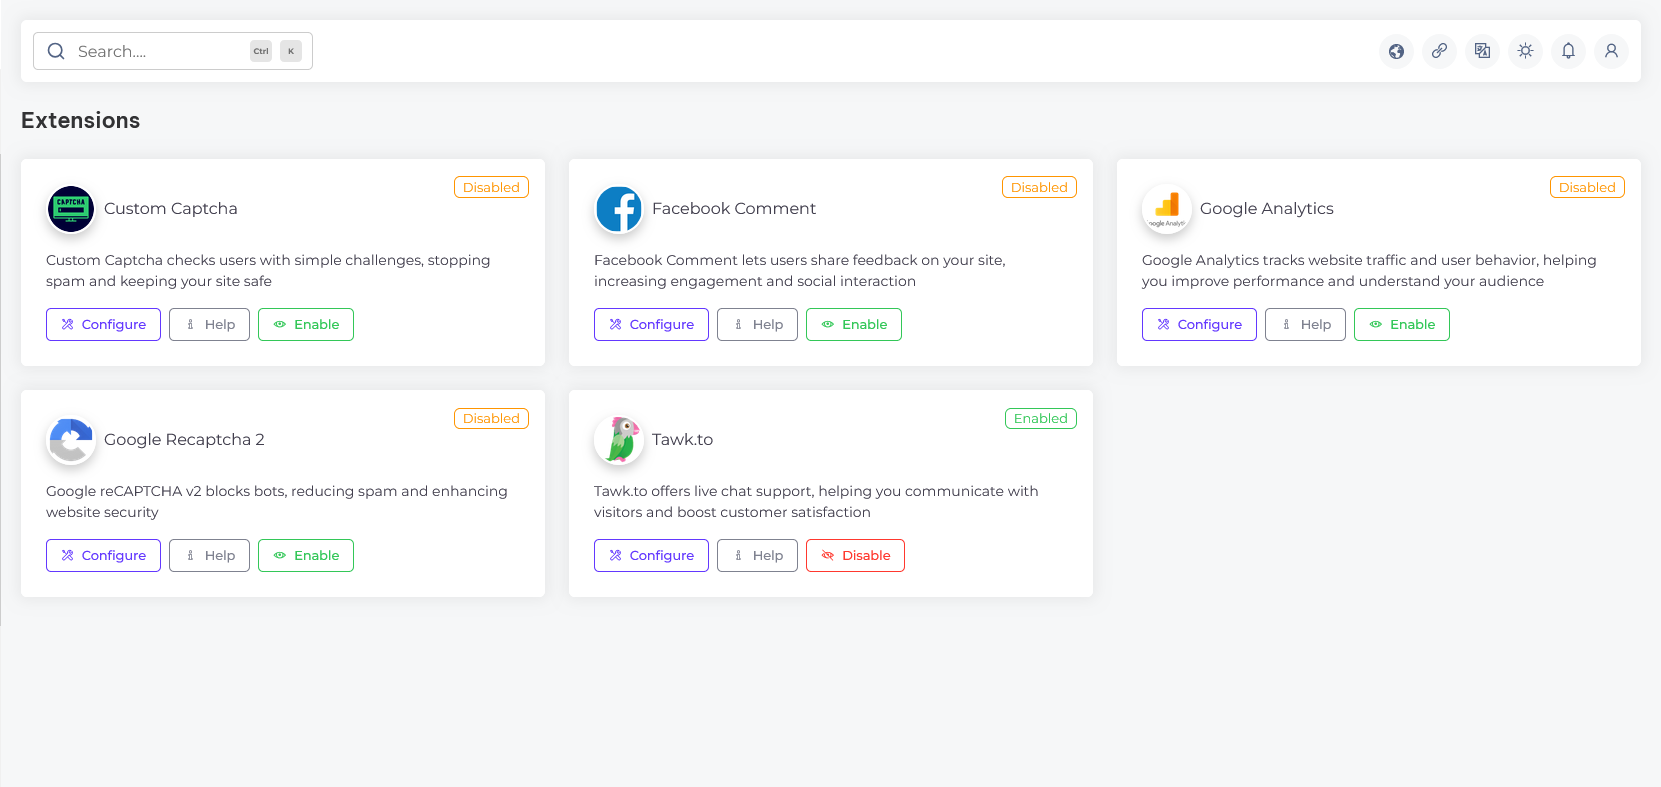
In the extensions section, you can manage additional features to enhance your website’s functionality. This includes integrating Custom Captcha, Facebook Comment, Google Analytics, Google reCAPTCHA 2, and Tawk.to, providing advanced security, user interaction, and analytics capabilities.
Manage SEO
Platform SEO customization overview
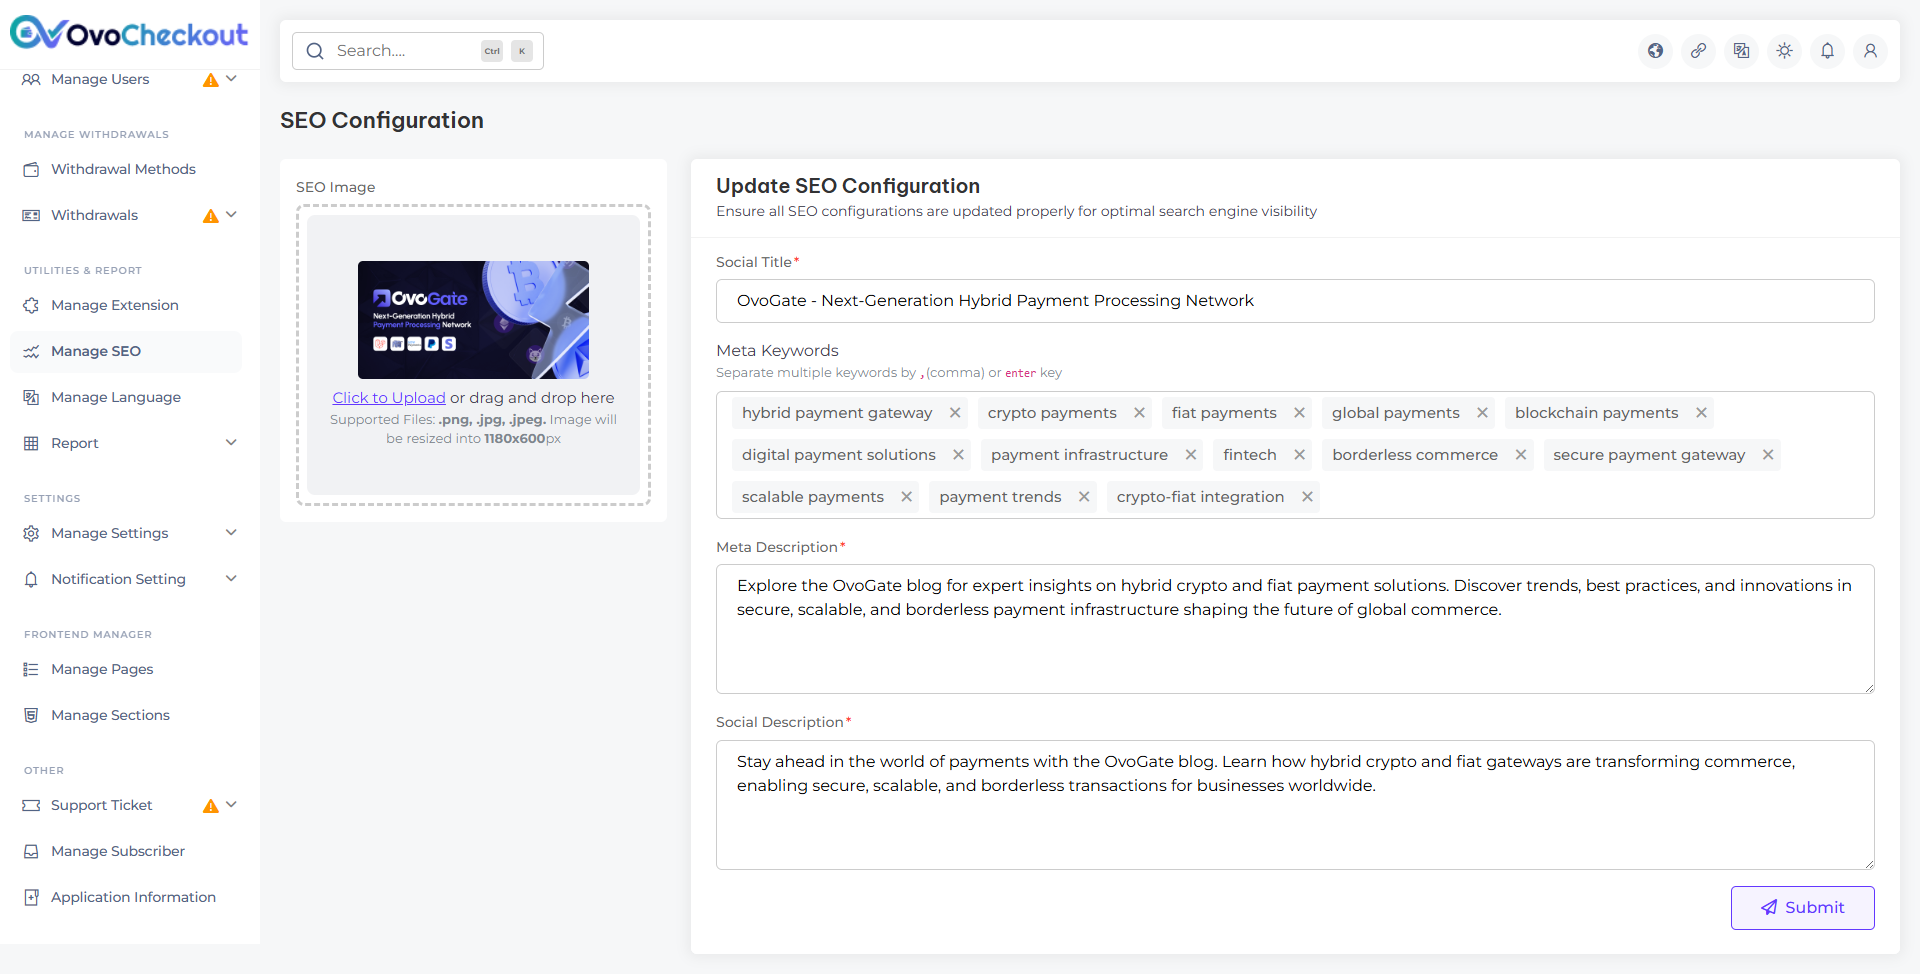
In the SEO configuration section, you can customize key elements to enhance your site's search engine presence. This includes setting the Social Title, Meta Keywords, Meta Description, and Social Description to improve visibility and engagement across search engines and social platforms
Localization
Overview of platform localization settings
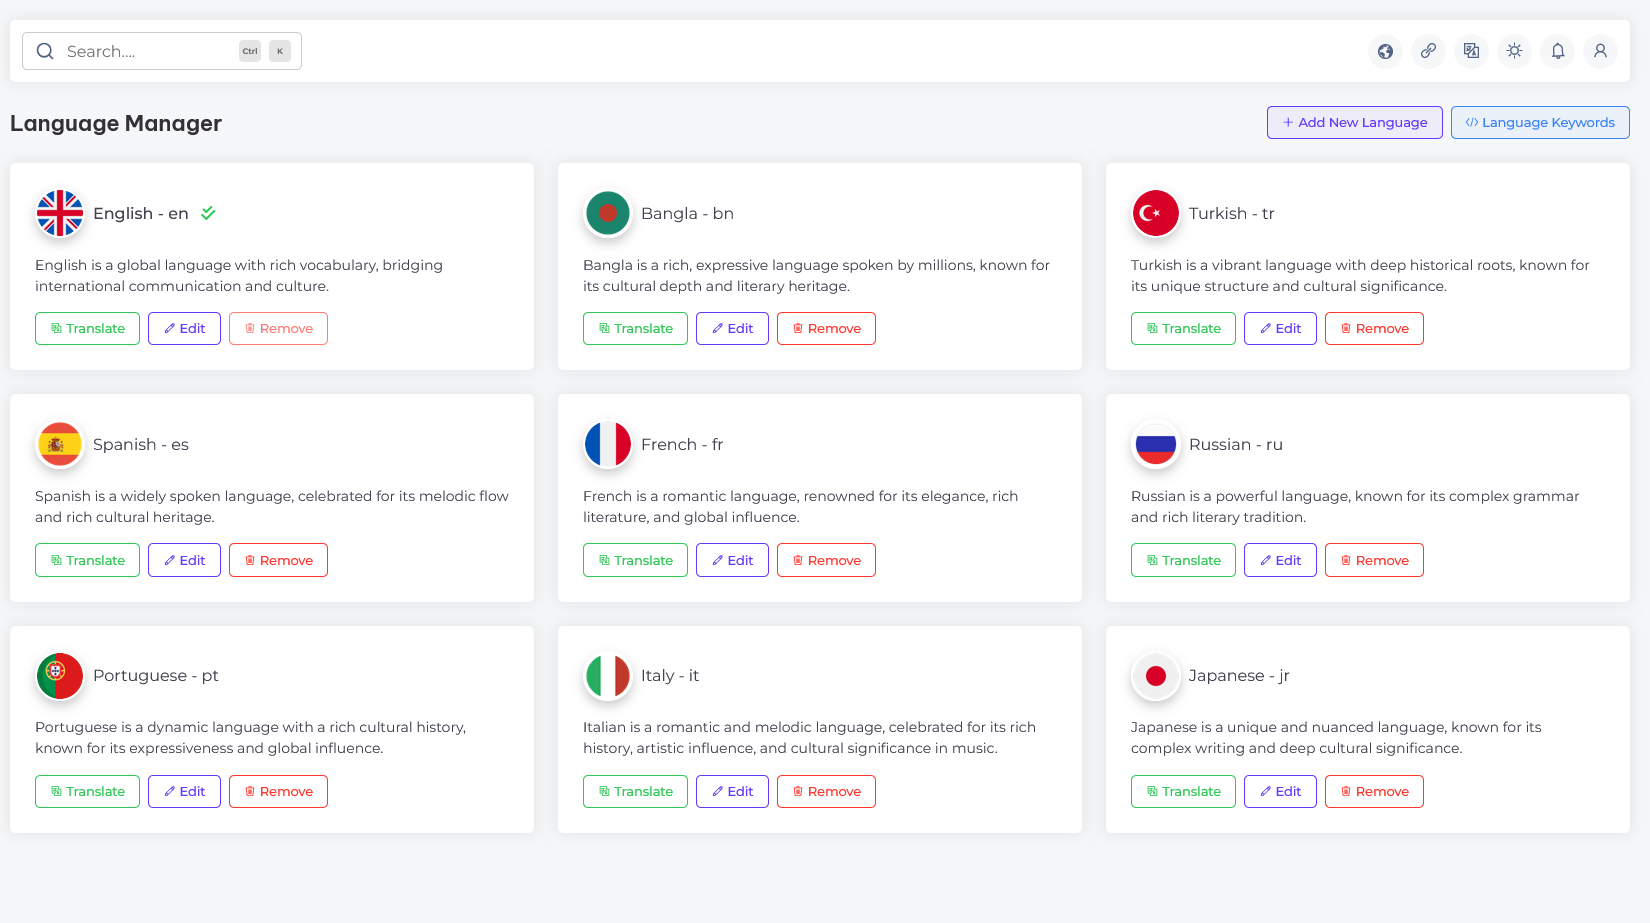
In the localization section, you can configure the language settings for your website. This allows you to tailor content and functionality to suit the preferences of your target audience, ensuring a personalized user experience across different locations
Database Backup
A simple, non-technical guide to manually backing up and restoring your OvoCheckout database using phpMyAdmin.
Your database holds all of your users, payments, invoices, and settings. We strongly recommend taking a backup before every update and on a regular schedule (for example, weekly). No coding or command line is required — the steps below use the phpMyAdmin tool included with almost every hosting control panel (cPanel, Plesk, or local XAMPP/WAMP).
Part A — Create a Backup (Export)
-
Log in to your hosting control panel (for example cPanel) and open
phpMyAdmin. On a local server, open
http://localhost/phpmyadmin. -
In the left-hand list, click your OvoCheckout database name (the same
name set in your
core/.envfile next toDB_DATABASE). - Click the Export tab at the top of the page.
- Leave the export method on Quick and keep the format as SQL, then click Go (or Export).
-
Your browser downloads a single
.sqlfile. Save it somewhere safe (and ideally a second copy in cloud storage). Naming it with the date, e.g.ovocheckout-backup-2026-07-23.sql, makes it easy to find later.
Tip: Also keep a copy of your uploaded files
(the assets/ and core/storage/ folders)
together with the database backup, so images and receipts can be
restored as well.
Part B — Restore a Backup (Import)
- Open phpMyAdmin and select the database you want to restore into. For a clean restore, first select all existing tables and choose Drop (delete) them, or create a fresh empty database.
- Click the Import tab at the top.
-
Click Choose File, select your saved
.sqlbackup file, then click Go. -
Wait for the success message. Your data is now restored. If you moved
to a new server, make sure
core/.envpoints to the correct database name, username, and password.
Large databases: if the import fails because the
file is too big, either compress the export as
.zip/.gz in the Export step, or ask your
hosting provider to increase the
upload_max_filesize and
post_max_size limits. Never edit the
.sql file by hand.
API Integration
Integrate OvoCheckout into external applications, ecommerce websites, and custom platforms.
OvoCheckout is designed as a developer-friendly payment processor. Using our RESTful API endpoints, you can connect external stores (like WooCommerce, WHMCS, custom PHP, Node.js, or Python apps) to process fiat and cryptocurrency payments securely.
1. API Credentials & Authentication
All requests sent to the OvoCheckout API must be authenticated. You must obtain your credentials and authorize your server's IP address:
-
Get API Credentials: Log in to your OvoCheckout User
Dashboard and navigate to Developer Tools to obtain
your unique
client-idandclient-secret. -
Headers: Include
client-idandclient-secretinside the headers of every HTTP request. -
IP Whitelisting (Crucial Security): For extra security,
OvoCheckout enforces server-to-server IP validation. You must add your
external website server's public IP address to the IP
Whitelist in the dashboard. Requests from an IP that is not
on the list are rejected with HTTP
401, remarkUnauthorizedand the message "Your ip address is not valid".
2. Base API URL
All endpoints use the following base path:
https://yourdomain.com/api
3. Main API Endpoints
Below is an overview of the core developer endpoints:
-
Check Connection:
GET /api- Send a ping request to verify if the API is working. Returns apongsuccess message. -
Retrieve Supported Currencies:
GET /api/supported-currencies- Returns active fiat and crypto currencies configured in your payment system. -
Initiate Checkout / Create Invoice:
POST /api/payment-initiate- Main endpoint to create a payment request.
Required POST fields:amount,currency_code,merchant_trx(unique reference),success_url,failed_url,ipn_url,description.
Returns: Invoice details and apayment_link. You should redirect your buyer to thispayment_linkto let them complete their payment on the checkout page. -
Verify Invoice Status:
GET /api/invoice-status/{invoice_id}- Check if an invoice is paid, unpaid, partially paid, or expired.
4. Instant Payment Notification (IPN) Webhooks
When a payment is successfully completed, the platform sends a secure,
server-to-server HTTP POST request to the ipn_url specified
during transaction initiation.
Ensure your IPN handler endpoint excludes CSRF token verification,
as this is a server-to-server call. Always check and match the
merchant_trx against your database to avoid spoofing.
Sample IPN POST JSON Payload:
{
    "status": "success",
    "payment_status": "success",
    "invoice_status": "paid",
    "type": "crypto",
    "name": "Customer Name",
    "email": "[email protected]",
    "data": {
        "invoice_id": "INV-XYZ123",
        "trx": "TX-ABC-123456",
        "merchant_trx": "ORDER_9988",
        "amount": "50.00",
        "method": "PayPal",
        "currency": {
            "code": "USD",
            "name": "US Dollar"
        },
        "date": "2026-07-18 12:00:00"
    }
}
5. Interactive API Documentation Guide
Your OvoCheckout installation comes with a built-in, fully interactive
developer documentation page! Once installed, you can access detailed
endpoint testing, cURL request schemas, validation attributes, and sample
responses directly on your server at:
https://yourdomain.com/api-documentation
(replace
yourdomain.com with your own domain - this page is served by
your own installation, so there is nothing to visit until you have
installed OvoCheckout.)
6. Common API Response & Error Codes
Every API response returns a JSON body containing a
remark (machine-readable code), a status
(success or error), a message
array, and an optional data object. Use the
remark value and the HTTP status code together to handle
responses in your integration. The most common codes are listed below.
| HTTP Status | Remark | Meaning / How to resolve |
|---|---|---|
| 200 | success / pong |
Request completed successfully. The requested data (if any) is returned in the data object. |
| 401 | Unauthorized |
Missing or invalid client-id/client-secret header, invalid credentials, or the requesting IP is not whitelisted. Verify your credentials and add your server IP to the whitelist in the User Dashboard. |
| 401 | incomplete_merchant |
The merchant company profile (name, logo, email, address) is incomplete. Complete your company profile before calling protected endpoints. |
| 403 | restricted |
Access to the requested resource or action is restricted for the current account. |
| 404 | invoice_not_found |
No invoice matches the supplied invoice_id for your account. |
| 404 | payment_not_found |
No payment record matches the supplied identifier for your account. |
| 404 | not_found |
The requested route or resource does not exist. Check the endpoint URL and method. |
| 200 (status: error) | validation_error |
One or more required POST fields are missing or invalid. The message array lists each validation failure. |
| 200 (status: error) | invalid_currency |
The supplied currency_code is not configured, or no active payment gateway is available for that currency. |
| 200 (status: error) | invalid_amount |
The amount is below the minimum or above the maximum limit allowed for the selected currency. |
| 200 (status: error) | duplicate_merchant_trx |
The supplied merchant_trx reference has already been used. Send a unique reference for every payment. |
| 200 (status: error) | invalid_provider |
There is no active API payment provider configured to process the request. Enable and configure a provider in the admin panel. |
| 200 (status: error) | error |
The payment provider failed to create the payment. The message array contains the provider's reason. |
| 200 (status: error) | exception |
An unhandled server-side error occurred. The message array carries the exception text. If you see this repeatedly, check core/storage/logs/laravel.log on your server. |
| 500 / 502 / 503 | (no JSON body) | The error came from your web server or PHP, not from OvoCheckout, so the body is an HTML error page rather than JSON. Usual causes are a missing core/vendor folder (run composer install), wrong file permissions, or an exhausted PHP memory limit. Always guard your JSON parsing against a non-JSON body. |
Important: most business errors are returned with
HTTP 200 and "status": "error" in the
body - not with a 4xx code. Always branch on the
status field first and treat the HTTP code as a
transport-level signal only. Code that checks only for HTTP 200
will read failures as successes.
A typical error body looks like this - note that
message is a flat array of strings, so join it or show the
first element:
{
    "remark": "validation_error",
    "status": "error",
    "message": [
        "The amount field is required.",
        "The currency code field is required."
    ]
}
And an authentication failure, which does carry an HTTP status code:
{
    "remark": "Unauthorized",
    "status": "error",
    "message": [
        "Your ip address is not valid"
    ]
}
Building a mobile app? See the Troubleshooting API Responses section of the mobile app documentation for app-side handling of these responses.
Troubleshooting FAQ
Solutions for common installation and configuration issues.
Refer to this guide to resolve common issues encountered during installation, database setup, or server configuration.
Q1: I get a 500 Internal Server Error or a blank white screen during installation. How do I fix it?
This error indicates a server configuration issue. Follow these steps to resolve it:
- Verify that your server meets all requirements, especially the PHP version (must be PHP 8.3 or above).
- Ensure the
core/storageandcore/bootstrap/cachefolders are fully writable by the web server (permissions set to775or755). - Make sure that the
.envfile exists in thecore/folder and database configuration parameters are set up correctly. - Check the error logs in
core/storage/logs/laravel.logfor specific details.
Q2: I get a "Database connection error" (SQLSTATE[HY000] [2002]...) during setup. What should I check?
This error means Laravel cannot establish connection to the MySQL database.
- Open
core/.envand check thatDB_HOST,DB_PORT,DB_DATABASE,DB_USERNAME, andDB_PASSWORDmatch your database credentials exactly. - Verify that the MySQL server is running and accepting local
connections (use
127.0.0.1instead oflocalhostinDB_HOSTif your hosting panel requires it). - Ensure the database user has been granted full privileges (ALL PRIVILEGES) on the designated database.
Q3: The home page loads correctly, but all other pages / routes return a "404 Not Found" error. How do I fix this?
This indicates that URL rewriting (routing) is not working on your web server.
- On Apache: Verify that the
.htaccessfile is present in the main root directory (whereindex.phpis located) and that the Apachemod_rewritemodule is enabled. Ensure your server configuration permits overrides (AllowOverride All). - On Nginx: Ensure that your server block
configuration redirects all requests to the central
index.phpfile. Your location block should look like this:location / { try_files $uri $uri/ /index.php?$query_string; }
Q4: Why are images, logos, or user attachments not displaying on the site?
This is typically a file permission or upload directory path issue:
- Make sure your main
assets/directory and subfolders have appropriate read/write permissions (usually755for directories and644for files). - If your server environment restricts relative uploads, ensure
storage folders in
core/storage/app/public/are fully writable and readable.
Q5: The Cron Job is not working. How do I verify it?
To automate background processing, your cron must run successfully:
- Navigate to the Cron settings in cPanel/VPS and confirm you
added the correct URL path:
* * * * * curl -s https://yourdomain.com/cron - If calling PHP CLI directly, verify that the CLI PHP version matches the web server PHP version (PHP 8.3+).
Q6: Why are email notifications not being sent from the platform?
By default, PHP mail may be blocked on shared hostings. You should configure SMTP:
- Go to the Admin Panel -> Notification Setting -> Email Setting and select SMTP, SendGrid, Mailjet, or another driver.
- Enter your credentials, host, port, encryption (SSL/TLS), and click save. Use the "Send Test Mail" option to verify settings.
Information
Overview of application information and technologies
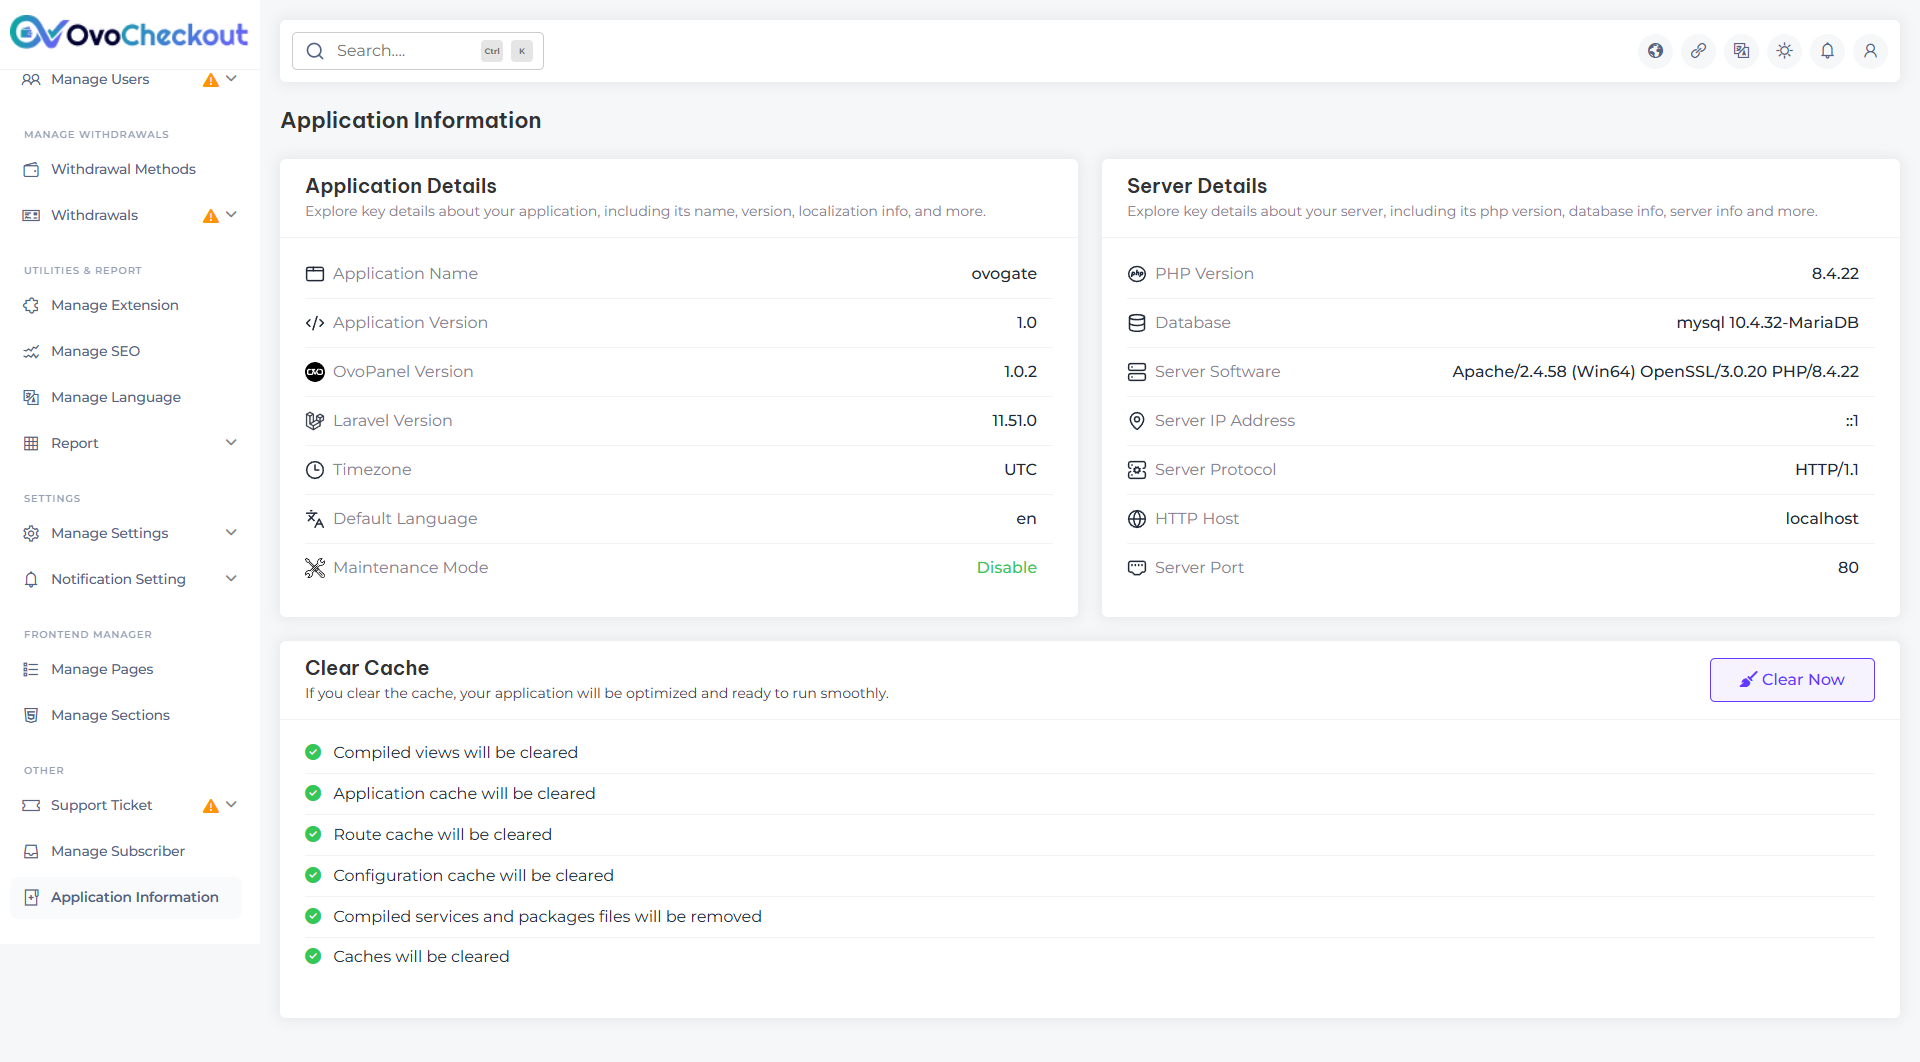
In the Overview of application information & technologies section, you can find key details about your application, including its name, version, and the technologies used. This section provides an insight into the technical foundation of your application, helping you manage and maintain its infrastructure effectively.
Support
How to get assistance
Thank you for purchasing our product! For any support or assistance, feel free to reach out to us via the provided email address. Our dedicated support team is available 24/7, ready to help with any questions, technical issues, or inquiries you may have. We are committed to providing prompt and reliable assistance to ensure a seamless experience with our product. Your satisfaction is our priority, and we are here to support you every step of the way.