Introduction
Overview of OvoWpp - Complete Cross Platform WhatsApp CRM and Marketing Tool | Web and Mobile App | SaaS
OvoWpp is a complete cross-platform SaaS-based WhatsApp CRM and marketing solution designed to help businesses connect, engage, and convert effortlessly. With powerful web and mobile apps, and a centralized admin panel for full control, OvoWpp makes it easy to manage customer communication and automate campaigns. Whether you're handling customer, sending bulk messages, or building a CRM & Marketing Tool, OvoWpp offers everything in one subscription-based platform — giving you all the tools to grow your brand through WhatsApp with the simplicity and scalability of SaaS.
This documentation provides a clear overview of the entire system, summarizing the core processes for easy understanding. The platform includes an intuitive admin panel and landing page, designed for seamless use without any coding expertise. It also integrates multiple automated online payment gateways, simplifying global transactions effortlessly.
Thank you for choosing OvoWpp If you have any questions not covered in this documentation, please feel free to reach out to us via email. We’re here to assist and will respond as promptly as possible. Thank you again!
Prerequisites
All the prerequisites before starting with OvoWpp.
To use OvoWpp effectively, each subscribed user must have a verified WhatsApp Business Account with API access via Meta’s platform. Additionally platform need the, set up Firebase in the Firebase Console, enabling required services and downloading the configuration files. For real-time features, create a Pusher account, generate app credentials, and configure them in your app for seamless integration.
- Pusher: Pusher is a reliable service for implementing real-time features such as live updates and instant messaging in OvoWpp. To set it up, create an account on the Pusher Dashboard and generate your app credentials. You’ll need to configure these credentials in your application to establish a seamless connection. Pusher provides easy-to-follow Setup Documentation to guide you through the integration process. Ensure you enable the required channels and events for optimal functionality.
- Google Firebase: Firebase is a powerful backend platform provided by Google, essential for integrating features such as push notifications into OvoWpp. To get started, you need to set up your project in the Firebase Console and configure it with your app. The setup involves creating a Firebase project, enabling necessary services, and downloading the configuration files to integrate with the app. For more info visit the Google Firebase
Flutter App Installation Requirements
Below are the requirements needed to set up and install a Flutter app.
The following installation requirements specify the essential setup for developing and running Flutter apps smoothly. Meeting these requirements helps ensure optimal performance and compatibility. Please confirm your environment meets these prerequisites before proceeding.
- Flutter SDK (latest stable version-> 3.41.9+)
- Dart SDK (bundled with Flutter SDK-> 3.11.5+)
- Android Studio (for Android development-> Panda | Latest)
- Xcode (for iOS development-> 18+)
- Android Studio | VS Code (Recommended IDEs)
- Java JDK 19 or later (for Android builds)
- Internet connection (for package and plugin downloads)
- Sufficient storage (at least 10GB free space)
- Minimum 8GB RAM (16GB recommended)
Installation
Application installation process
Setting up Flutter and Android Studio is straightforward and can be completed in a few simple steps. Our setup guide is designed to make the process seamless and efficient, ensuring a smooth start for your development environment.
Installation Steps:
- Download and Install Flutter: Visit the official Flutter installation page for the latest version and platform-specific setup instructions. Follow the guidelines for your operating system (Windows, macOS, or Linux) to complete the installation.
- Set Up Android Studio: Android Studio is required for developing and running Flutter apps on Android. Visit the official Android Studio download page and install the latest version. During setup, ensure that you install the Android SDK and configure the necessary environment variables for Flutter development.
-
Verify Flutter Installation:
After installing both Flutter and Android Studio, open a terminal or
command prompt and run
flutter doctorto check if everything is set up correctly. This command will display any missing dependencies or configurations needed for development. - Connect a Device or Set Up an Emulator: Connect your Android device via USB or set up an Android emulator in Android Studio to test your app.
Folder Structure
Important details about the application folder structure
After installation, your project folder will contain essential directories and files necessary for the proper functioning of the Flutter application.
-
The
assetsfolder contains all essential assets such as images and fonts. This is the folder to use if you need to add or update any images or custom fonts. -
The
libfolder is the main directory for all Dart code in the application. It is typically organized into subfolders such ascorefor utility files and dependencies,datafor managing API calls and local data sources, andviewfor UI components and screens. -
The
main.dartfile is the entry point of the Flutter application where the app's root widget and initial setup are defined.
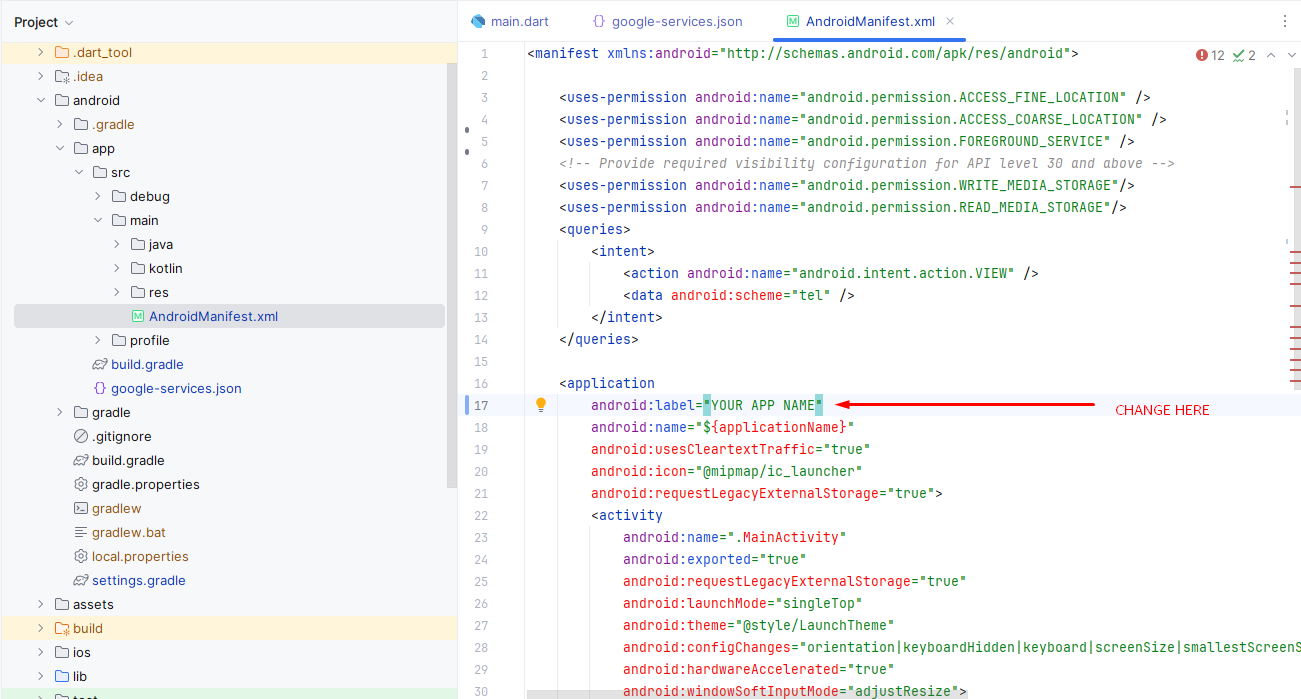
Change App Name
App name change overview
-
For Android:
- Open the Android project in Android Studio.
- Update the package name in
the `AndroidManifest.xml` file
located at
android/app/src/main/AndroidManifest.xml.
-
For iOS:
- Update the bundle
identifier in the `Info.plist` file located at
ios/Runner/Info.plist.
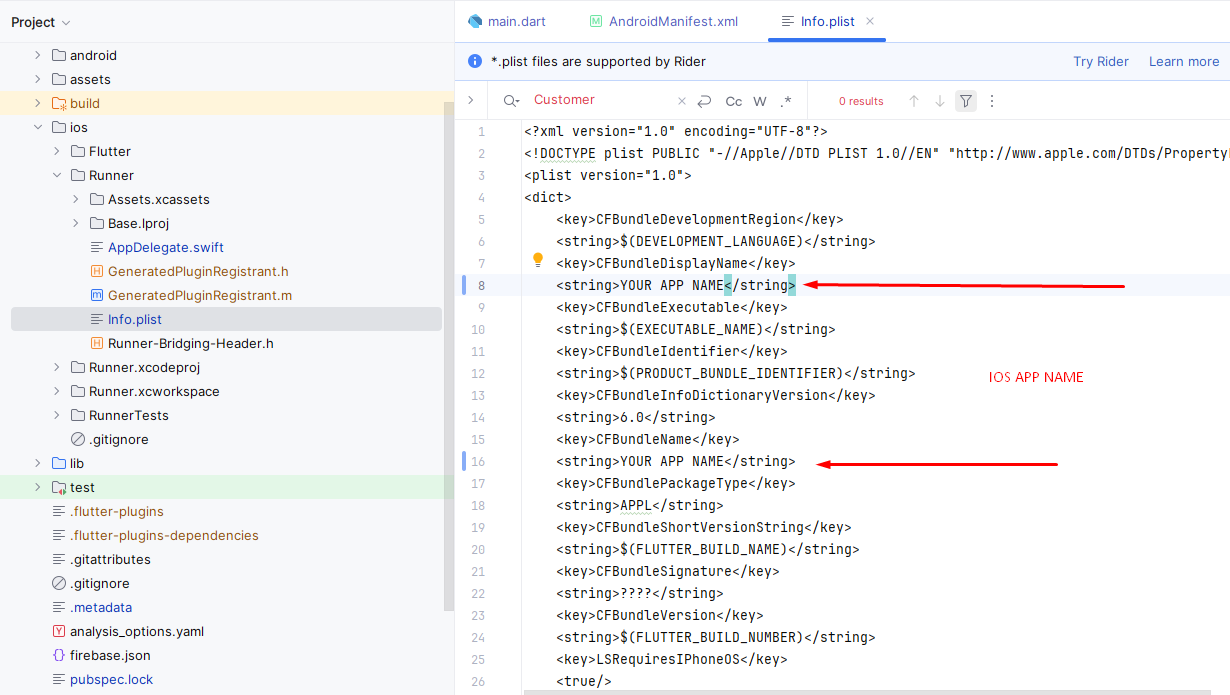
- Update the bundle
identifier in the `Info.plist` file located at
Change App Icon
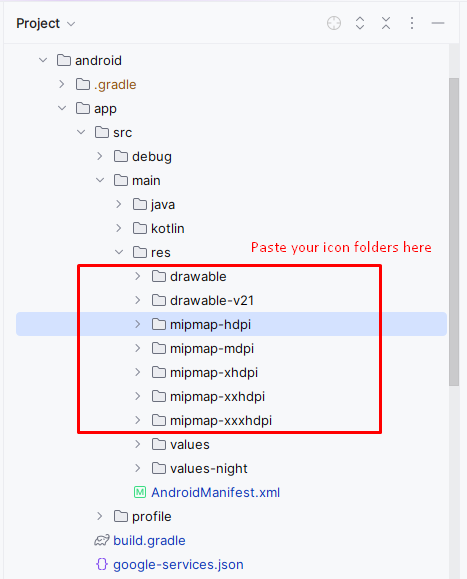
App icon change overview
-
For Android:
- Prepare the icon images in various sizes (e.g., 48x48, 72x72, etc.).
- Navigate to the `res`
directory at
android/app/src/main/res/. - Replace the default icons
in the `mipmap-*` directories with your new app icon files
(e.g.,
mipmap-hdpi/ic_launcher.png). - Ensure that you follow the required naming conventions for different densities (e.g., `mipmap-mdpi`, `mipmap-hdpi`, `mipmap-xhdpi`, etc.).
- Update the icon in the
AndroidManifest.xmlfile if necessary.
-
For iOS:
- Prepare the app icon images in multiple sizes (e.g., 60x60, 120x120, 180x180, etc.).
- Open the iOS project in Xcode.
- Navigate to the
Assets.xcassetsfolder in the project navigator. - Find the `AppIcon` set and drag your new icon images into the appropriate boxes for different sizes (e.g., 60pt, 120pt, etc.).
- Ensure that the icon set includes all required sizes for both iPhone and iPad.

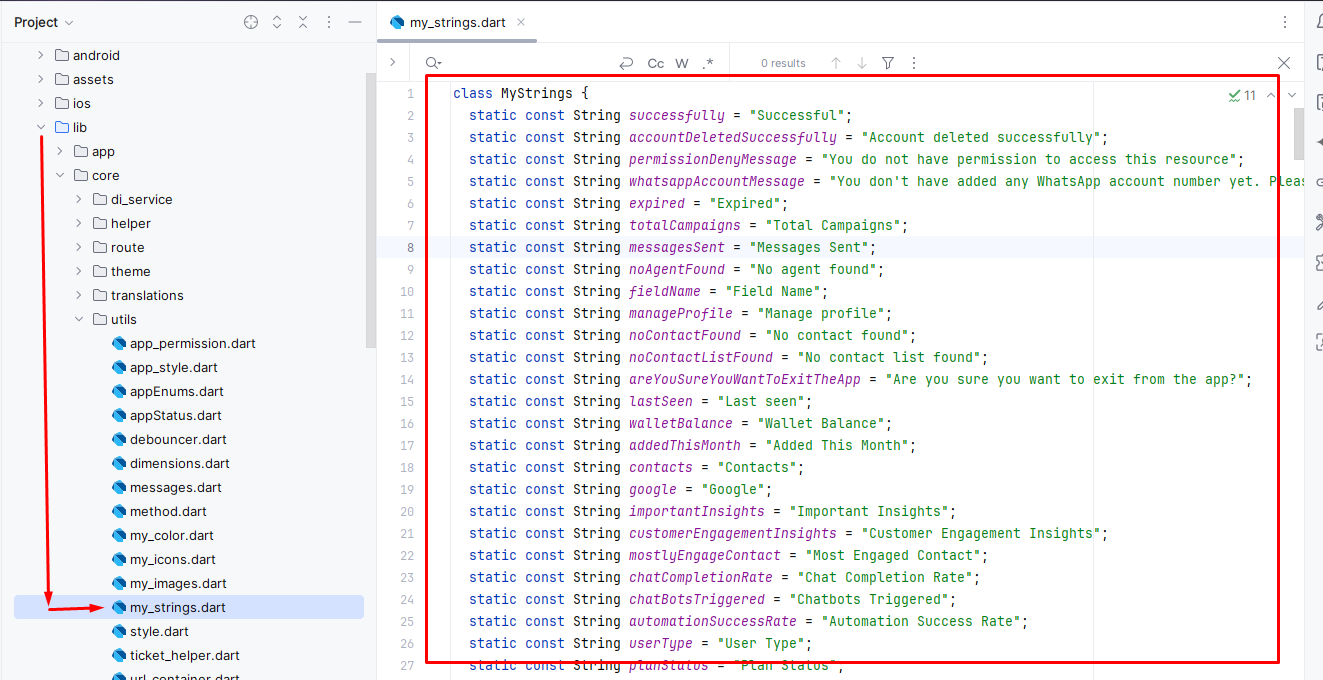
Edit App Strings
Customize the display text across the app by modifying string values.
The app's strings are managed in the file located at:
lib/core/utils/my_strings.dart.
- Open
my_strings.dartin your preferred code editor. - Locate the string constants, which are typically organized for each screen or feature.
- Edit the text values as needed, and save the file to apply your changes throughout the app.
- Ensure you rebuild the app if required to see updates in the app UI.
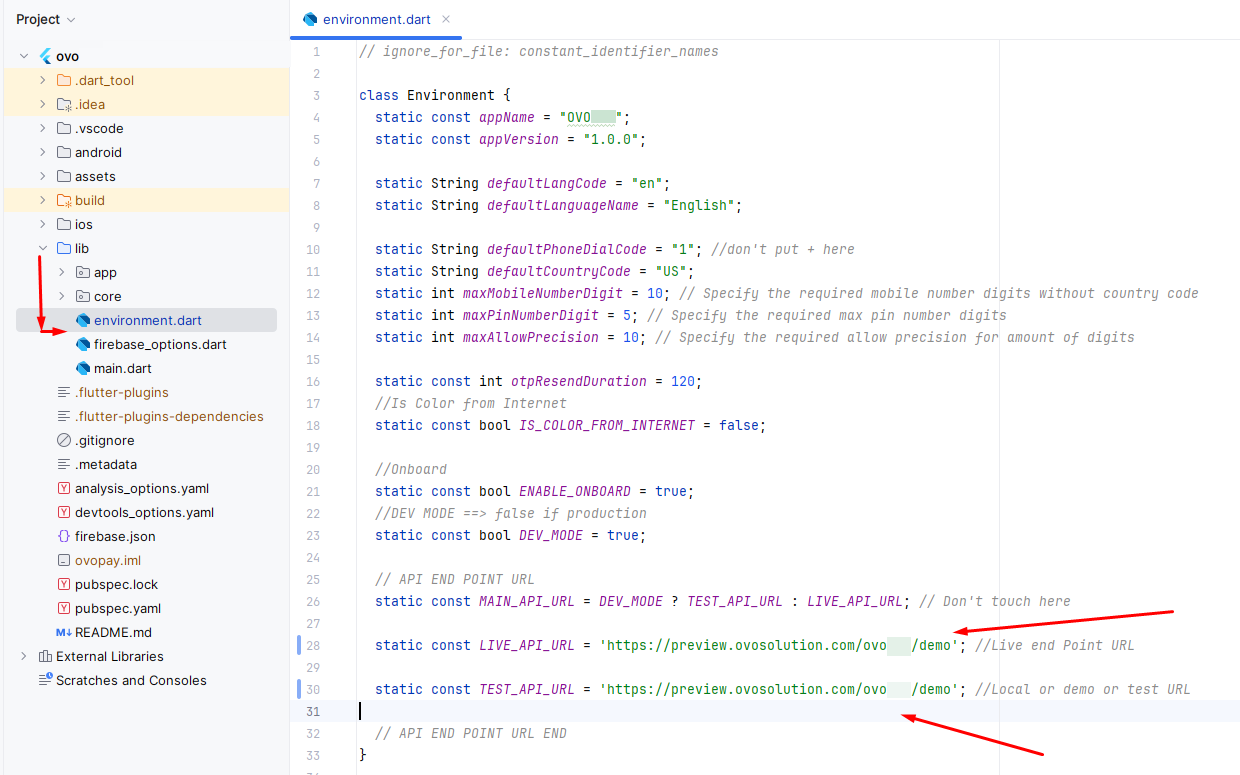
Change Base URL
Overview of how to change the base URL for your app's API requests.
-
For Both Android and iOS:
- Open the `lib` directory of your Flutter project.
- Locate the file that
manages your network configurations (e.g.,
lib\environment.dart). - In this file, define the
domain URL for your API requests (e.g.,
static const String LIVE_API_URL = 'https://yourapi.com';
static const String TEST_API_URL = 'https://yourapi.com';). - Ensure all network calls use this base URL for making API requests throughout the app.
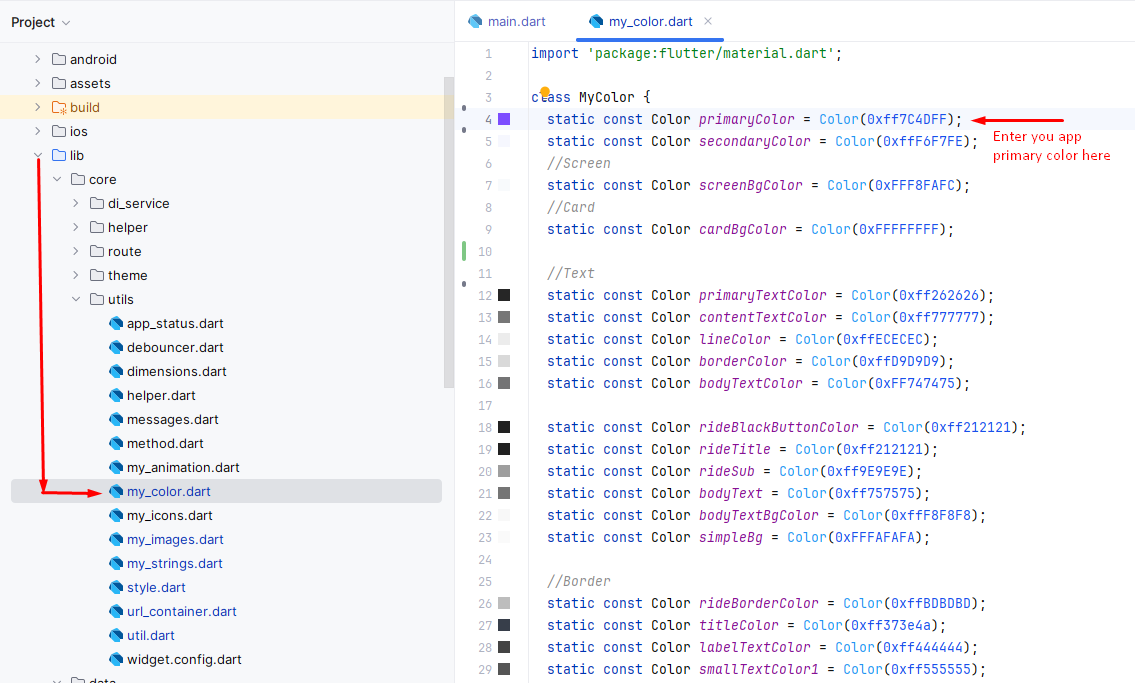
Change App Color
Overview of how to change the app's primary and secondary color scheme.
-
For Both Android and iOS:
- Open the `lib` directory of your Flutter project.
- Navigate to your utils
folder (e.g.,
lib\core\utils\my_color.dart).
Change Package Name
Overview of how to change the package name for both Android and iOS in your Flutter app.
-
For Android:
- Open the Android project in Android Studio.
- Update the
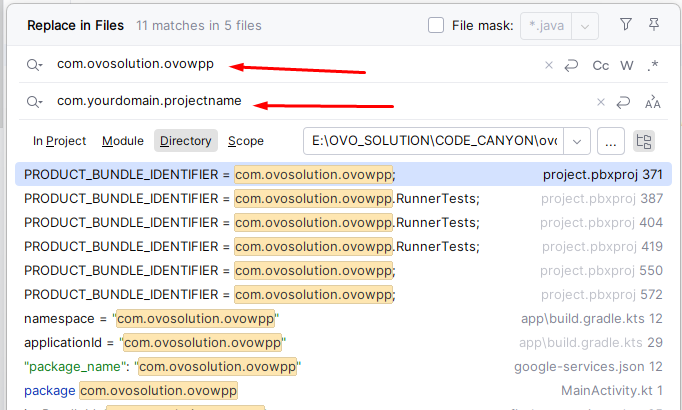
applicationIdin theandroid/app/build.gradlefile: - Right click on project folder and click on Replace in Files
defaultConfig { applicationId "com.ovosolution.ovowpp" }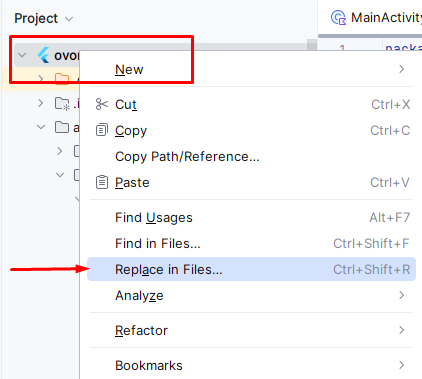
- Search com.ovosolution.ovowpp in the first indicated box and your own package name in the second marked box. Then click Replace All button
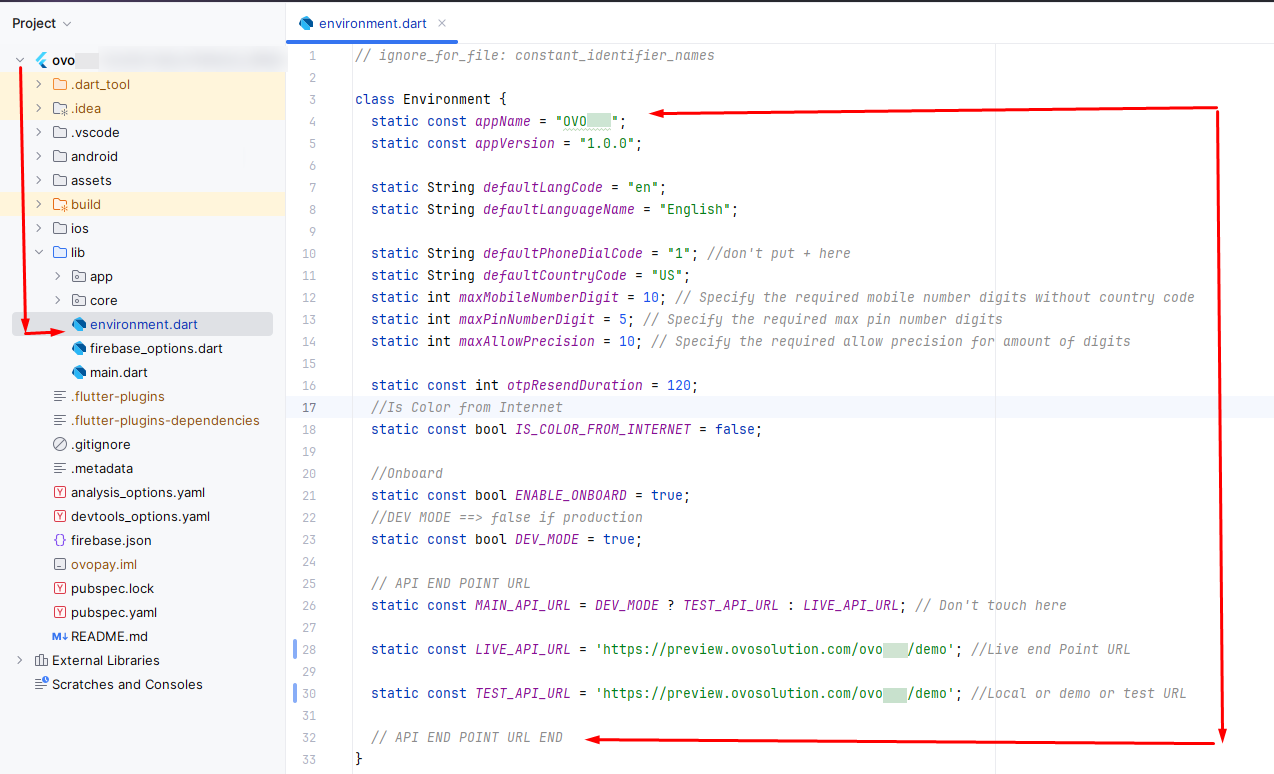
Setting Environment Variables in Flutter
Learn how to configure environment variables in Flutter using the `environment.dart` file for different environments like development, staging, and production.
The app's environment configuration is stored in the file located at:
lib/environment.dart.
-
Open
environment.dartin your preferred code editor. - Locate the environment variables section where you define different variables for various environments.
- Set the values for each environment by modifying the respective key-value pairs in the file.
- Ensure you rebuild the app after making changes to the environment file to apply the new configuration.
How to Change App Logo in Flutter
Learn how to change the logo of your Flutter app by updating the logo image in the assets directory.
-
Step 1: Add Your Logo to the Assets Directory
- Create a folder inside the `assets` directory, called `images/logo`.
- Place your logo image files inside the `assets/images/logo` folder. For example: - `assets/images/logo/logo.png` - You can also include other formats like `.jpg`, `.jpeg`, or `.svg` depending on your preference.
Update Firebase Settings for Flutter
Learn how to update Firebase settings for your Flutter app using the Firebase CLI tool and FlutterFire.
- Follow the official Firebase documentation to add Firebase to your Flutter app:
-
Step 1: Install Node.js and npm:
-
First, ensure you have Node.js and npm installed. If not, follow
these steps:
- Download Node.js
-
After installation, verify if Node.js and npm are
installed by running:
node -vnpm -v
-
First, ensure you have Node.js and npm installed. If not, follow
these steps:
-
Step 2: Install Firebase CLI:
-
Install the Firebase CLI globally using npm:
npm install -g firebase-tools
-
After installation, verify if Firebase CLI is installed by
running:
firebase --version
-
Log in to Firebase using your Google account:
firebase login
-
Install the Firebase CLI globally using npm:
-
Step 3: Install FlutterFire CLI:
-
Install the `flutterfire_cli` tool globally using the following
command:
dart pub global activate flutterfire_cli
-
Ensure the `dart pub global` bin directory is in your PATH. You
can check if the tool is installed by running:
flutterfire --version
-
Install the `flutterfire_cli` tool globally using the following
command:
-
Step 4: Configure Firebase for Your Flutter Project:
-
Run the following command to configure Firebase in your Flutter
project:
flutterfire configure --project=your-firebase-project-id
- This command will automatically download the necessary configuration files (`google-services.json` for Android and `GoogleService-Info.plist` for iOS), modify the `pubspec.yaml` to include the required dependencies, and set up Firebase services.
-
Run the following command to configure Firebase in your Flutter
project:
Still facing issues to add Firebase? Watch our step-by-step video guide to get it resolved quickly!
Keystore Setup and Retrieving SHA-1/SHA-256 Keys
Learn how to generate a keystore and retrieve the SHA-1 and SHA-256 keys for your Flutter app.
Step 1: Generate Keystore
- Follow the official Flutter documentation to Build and release an Android app:
- Or Open a terminal or command prompt and navigate to a folder where you want to save your keystore.
-
Run the following command to generate a keystore:
keytool -genkey -v -keystore your_keystore_name.jks -keyalg RSA -keysize 2048 -validity 10000
-
You will be prompted to enter the following details:
- Your name and organization details
- A password for the keystore
- A password for the key alias (can be the same as the keystore password)
- After successfully running the command, you will have a file named `your_keystore_name.jks`.
Step 2: Add Keystore to Your Flutter App
- Place the keystore file (`your_keystore_name.jks`) in the `android/app` directory of your Flutter project.
-
Edit the `android/app/build.gradle` file and add the keystore configuration
under the `android {}` block:
android {
    ...
    signingConfigs {
        release {
            keyAlias 'your_key_alias'
            keyPassword 'your_key_password'
            storeFile file('your_keystore_name.jks')
            storePassword 'your_keystore_password'
        }
    }
    buildTypes {
        release {
            signingConfig signingConfigs.release
            minifyEnabled false
            shrinkResources false
        }
    }
}
Step 3: Retrieve SHA-1 and SHA-256 Keys
- Open a terminal or command prompt.
-
Run the following command to get the SHA keys:
keytool -list -v -keystore your_keystore_name.jks
- Enter the keystore password when prompted.
-
The output will include the SHA-1 and SHA-256 keys under the certificate
details. For example:
Certificate fingerprints: SHA1: 12:34:56:78:90:AB:CD:EF:12:34:56:78:90:AB:CD:EF:12:34:56:78 SHA256: AB:CD:EF:12:34:56:78:90:AB:CD:EF:12:34:56:78:90:AB:CD:EF:12:34:56:78:90:AB:CD:EF
Support
How to get assistance
Thank you for purchasing our product! For any support or assistance, feel free to reach out to us via the provided email address. Our dedicated support team is available 24/7, ready to help with any questions, technical issues, or inquiries you may have. We are committed to providing prompt and reliable assistance to ensure a seamless experience with our product. Your satisfaction is our priority, and we are here to support you every step of the way.
Social Authentication Setup
Learn how to configure and integrate social authentication providers like Google.
Google Authentication