Introduction
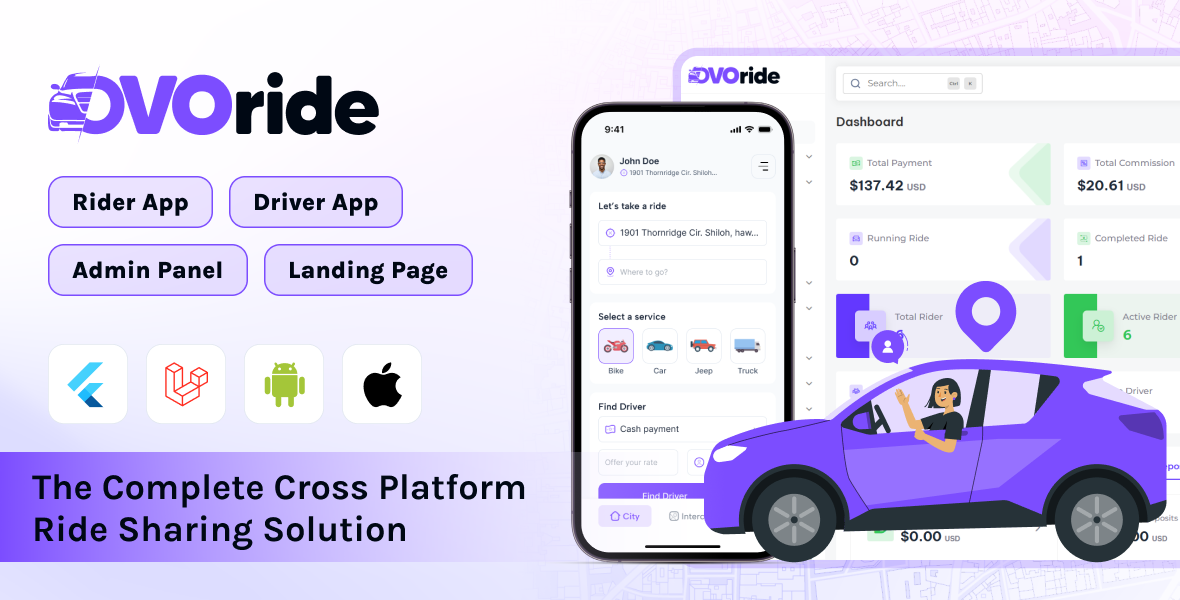
Overview of OvoRide - The Complete Cross Platform Ride Sharing Solution
OvoRide is a complete ride-sharing solution designed to simplify transportation and connect riders with drivers seamlessly. With dedicated apps for both riders and drivers, plus a powerful admin panel for total control, OvoRide offers a robust, feature-rich platform for managing ride services efficiently. Whether you're looking to launch a ride-hailing business or optimize fleet operations, OvoRide is your all-in-one solution.
This documentation provides a clear overview of the entire system, summarizing the core processes for easy understanding. The platform includes an intuitive admin panel and landing page, designed for seamless use without any coding expertise. It also integrates multiple automated online payment gateways, simplifying global transactions effortlessly.
Thank you for choosing OvoRide If you have any questions not covered in this documentation, please feel free to reach out to us via email. We’re here to assist and will respond as promptly as possible. Thank you again!
Prerequisites
All the prerequisites before starting with OvoRide.
To integrate essential services into OvoRide, you'll need to configure a Google Maps API key through the Google Cloud Console . For push notifications, set up Firebase in the Firebase Console, enabling required services and downloading the configuration files. Additionally, implement real-time features by creating a Pusher account, generating app credentials, and configuring them in your app for seamless integration.
- Google Map API Key: The Google Maps API is a paid service provided by Google, and its pricing starts at $5 per 1000 requests, depending on the usage and service type. The cost is calculated based on factors such as the number of map loads, directions requested, and geocoding operations performed. To integrate this service into OvoRide, you need to purchase and configure a valid API key through the Google Cloud Console. Ensure that your account has a billing setup to enable the API functionality. For detailed pricing and usage limits, visit the Google Maps API Pricing page
- Google Firebase: Firebase is a powerful backend platform provided by Google, essential for integrating features such as push notifications into OvoRide. To get started, you need to set up your project in the Firebase Console and configure it with your app. The setup involves creating a Firebase project, enabling necessary services, and downloading the configuration files to integrate with the app. For more info visit the Google Firebase
- Pusher: Pusher is a reliable service for implementing real-time features such as live updates and instant notifications in OvoRide. To set it up, create an account on the Pusher Dashboard and generate your app credentials. You’ll need to configure these credentials in your application to establish a seamless connection. Pusher provides easy-to-follow Setup Documentation to guide you through the integration process. Ensure you enable the required channels and events for optimal functionality.
Server Requirements
All server requirements are stated bellow
The following server requirements outline the essential specifications for setting up and running the system efficiently. Meeting these requirements will ensure smooth operation, enhance performance, and support seamless functionality across all features. Please verify your server configuration aligns with these standards prior to installation.
- PHP Version 8.3 or 8.3+
- MySQL Version 8.0+ or MariaDB version 10.6+
- BCMath PHP Extension
- Ctype PHP Extension
- cURL PHP Extension
- DOM PHP Extension
- Fileinfo PHP Extension
- GD PHP Extension
- JSON PHP Extension
- Mbstring PHP Extension
- OpenSSL PHP Extension
- PCRE PHP Extension
- PDO PHP Extension
- pdo_mysql PHP Extension
- Tokenizer PHP Extension
- XML PHP Extension
- Filter PHP Extension
- Hash PHP Extension
- Session PHP Extension
- Zip PHP Extension
- allow_url_fopen()
- file_get_contents()
Installation
Application installation process
Installation is straight forward and can be completed in a few simple steps. Our setup process is designed to be seamless and efficient, ensuring a smooth start
Installation Steps:
-
Upload the downloaded files directly to your server after purchase to
begin setup.

-
Extract the downloaded file and move all contents from the
Filesfolder to your desired installation directory. Ensure that bothindex.phpand.htaccessare included.

-
Quickly set up your database using the
Database Wizard/Managerin your control panel.
-
After creating the database, access
phpMyAdminon your server, select the newly created database, and import the project database from theFiles/Installationfolder.


-
After importing the database, configure the
database credentialsin the.envfile and update the necessaryenvironment variables.

-
Installation is almost complete. Your site is now ready to browse.
Simply visit
http://your-site-url/adminand log in with the credentials below- username:admin
- password:admin
-
After logging in, please change the password for security. Also, remember to remove the
installationfolder once the project is successfully installed. -
If you're still unable to install the system, please contact us. We offer free installation on cPanel-based hosting.
Folder Structure
Important details about the application folder structure
After installation, your main folder will contain two folders and two files essential for the proper functioning of the application.
- assets
- core
- .htaccess
- index.php
-
In the
assetsfolder, you'll find all the necessary assets such as CSS, JS, and images. If you need to edit or modify any CSS or JS, this is the folder to access. -
The
corefolder contains the core Laravel files, maintaining the full MVC structure of the project for seamless functionality and organization.
Admin Dashboard
Overview of the admin dashboard
The items include the latest secure admin panel with a unique admin dashboard. By logging into your dashboard, you can easily view and manage all key information related to your website. From this dashboard, you'll get a comprehensive overview of your system, including user statistics, total deposits, withdrawals, and more. Additionally, you can track and compare system transactions with graphical data for better insights.

Rides
Overview of the all rides
In the manage rides section, you can monitor and control all active and completed rides on the platform. This includes viewing ride details, tracking statuses, managing cancellations, and ensuring quality service for both drivers and riders.

Riders
Overview of the platform Riders
In the manage riders section, you can oversee all registered riders on the platform. This includes viewing rider profiles, tracking ride history, managing status, and handling any necessary updates to ensure a smooth and reliable experience for all riders.

Driver
Overview of the platform Drivers
In the manage drivers section, you can monitor and manage all registered drivers on the platform. This includes reviewing driver profiles, verifying documents, tracking ride activity, and updating status to maintain quality and compliance across your service.

Driver Deposit
Overview of the platform Deposit
In the driver deposit section, you can manage and track all deposit transactions made by drivers. This includes reviewing deposit details, confirming payments, and ensuring accurate records to maintain financial transparency and support drivers effectively.

Driver Withdrawals
Overview of the platform Withdrawals
In the driver withdrawals section, you can oversee and process withdrawal requests from drivers. This includes reviewing withdrawal details, approving transactions, and maintaining accurate records to ensure timely and transparent payouts.

Payment Gateway
Overview of the platform-integrated payment gateway
In the payment gateway section, you can configure and manage both automatic and manual payment gateways. This includes setting up preferred payment methods, ensuring secure transactions, and offering flexibility in payment options for a seamless user experience

Withdrawal Methods
Withdrawal methods overview
In the withdrawal methods section, you can set up and manage available options for users to withdraw funds. This includes configuring various withdrawal methods, defining limits, and ensuring secure processing to provide a smooth and reliable withdrawal experience

General Setting
General settings overview
In the general settings section, you can configure the foundational details of your website. This includes setting the site title, timezone, date and time format, site primary and secondary colors, currency, currency symbol, display format, precision settings, thousand separator, records displayed per page, and other essential elements that define your site’s identity.

Brand Setting
Brand settings overview
In the brand settings section, you can establish the core branding elements of your website. This includes uploading your logo in both dark and light variations, setting a site favicon, and configuring other essential elements that define your site’s unique identity.

System Configuration
System configuration overview
In the system configuration section, you can manage critical settings that control your website’s functionality and performance. This includes configuring server preferences, email settings, sms settings, and other essential parameters to ensure smooth and efficient system operations.

Notification Setting
Notification setting overview
In the notification settings section, you can manage all communication channels for your system, including email notifications, SMS alerts, and push notifications. This setup allows you to keep users informed and engaged effectively across all platforms.


Pusher Setting
Pusher setting overview
In the Pusher settings section, you can configure real-time communication for your system, including broadcasting notifications, live updates, and event-driven messages. This setup ensures seamless, instant interactions to keep your users connected and engaged across all devices.
Get Pusher App Credentials
- Sign Up or Log In to Pusher: Visit the official Pusher website and create an account if you don’t already have one. If you already have an account, log in to access your dashboard.
- Create a New App: Once logged in, navigate to the "Apps" section of your dashboard. Click on the Create App button and fill in the required details such as app name, cluster region, and type of app (e.g., Channels).
- Configure App Settings: After creating the app, go to the app’s settings page. Here, you can enable or disable features like client events, presence channels, or authentication as per your requirements.
- Get Your App Credentials: Navigate to the App Keys or Credentials section. Copy the following details:App ID,Key,Secret and Cluster
- Update Pusher Settings: Log in to the admin panel, go to General Settings, and configure the credentials in the Pusher Settings section.
Still facing issues configuring Pusher credentials? Watch our step-by-step video guide to get it resolved quickly!
Google Map API Creation
Learn how to create and configure a Google Maps API key for Web, Android, and iOS platforms.
The Google Maps API lets you integrate maps, directions, and geolocation into your website and mobile apps. To use it, you need to create an API key in the Google Cloud Console and enable the required services for Web, Android, and iOS.
How to Create and Enable a Google Maps API Key
- Sign In to Google Cloud Console: Go to Google Cloud Console and log in with your Google account.
- Create a New Project: Click on the project dropdown at the top, select New Project, enter a name (e.g., “My Maps Project”), and click Create.
-
Enable Required APIs: Open
APIs & Services > Library and enable the following:
- Maps JavaScript API (for Web)
- Maps SDK for Android
- Maps SDK for iOS
- Geocoding API
- Places API
- Directions API
- Create an API Key: Go to APIs & Services > Credentials → click Create Credentials > API Key. Copy the generated key.
-
Set Platform Restrictions: Click your API key name to
open settings and apply these:
- For Web: Under Application
restrictions, select “HTTP referrers” and add your
domain (e.g.,
https://yourdomain.com/*). - For Android: Select “Android apps” and add your app’s SHA-1 fingerprint and package name.
- For iOS: Select “iOS apps” and add your app’s
bundle identifier (e.g.,
com.yourapp.name).
- For Web: Under Application
restrictions, select “HTTP referrers” and add your
domain (e.g.,
- Restrict API Access: Under API restrictions, choose “Restrict key” and enable only the APIs you activated (Maps, Places, Directions, etc.).
-
Add API Key to Your Project:
- Web: Add it inside your HTML or JS Maps initialization script.
- Android: Add it in
android/app/src/main/AndroidManifest.xml. - iOS: Add it in
ios/Runner/AppDelegate.swiftorInfo.plist.
Still having trouble creating or enabling your Google Maps API key? Watch this video.
Extensions
Overview of the platform integrated extensions
In the extensions section, you can manage additional features to enhance your website’s functionality. This includes integrating Custom Captcha, Facebook Comment, Google Analytics, Google reCAPTCHA 2, and Tawk.to, providing advanced security, user interaction, and analytics capabilities.

Manage SEO
Platform SEO customization overview
In the SEO configuration section, you can customize key elements to enhance your site's search engine presence. This includes setting the Social Title, Meta Keywords, Meta Description, and Social Description to improve visibility and engagement across search engines and social platforms
Localization
Overview of platform localization settings
In the localization section, you can configure the language settings for your website. This allows you to tailor content and functionality to suit the preferences of your target audience, ensuring a personalized user experience across different locations

Information
Overview of application information and technologies
In the Overview of application information & technologies section, you can find key details about your application, including its name, version, and the technologies used. This section provides an insight into the technical foundation of your application, helping you manage and maintain its infrastructure effectively.

Support
How to get assistance
Thank you for purchasing our product! For any support or assistance, feel free to reach out to us via the provided email address. Our dedicated support team is available 24/7, ready to help with any questions, technical issues, or inquiries you may have. We are committed to providing prompt and reliable assistance to ensure a seamless experience with our product. Your satisfaction is our priority, and we are here to support you every step of the way.